
Best Denture Repair Kit: Choosing a Safe Temporary Fix
A denture rarely breaks at a convenient hour. It gives way while you're rinsing it over the bathroom sink on a Sunday night, or when you bite into a crust of toast twenty minutes before you need to leave the house. You're left holding two pieces of the appliance you eat, speak and go out in public with, and the dental office is closed.
What happens in the next ten minutes decides whether that denture gets repaired properly or ruined. Press the pieces together, keep every fragment, keep the appliance dry, and get it to a dentist with the break intact, and most simple fractures come back together well. Reach for household glue, or build a thick blob of resin across the fitting surface, and a clean break can turn into a distorted base that no longer seats.
That's the frame for everything below. The best denture repair kit isn't the strongest one on the shelf. It's the one whose label tells you plainly what it can do, how long you may wear the result, and when to stop.
Best Denture Repair Kits by Damage Type
A kit buys time. Nothing more. Judged that way, the question stops being which brand holds hardest and becomes which damage you have, because the same tube of resin is reasonable for one break and the wrong move for the next.
Five checks before you open any package
- Where the crack sits. A short crack in the base away from the tooth line usually meets back together cleanly. A split that runs through the palate or into the border rarely does.
- Whether anything is missing. A fragment, a whole tooth or a chunk of pink acrylic changes the job from repair to reconstruction.
- Whether an edge is sharp. Run a fingertip along the break. If it catches, the appliance shouldn't go back in your mouth until that edge is smoothed or the denture is out of service.
- Whether the denture still seats. If it rocks, drops or no longer sits where it used to, the fit has changed and resin can't bring it back.
- Whether there's pain, bleeding or swelling. That moves you out of the kit aisle and into a dental chair.
- How long until a dentist can see you. A weekend is a different situation from three weeks.
Match those answers to the table below. The "what to look for" column names the tool or the label claim that matters for each case, and the last column sets the urgency.
| Damage | Kit suitable as stopgap? | What to look for | When to call a dentist |
|---|---|---|---|
| Small crack in the base, no fragments | Yes, as a stopgap | Acrylic kit labeled for emergency use with clear mixing instructions | Schedule a visit soon |
| Single tooth loose or detached | Possibly, to reattach temporarily | Tooth-bonding resin kit with curing instructions | Schedule soon if it won't hold |
| Chipped edge, smooth and not irritating | Yes, if smoothed | Kit with fine finishing tools | Only if it irritates the gums |
| Broken or loose clasp | No | None; do not attempt a repair | Promptly |
| Multiple fracture lines or missing fragments | No | None | Promptly |
| Ill-fitting, rocking or loose denture | No, a kit can change the fit | None | Promptly for reline or rebase |
| Sharp edge causing sores or bleeding | No, stop wearing it | Not a repair product | Same day |
The rule that covers every row: a repaired denture is on loan. Book the dental appointment the day you open the kit, not the day the repair fails.
Find your row before you read any further, and read the rest of this guide before you open a product. The rows marked "no" aren't cautions against bad luck. They're cases where adding resin moves the break into a place a dentist can't easily correct, and where the honest answer is that you need to be seen.
What Is in a Denture Repair Kit and Who Needs One
The contents fit in a small box, which is much of the appeal at nine o'clock on a Saturday night.
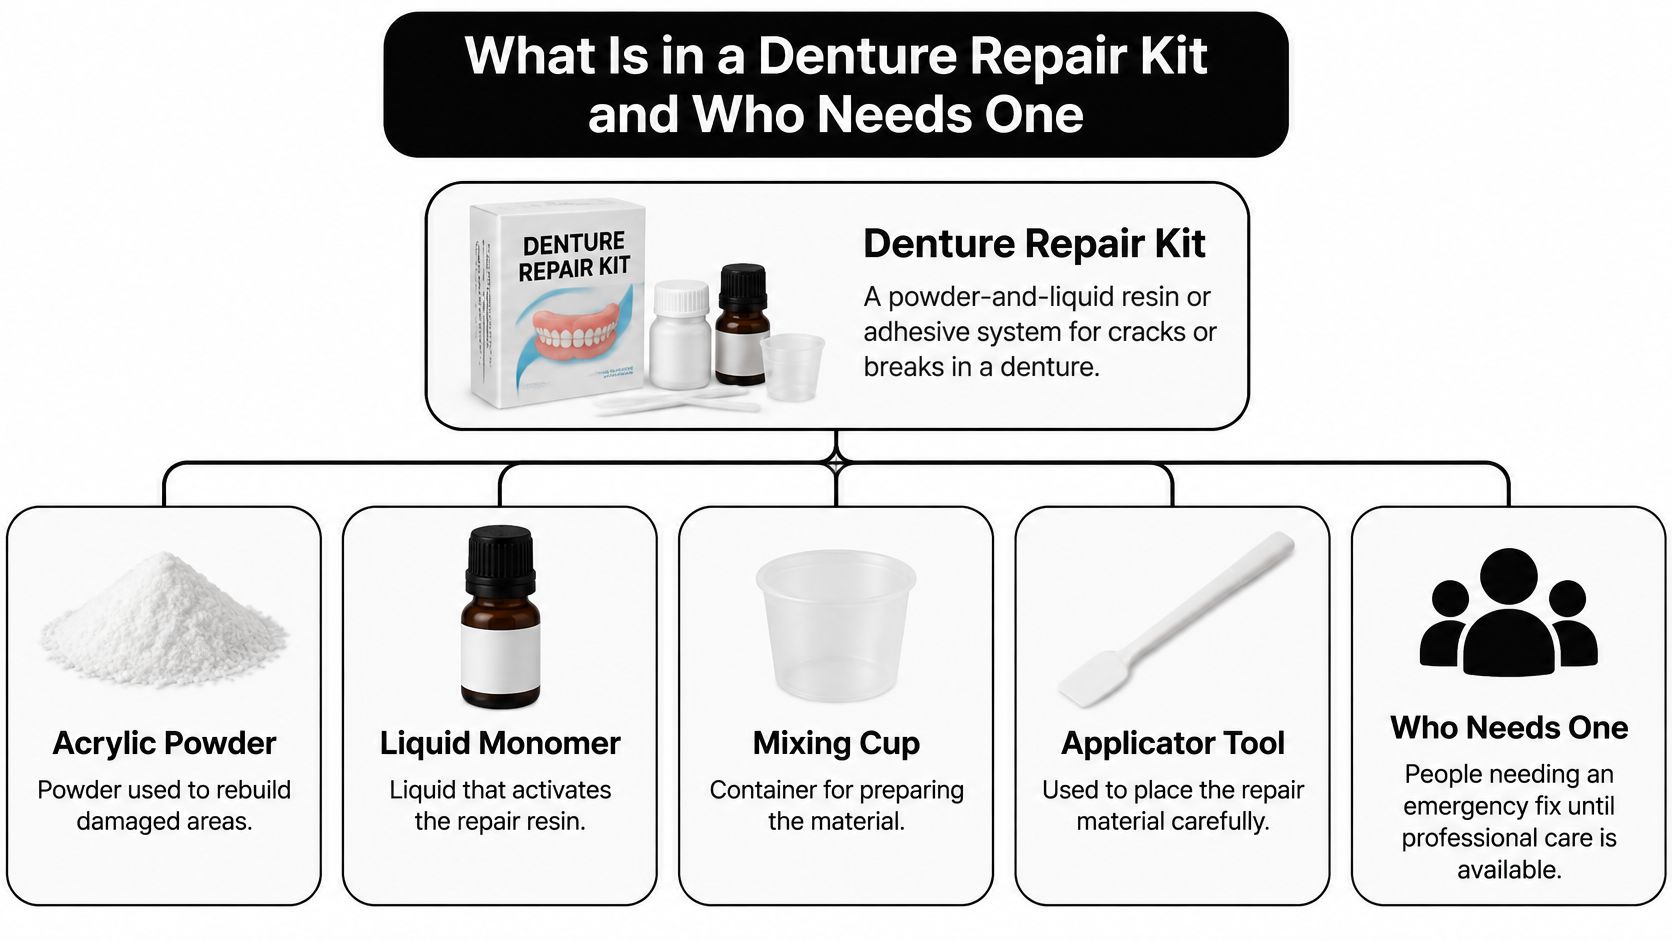
A denture repair kit is a powder-and-liquid acrylic system you mix and place yourself, plus the small tools needed to keep the material where it belongs. Most kits contain the same handful of parts:
- Acrylic powder. The polymer that forms the body of the repair and rebuilds a chipped or missing area.
- Liquid monomer. The liquid that softens the powder into a workable paste and starts the curing reaction.
- Mixing cup and spatula. For measuring and blending to the ratio the instructions state.
- Applicator brush or syringe. For placing resin on the fracture line instead of your fingers.
- Fine sandpaper or a finishing file. For trimming and smoothing the repair so it doesn't rub.
- Printed instructions. The working time, the cure time and the removal steps, which differ from kit to kit.
Think of a temporary splint on a broken bone. It holds the pieces still, keeps them from moving further apart and buys the specialist time to set them properly. It doesn't heal anything on its own, and nobody mistakes it for the finished job. A repair kit does the same for acrylic.
Denture damage matters because denture wear is common. In U.S. national data from 2011 to 2014, 17.6% of adults aged 65 and older were edentulous, meaning they had lost all natural permanent teeth. The rate climbed with age, from 13.9% among adults 65 to 74 to 23.0% among those 75 and older. A related national analysis found that 85.8% of edentate adults had full dentures. When a full prosthesis breaks, eating, speech, comfort and independence go with it, which is exactly why people reach for a kit at midnight.
Those figures describe who is likely to face a break. They say nothing about whether any particular product works, so treat every kit as a short-term aid.
Quick self-check: hold the appliance and look at the palate or the gum side. A full denture covers the whole arch. A partial has a metal or acrylic frame with clasps. A single detached tooth is a part, not an appliance, and a kit for reattaching it needs different handling than a base repair.
Once a repair is in, keep the appliance clean with products made for acrylic rather than whitening toothpaste, and follow guidance on denture cleaning products that won't scratch the repair or soften the edges you just smoothed.
Acrylic Repair Materials and Which Holds Up Best
Nearly every kit in the aisle is a variation on the same chemistry. What separates them is how the resin cures and how much of the work the material can realistically do.
| Material | How it cures | Relative strength for repair | Suits a home kit? |
|---|---|---|---|
| Autopolymerizing (self-cure) acrylic | Cures at room temperature | Lower than heat-cured | Yes, the usual kit material |
| Heat-polymerized acrylic | Cured with heat in a laboratory | Generally higher | No, needs laboratory equipment |
| Glass-fiber-reinforced resin | Fibers embedded by a professional | Significantly stronger in research | No, a professional technique |
| Reliner or temporary cushion | Soft material placed against the tissue | Not structural | No, different purpose from a repair |
Denture bases have been through several materials. A historical survey of dental plate materials published for 1938 reported that 71% of dentists used vulcanite, 20% used phenol-formaldehyde materials, 8% used cellulose derivatives and 1% used vinyl resins. Polymethyl methacrylate, known as PMMA acrylic, arrived in the early 1930s and became the standard denture-base material because of its appearance, biocompatibility, manufacturability and acceptable mechanical strength. That's what your denture almost certainly is, and it's why repair kits are acrylic systems rather than general-purpose adhesives.
Why the cure matters more than the claim
Self-curing acrylic is what home kits use because it sets at room temperature without laboratory heat-processing equipment. Heat-polymerized repair resins generally provide greater strength, but reheating can distort the denture, which is why that work belongs in a lab.
Neither fact tells you a kit is safe to wear indefinitely. Repair performance depends on fracture alignment, surface preparation, bonding and curing, not on a strength figure printed on the box. A well-placed self-cure repair on a clean, aligned break beats a badly placed one every time.
Reliners and temporary cushions sit in a different category. They're soft materials placed against the tissue to cushion or improve grip, so they don't repair structure and they don't belong on a fracture line.
The check that matters at the shelf: the label should name a compatible acrylic type and give precise mixing and placement instructions. If it only promises strength, put it back.
Warning Signs That Mean Stop and Call Your Dentist
This is the situation many people are in when they search for a kit at night.
U.S. Food and Drug Administration labeling guidance defines an OTC denture repair kit as a powder-and-liquid resin or adhesive system intended to repair cracks or breaks, and it requires prominent warnings limiting use to emergencies until professional care is available. That wording isn't brand hedging. It reflects what a home repair physically does.
What a home repair actually changes
A denture is a fitted appliance, and three things can shift when you add resin: the occlusion, meaning how the upper and lower teeth meet; the tissue-bearing surface, meaning how it sits on the gums; and the border extension, meaning how far the edges reach into the soft tissue.
Get any of those slightly wrong and the denture stops distributing bite force the way it was designed to. Continued wear of an improperly repaired denture can produce localized mucosal trauma, discomfort and chewing fatigue, accelerated residual-ridge bone resorption, and potentially permanent changes in the oral tissues. A repair that looks neat on the outside can be pressing in the wrong place underneath.
The stop list
- An ulcer, raw patch or sore on the gums. Take the denture out and stay out of it. Same-day call.
- Bleeding from the gum or a tissue tear. Stop wearing it and call for same-day care.
- Pain while eating, or a bite that suddenly feels different. The repair has changed the way the teeth meet, and only an exam sorts that out.
- A denture that rocks, drops or won't seat. Looseness is a fit problem. A kit can't fix it, and resin can make it worse.
- A broken clasp or damaged metal framework. Resin won't bond a clasp, and a bent one can tear tissue.
- Missing fragments, several fracture lines, or a second break in the same spot. Repeated breaks point at the cause underneath, whether that's fit, bite imbalance, thin acrylic or grinding.
A repaired denture that hurts is not a denture that needs more adhesive. It's a denture that needs to come out.
If your problem is movement rather than a fracture, you're in a different category of product, and this guide to a denture adjustment kit covers what those products are for. A cushion or adjustment material is not a structural repair.
How to Use a Denture Repair Kit Step by Step
A broken denture creates pressure to move fast. Slow down anyway. The repair that buys you a few days is the one that stays small, stays aligned and leaves the appliance easy for a dentist to finish.
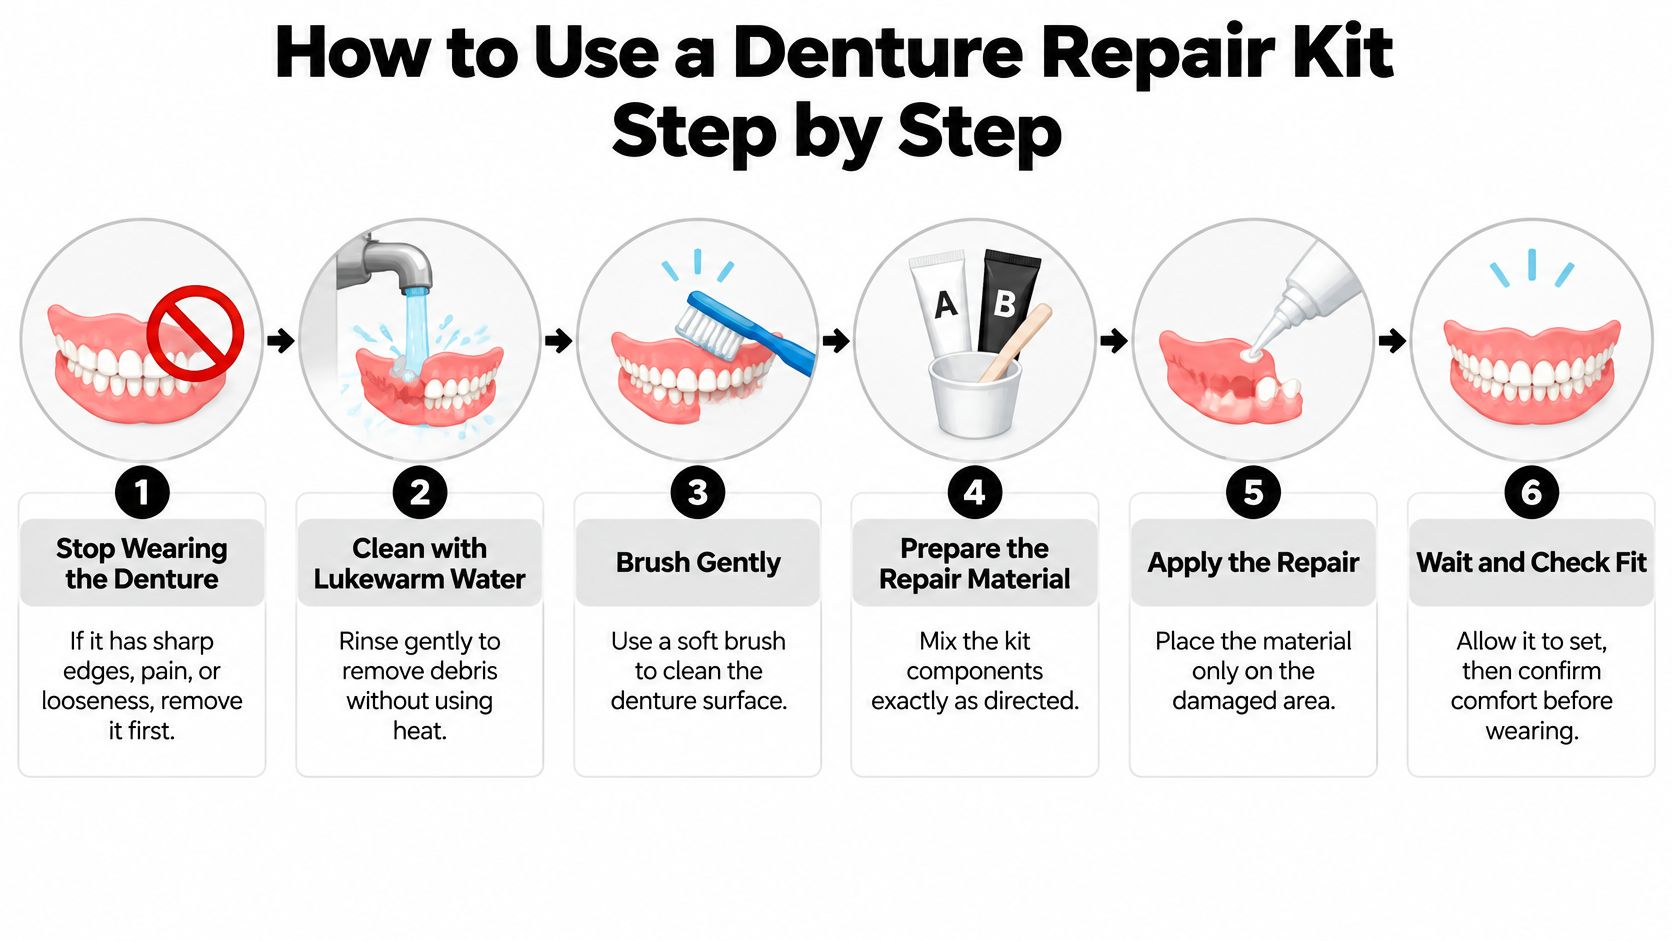
- Take it out and clean it with lukewarm water. If the denture has sharp edges, pain or looseness, it stays out of your mouth for now. Rinse away food debris with a soft brush and lukewarm water, never hot. Heat softens and warps acrylic, and residue left in a fracture line weakens the bond.
- Dry it fully and inspect the break under good light. Confirm that no fragment is missing and no clasp is damaged. If either is true, stop here. Adding resin to an incomplete break locks the gap into the repair.
- Lightly roughen the fracture edges with fine sandpaper. A slightly textured surface gives the new resin something to grip. The common slip is going too far and widening the crack or thinning the base, which weakens the area instead of strengthening it.
- Mix the powder and liquid in the ratio the kit states, and stay inside the working time. A mix that's too wet slumps and won't hold; one that's too dry crumbles before it cures. If your kit allows it, chilling the components before mixing can buy a little extra working time.
- Apply the resin to the fracture, then align the pieces on a flat, stable surface. Place the material with the applicator, not your fingers, and bring the pieces together outside your mouth where you can see the seam. The common slip is squeezing the denture in your hand so the halves rotate slightly out of line.
- Let it cure completely, dry and undisturbed. Don't test the repair with your tongue, don't rinse it, don't wear it early. Handling resin before it's fully set distorts a seam that looked fine a minute ago.
- Trim the excess with a fine file and smooth every edge. A sharp internal contour acts like a notch and starts a new crack, and a rough ridge on the tissue side will rub within a day. Blobs on the fitting surface are the most common reason a home repair becomes uncomfortable.
- Rinse it, brush gently with a mild toothpaste, and dry it before storage. Harsh abrasives and hot water both compromise fresh resin. Store the denture damp, in a closed container, not in a dry drawer.
Write it down: note the date of the repair and the product you used, on paper or on your phone. That note tells your dentist how long the repair has carried load, and it tells you how quickly the next break happened.
Then book the visit. Wear the denture only as an emergency measure, avoid hard and sticky food, and take it out at night so the tissue under it can rest.
Temporary Fixes, Permanent Repairs and What They Cost
Four routes exist once a denture breaks, and they differ in how long you go without the appliance, how long the result holds and what you pay.
| Option | Time to finish | Expected durability | Relative cost |
|---|---|---|---|
| Home repair kit | Minutes plus curing time | Temporary, until a dentist visit | Low |
| Same-day chairside repair | Usually one visit | Longer-term for simple breaks | Moderate |
| Laboratory repair or rebase | Several days to weeks | Durable when the fit is sound | Higher |
| New denture | Several weeks | Full replacement | Highest |
The home kit's advantages are real. It's fast, it's available at short notice and it's the cheapest option by a wide margin. It also has hard limits: it can't restore a lost fit, and the result depends entirely on how cleanly the break aligns and how well the resin cures.
Why repairs fail
Repair-resin chemistry and reinforcement change fracture resistance more than marketing suggests. Acrylic bases are typically PMMA, and research comparing repair designs found that glass-fiber-reinforced resin produced significantly stronger repaired specimens than unreinforced repair resin, at a reported significance of P < 0.001, with fiber reinforcement plus a rounded repair-surface design showing the highest transverse strength. Fiber placement requires correct orientation and embedding, which is a laboratory technique, not something a tube and a brush can reproduce.
Autopolymerizing acrylic cures quickly at room temperature, but its performance depends on fracture alignment, surface preparation, repair-gap geometry, polymerization quality and the absence of voids. Roughening or enlarging the fracture too much weakens the base and creates stress concentrations, and a sharp internal repair contour promotes crack propagation. That's the mechanical reason a bulky repair often fails faster than a modest one.
The cause of the break matters more than the material. A dentist should assess whether the fracture came from fit, occlusal imbalance, thin acrylic or parafunctional loading before choosing a definitive repair, because new resin on an ill-fitting denture tends to break again in the same place.
On price, check current kit prices with the seller rather than trusting an old listing, and ask the dental office for a written estimate before you commit to a professional repair. Weigh that estimate against the cost of replacement when the base is old, worn thin or already relined more than once. And if the denture is moving rather than broken, adhesive is the right category, covered in this guide to Fixodent Extra Hold denture adhesive.
Frequently Asked Questions About Denture Repair Kits
Can I use super glue or household glue? No. These aren't denture-rated, they can irritate tissue, they set too brittle to survive chewing and they leave residue a lab has to remove. Use only a kit labeled for acrylic denture repair.
Can I wear the denture while the repair cures? No. Keep it out of your mouth, dry and untouched until the cure time on the label has passed. Your mouth is warm and wet, and both work against a clean set.
Can I sleep in a repaired denture? Take it out at night unless your dentist has told you otherwise, so the tissue under it can rest. A fresh repair adds pressure points.
How long will the repair last? Until your dental visit, and no longer. If it breaks again within days, that's a signal the break has an underlying cause and needs prompt professional review.
Should I wear a denture with a sharp repair edge? No. Smooth it with a fine file, and if it still catches, leave the denture out until a dentist sees it.
Does a kit work on a partial denture? Only for a simple crack in the acrylic base. Clasp or framework damage needs a dentist.
What should I bring to the appointment? The denture and the kit packaging, so the dentist can see which material went in and how the break ran.
Choose a Kit and Confirm Your Next Step
The label is where a real repair product separates itself from everything else in the denture aisle.
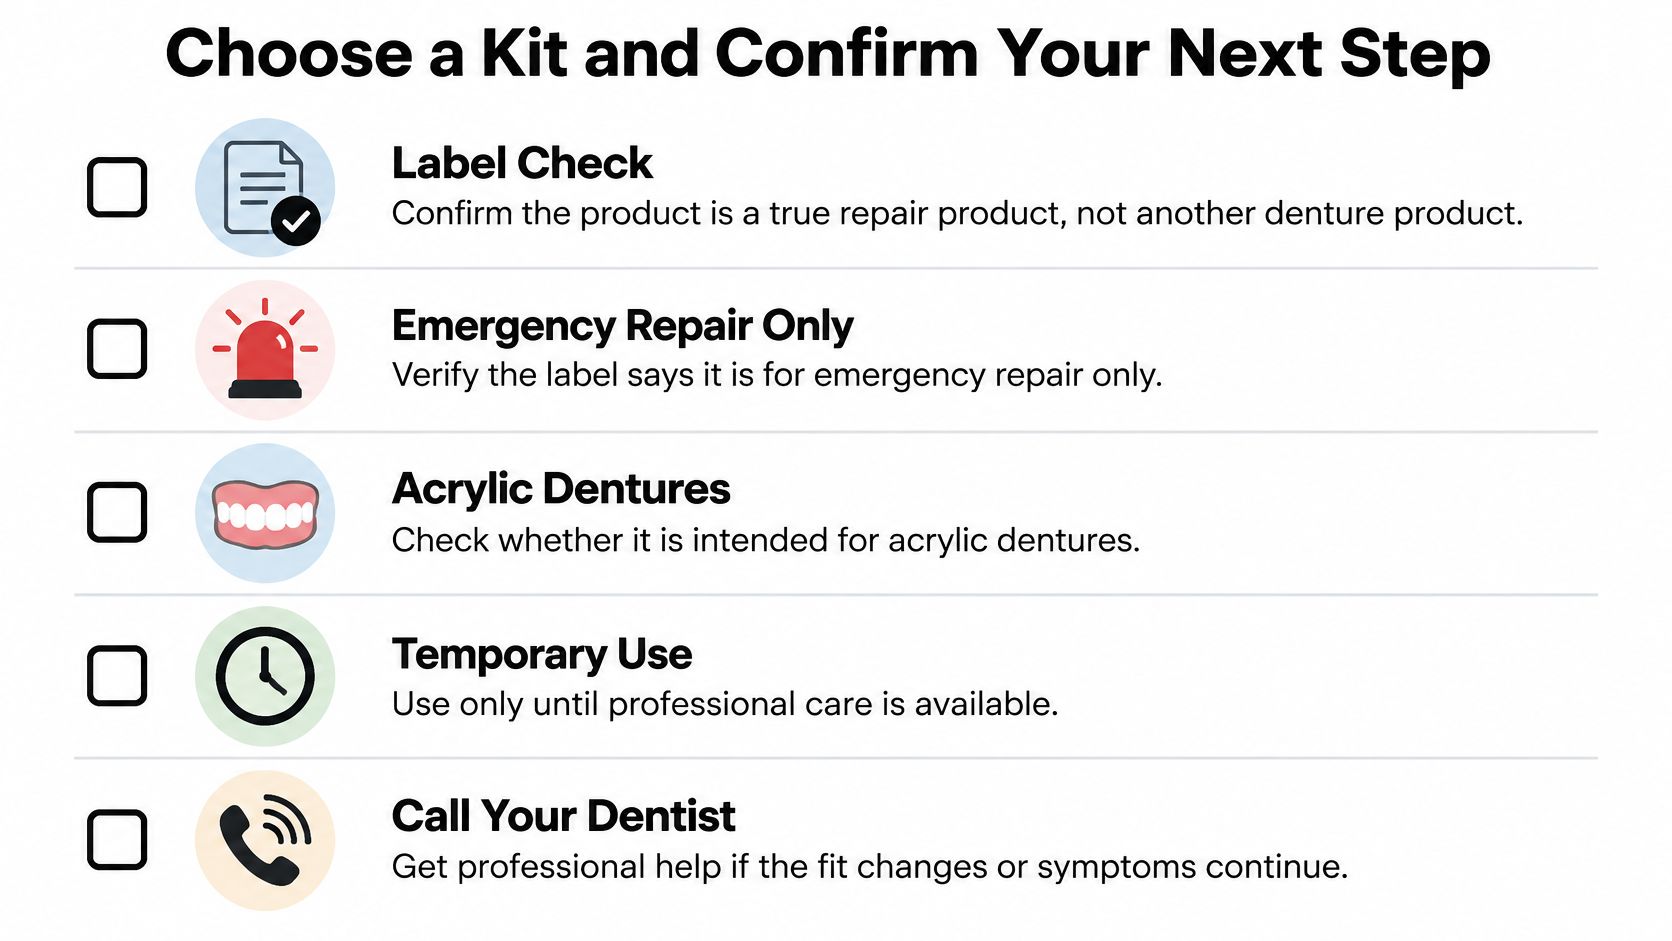
- Emergency repair only. The label should say the product is for temporary emergency use until professional care is available.
- Intended for acrylic. Check that it's made for acrylic denture material, not metal frameworks or soft liners.
- Curing and cleanup covered. Instructions should address cure time and how to remove excess material.
- Traceable manufacturer. A named maker with contact details is a basic quality signal.
Federal regulation treats these products as a distinct category for a reason. The rules governing denture reliners, cushions, repair kits and partially fabricated kits exist because regulators were concerned about lay users repairing or refitting dentures without specialized knowledge, and they prohibit labeling that exaggerates usefulness or safety or leaves out facts relevant to those claims. A product claiming permanent strength is working against that standard.
Four terms get used as if they mean the same thing. A repair reconnects broken acrylic. A reline resurfaces the fitting side of an existing denture. A rebase replaces the entire base while keeping the teeth. A temporary cushion is a soft layer for comfort. Using one in place of another can worsen fit or start an irritation that wasn't there before.
Then run the sequence: match your damage to the right row in the first table, confirm the label, follow the steps exactly, stop wearing the denture at the first red flag, and book the appointment within the timeframe your row gives. Bring the denture and the kit packaging to that visit so your dentist can see the material used and the break pattern.
A cracked denture is manageable once you know which row of the damage table you're in, and DentalHealth.com is a practical place to keep the rest of your routine in order while you wait for that appointment, with professional-grade oral care brands and plain-spoken guidance on whitening, sensitivity and daily maintenance. Every USA order ships free, and a 30-day return policy means restocking the basics carries little risk. Visit DentalHealth.com to browse the catalog and pick up what your denture routine needs.