
Gum Eez Thru Floss Threader
You're standing at the bathroom mirror, trying to guide ordinary floss beneath an orthodontic wire. It catches, snaps, or slides away before it reaches the gumline. If you have a bridge or fixed retainer, the problem can feel even more confusing because the floss may pass between natural teeth but refuse to reach the space beneath the artificial tooth or bonded wire.
A GUM Eez-Thru floss threader is designed for that access problem. It doesn't clean teeth by itself, and it won't replace the gentle flossing motion that removes plaque from tooth surfaces. Instead, it helps you position floss where your fingers and ordinary floss may struggle to reach. The key is knowing when to use it, how to guide it without force, and when another interdental tool or professional advice makes more sense.
Why Flossing Around Braces and Bridges Is So Hard
Regular floss works well when you can guide it directly between two teeth. Braces change that path. Brackets, archwires, elastics, and bonded retainers create physical barriers, so the floss needs to travel under or over an appliance before it can reach the gumline.
Consider someone in the early part of orthodontic treatment. They can see food around a bracket, but the floss keeps catching on the wire. Pulling harder may fray the strand or make it spring against the gums. The problem isn't necessarily a lack of motivation. The route to the tooth surface is blocked.
A bridge creates a different access challenge. The replacement tooth, or pontic, rests near the gumline between supporting teeth. A toothbrush can clean the visible surfaces, but it may not reach beneath the bridge. Food and plaque can remain in that sheltered area unless the person guides floss underneath it.
Practical rule: If the appliance blocks the path, change the path. Don't compensate by using more force.
The DentalHealth.com guide to caring for braces can help you place flossing in the wider context of orthodontic hygiene. The important distinction is that a threader doesn't make orthodontic hardware disappear. It gives the floss a way around the hardware.
A threader is therefore an access aid. It's especially useful when you need to pass floss beneath a bridge, around a fixed retainer, or under an archwire. Once the floss reaches the correct position, you still need to clean both sides of the contact and curve the strand gently around each tooth. That final movement is where much of the cleaning takes place.
What a GUM Eez-Thru Floss Threader Does
A GUM Eez-Thru works like a small, flexible guide for placing floss where your fingers cannot reach easily. Feed floss through its loop, pass the firmer end beneath an appliance or through a narrow opening, then draw the floss into position. The threader changes how the floss reaches the area. It does not change the cleaning motion that follows.
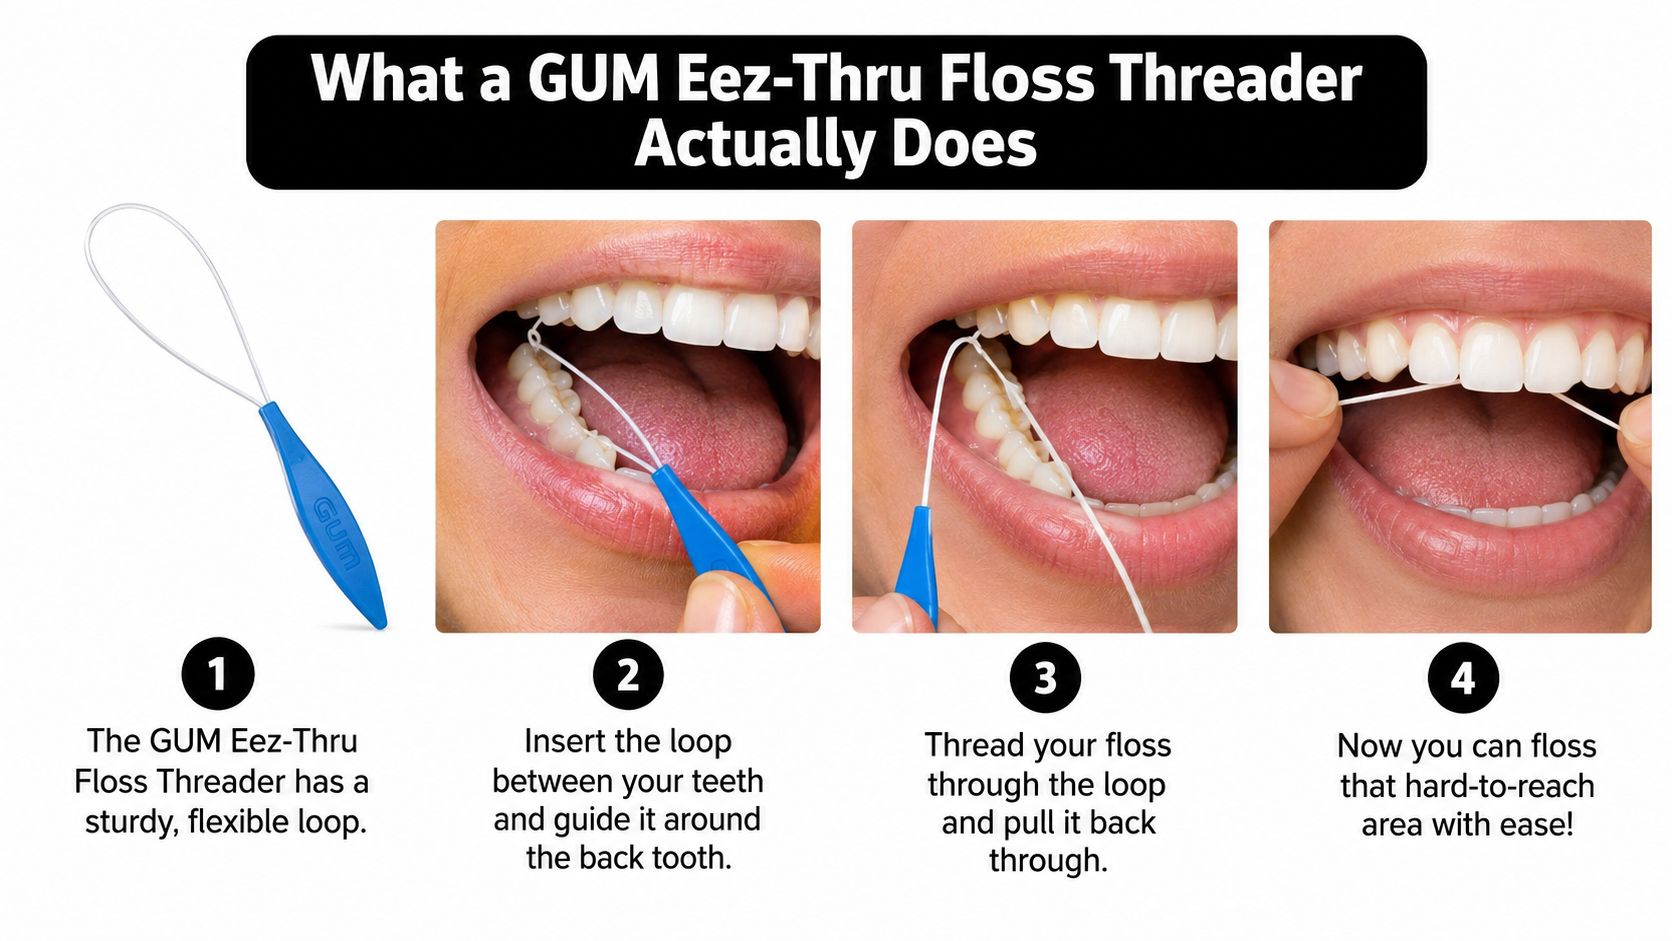
The distinction matters because the threader doesn't replace floss. It is not an interdental brush, water flosser, powered cleaner, or pre-threaded floss product. Its role is narrower: it helps you place ordinary floss when direct finger control is not enough.
An access tool with a long history
The idea comes from a long tradition of cleaning between teeth. In 1819, dentist Levi Spear Parmly recommended waxed silk thread for material that toothbrushes could not reach. Modern floss threaders extend that approach by helping users position floss around orthodontic and prosthetic work. The history of dental floss and floss threaders provides background and discusses evidence that floss or other interdental cleaners, used with brushing, may reduce plaque or gingivitis, while noting limitations in the available studies.
That evidence supports a practical expectation. Eez-Thru can improve access and handling, but successful threading does not prove that every surface is clean. After the floss is in place, it must still touch the tooth with a controlled motion.
A threader is often the right choice when a wire, bridge, or fixed retainer blocks the route. An interdental brush may be easier where there is a wider, brush-sized space, so forcing floss into every opening is unnecessary. Stop if threading causes sharp pain, persistent bleeding, or tissue injury, and ask your dentist or hygienist for guidance rather than applying more pressure.
The same engineering questions that shape a clinic appear in tools used at home. For a look at the infrastructure behind professional care, see how much a dental office costs to build.
A short demonstration can clarify the movement:
The American Dental Association describes interdental cleaning as an addition to toothbrushing and recommends cleaning between the teeth regularly. A threader helps turn that recommendation into a task you can perform gently and consistently.
How to Use a GUM Eez-Thru Floss Threader
Work in front of a mirror at first. You're learning the route around your appliance, so slow movements are more useful than trying to finish quickly.
- Wash your hands and prepare the floss. Cut approximately 12 to 18 inches of floss, as described in the practical floss-threader guidance from Colgate's instructions for using a floss threader. Waxed floss or dental tape may glide more comfortably through some contacts. Feed several inches through the threader loop, leaving enough floss on both sides to control it.
- Approach the appliance with the threader tip. Hold the firmer leading end between your thumb and forefinger. Guide it beneath the archwire, beneath the bridge, or through the access point beside a fixed retainer. Use a small rocking motion if necessary, but keep the pressure light.
- Keep the floss slack while threading. Don't pull the floss tight before the threader has passed through. Slack helps prevent the floss from catching and reduces the chance that the loop will pop free.
- Pull the floss into position. Once the loop emerges on the other side, hold the floss and draw it through. Remove the threader before beginning the cleaning motion.
- Curve the floss around one tooth. Wrap the floss around the tooth in a gentle C shape, then move it up and down against the tooth surface. Slide carefully toward the gumline without cutting or snapping the floss into the tissue.
- Clean the neighboring surface. Each contact involves two adjacent tooth surfaces. Reposition the floss so you clean the other side before withdrawing it. Repeat the threading process for the next space.
The threader should guide the floss, not force its way through tissue. If the tip stops, change the angle slightly and reassess the route. A fixed appliance may require you to approach from a different direction, while a bridge may need the floss to travel under the artificial tooth rather than between the supporting teeth.
Tips for Easier, More Effective Threading
Threading is easier when the floss behaves like a controlled guide rather than a loose string. Cut enough to wrap once around your middle fingers, with no excess hanging toward the floor. Long, loose floss can catch on brackets, twist around your fingers, and make the threader harder to control.
Keep several inches of floss through the loop so it stays seated as you guide the threader. Hold the stiff end with your fingertips, like guiding a small sewing needle, and keep the floss slightly slack until the threader has cleared the wire or bridge. Once it is through, take up the slack gradually.
Make the routine gentler
A slightly moistened loop may slide more easily beneath some orthodontic wires. Use this only if it does not make your fingers slippery. Controlled placement matters more than speed.
If the threader catches repeatedly, stop and reassess the route instead of pulling harder. Persistent resistance, sharp pain, bleeding that does not settle, or a wire or bracket that shifts are signals to contact your dentist or orthodontist. An interdental brush may suit an open space better, while forcing a threader into a tight contact can irritate the gum without improving cleaning.
Replace the threader when its loop frays, loses its shape, or no longer stays firm enough to guide the floss. A damaged loop may feel rough against delicate tissue.
Regular interdental cleaning works best when attached to a repeatable habit. Evening cleaning can fit naturally into a bedtime routine, but choose a time you can maintain. If a handle-based design would make access easier, this overview of a Flossaid dental floss holder may help you compare options.
Use fluoride toothpaste as directed by your dental professional. Ask your dentist or hygienist before using an antimicrobial rinse, particularly with braces, sensitive gums, restorations, or dry mouth.
When Eez-Thru Works and When to Choose Something Else
A threader is a strong match when the main problem is getting floss under or around fixed dental work. That includes many braces setups, conventional bridges, implant-supported restorations, and bonded retainers. It can also help people whose hand control makes it difficult to guide ordinary floss into a narrow route.
It isn't automatically the right tool for every space. An open gap may give an interdental brush more room to clean the sides of the teeth. A very tight contact may cause the floss or threader to catch repeatedly. In that situation, forcing the same tool harder can irritate the gums without improving access.
Independent evidence also supports a measured approach. A recent evidence summary on interdental cleaning devices describes limited certainty around comparative outcomes and notes that interdental brushes may perform better than floss for some outcomes. The practical lesson is to match the device to the shape of the space, not to choose a product just because it feels more specialized.
| Situation | Best tool | Why |
|---|---|---|
| Floss must pass beneath an orthodontic wire | GUM Eez-Thru threader | The loop helps guide floss around the wire |
| Floss must reach under a conventional bridge | Threader or bridge-specific floss | The access path may run beneath the artificial tooth |
| The space is open between teeth | Interdental brush | The brush can contact more of the accessible side surfaces |
| A fixed retainer blocks direct floss placement | Threader | The leader helps place floss beneath the bonded wire |
| The same point repeatedly catches or damages the floss | Professional assessment | The contact, restoration, or route may need evaluation |
If you're deciding between a threader and a pre-threaded product, this explanation of what Super Floss is can help clarify the difference. Stop and ask a dentist or hygienist for a demonstration if you can't identify the correct route beneath a restoration, if the threader repeatedly bends at the same location, or if the area becomes painful.
Common Mistakes and Troubleshooting
The most common mistake is pulling the floss taut before the threader has cleared the appliance. Tight floss can snag on a bracket or bridge margin, making the threader spring free. Keep the strand loose during placement, then create tension only after the floss is in the correct position.
Another problem is treating the threader like the floss itself. Rapid back-and-forth sawing can bend the loop and make the leading end less useful. Guide it through once, remove it, and use the floss to make the controlled C-shaped cleaning motion.
Match the problem to the response
- The floss keeps slipping from the loop: Leave more floss trailing through the loop and reduce tension while threading.
- The threader catches beneath a wire: Stop, withdraw slightly, and change the angle. Don't push harder.
- The loop feels rough or floppy: Replace the threader. Fraying or lost stiffness makes precise guidance more difficult.
- The floss snaps at the same contact: Ask a dental professional whether the contact is unusually tight or whether another interdental aid would fit better.
- The area hurts during threading: Stop the attempt and arrange an evaluation if changing the angle doesn't resolve the discomfort.
Bleeding can occur when gums are inflamed, but persistent bleeding deserves professional attention rather than increasingly forceful flossing. Pain, a loose bracket or abutment, catching around a restoration, or visible gum recession are also reasons to stop and contact your dentist or hygienist.
Stop signal: Resistance means reassess the route. It doesn't mean apply more pressure.
A dental professional can show you whether the floss belongs under a bridge, around a retainer, or through a different contact. That short demonstration may prevent repeated irritation and help you choose between a threader, an interdental brush, or another device.
Building a Flossing Routine You Will Stick With
The most useful threader is the one you can use gently and regularly. Choose one fixed cue, such as after evening brushing, and keep the threader with your floss rather than in a separate drawer. Performing the routine in front of the mirror can help until your fingers learn the path around the appliance.
Use the threader for the spaces that genuinely require it. If an area is open enough for an interdental brush, that may be simpler. If a contact remains painful or impossible to access, get professional guidance instead of turning the routine into a test of force.
Keep spare threaders available when you're away from home, and replace any that become frayed or lose their stiffness. Access plus gentle consistency is more useful than occasional aggressive cleaning. Pick one anchor moment tonight, thread one difficult space carefully, and build from there.
DentalHealth.com offers professional-grade at-home dental care products and practical guidance for maintaining braces, retainers, bridges, and everyday oral hygiene routines. Visit DentalHealth.com to explore dental-care options and find more guidance for making interdental cleaning easier.