

A Practical Guide to Professional Teeth Whitening at Home
When you hear "professional teeth whitening," you might picture a bright light and a dental chair. But what if you could get that same level of quality and power right in your own bathroom?
That’s exactly what professional at-home teeth whitening is all about. It’s the perfect sweet spot, bridging the gap between those flimsy over-the-counter strips and a pricey in-office procedure. These are dentist-approved systems designed to give you significant, safe, and convenient results from the comfort of your home.
Your Path to a Brighter Smile Starts Here
Walking down the dental aisle can be dizzying. Strips, pens, lights, toothpastes—where do you even start? This guide is here to cut through that noise and focus on one of the most effective methods available: professional teeth whitening at home.
We’ll break down what these kits are and why they’ve become the go-to for so many people who want a truly radiant smile without the dental office price tag. Think of it as getting the best of both worlds: the strength and safety of a professional treatment with the flexibility to do it on your own schedule.
Understanding the Professional Advantage
So, what really separates these kits from the stuff you grab at the supermarket? It all comes down to a few key differences that work together to deliver real, lasting results.
- Higher Potency Gels: Professional kits are packed with stronger concentrations of active whitening agents like carbamide peroxide or hydrogen peroxide. This allows them to break down deep, stubborn stains that weaker products just can’t touch.
- Custom-Fitted Trays: This is a huge one. Unlike generic strips that can slip and slide, custom trays ensure the whitening gel makes even contact with every single tooth surface. Just as importantly, they protect your sensitive gums from irritation.
- Dentist-Guided Safety: Even though you're using them at home, these are the same systems dispensed by dental pros. That means the formulas have been rigorously tested for both safety and effectiveness.
Comparing Your Whitening Options
To really see the difference, it helps to put the main choices side-by-side. Here’s a quick breakdown of how professional at-home kits stack up against other popular methods.
| Feature | Professional At-Home Kits | In-Office Whitening | Over-the-Counter (OTC) Products |
|---|---|---|---|
| Effectiveness | High (several shades lighter) | Very High (most dramatic results) | Low to Moderate (surface stains only) |
| Cost | Mid-range | High (most expensive) | Low (most affordable) |
| Convenience | High (use anytime at home) | Low (requires dental appointment) | High (widely available) |
| Sensitivity Risk | Moderate (can be managed) | Moderate to High | Low to Moderate |
| Customization | High (custom trays, varied gel strengths) | Very High (dentist supervision) | Low (one-size-fits-all) |
As you can see, professional at-home kits offer a powerful combination of effectiveness and convenience that's hard to beat, making them a fantastic value for most people.
The demand for these powerful yet convenient solutions is surging. The professional teeth whitening market was valued at USD 2.68 billion globally and is projected to hit USD 3.73 billion by 2030. Much of that growth is being driven by people discovering they can get clinic-level results with professional-grade at-home kits.
Before diving in, it's always a good idea to know all your choices. You can explore all professional teeth whitening options available to get a full picture of the landscape. This guide will give you the clarity you need to move forward with confidence.
How Professional Whitening Actually Lifts Stains
Ever wondered what’s really going on when you put whitening gel on your teeth? It’s not some kind of magic trick—it’s actually a pretty cool chemical reaction that gently scrubs away years of discoloration. It’s simple, powerful chemistry working to brighten your smile.
The active ingredients doing all the work in a professional at-home whitening kit are typically carbamide peroxide or hydrogen peroxide. Think of these as the clean-up crew for your smile. Once they’re applied to your teeth, a process called oxidation kicks off.
The Science of a Brighter Smile
It helps to imagine your tooth enamel isn't a perfectly smooth, solid wall. Instead, it’s more like a sponge, full of millions of microscopic channels. Over the years, tiny molecules from things like coffee, tea, red wine, and berries find their way into these channels, creating deep-set stains that a toothbrush just can't reach.
This is where the whitening gel comes in. As soon as it touches your teeth, the peroxide starts to break down, releasing a flood of highly reactive oxygen molecules. These little oxygen bubbles are the heroes of the story—they’re small enough to dive deep into the pores of your enamel and hunt down those pesky stain molecules.
Key Takeaway: The whitening process is basically a deep-clean for the pores of your teeth. The oxygen molecules act like microscopic stain-busters, breaking apart the chemical bonds that make the stain molecules visible.
Once those bonds are broken, the stain molecules become colorless. They’re effectively neutralized and washed away, revealing the naturally whiter tooth surface that was hiding underneath. It’s a gentle process that tackles stains right at the source for a truly effective result.
Why Custom Trays Are a Game-Changer
While the gel is doing the heavy lifting, how you apply it is just as important for getting those fantastic, even results. This is where custom-fitted trays—the hallmark of any true professional system—make all the difference. When it comes to something as unique as your smile, a one-size-fits-all approach just doesn't cut it.
A custom tray, molded perfectly to the unique landscape of your teeth, creates a perfect seal. It ensures every nook, cranny, and surface of every single tooth gets a consistent, even coating of whitening gel. This precision is exactly what prevents the splotchy or uneven whitening you often get with over-the-counter strips that can slip around or miss spots entirely.
Here’s why that perfect fit is so critical:
- Maximized Gel Contact: The tray holds the peroxide gel right up against the tooth surface, letting it work its magic continuously without getting washed away or diluted by your saliva.
- Gum Protection: It forms a protective barrier, keeping the powerful whitening gel off your sensitive gum tissue. This dramatically reduces the risk of irritation or uncomfortable inflammation.
- Efficiency and Less Waste: Because the gel is held precisely where it needs to be, you end up using less of it with each treatment. This makes your kit last longer and saves you money in the long run.
The combination of a potent, professional-grade gel and a perfectly molded tray is the secret sauce behind successful professional teeth whitening at home. It's a system designed for both maximum effectiveness and safety, which should always be the top priority. To get a better grasp of the full picture, you can learn more about the 10 things you should know about teeth whitening to ensure you're well-informed. This synergy is what allows you to achieve results just like you’d get at the clinic, but on your own time and in your own home.
Why Professional Kits Outperform Store Brands
When you’re standing in the dental aisle at the store, the wall of whitening options can feel pretty overwhelming. You’ve got strips, pens, and those generic one-size-fits-all trays all making big promises for a brighter smile. But here's the thing: not all whitening kits are created equal, and the differences between a professional-grade system and a generic store brand are massive.
It really all comes down to three things that directly shape your results and your experience: the strength of the whitening gel, how precisely you can apply it, and the overall safety of the system. Getting a handle on these differences is the key to picking a path that leads to a genuinely brilliant smile, not a frustrating or disappointing one.
The Power Of Potency And Precision
The most obvious difference right off the bat is the concentration of the active whitening agent. Professional at-home kits pack a much stronger punch, typically using 10% to 35% carbamide peroxide or an equivalent. This professional-grade strength allows the gel to work its way deeper into the enamel to break down those stubborn, set-in stains from years of coffee, tea, or red wine.
Over-the-counter products, on the other hand, have to use much lower concentrations to minimize risk for a huge, general audience. While that makes them safer in a broad sense, it also means they can usually only lift the most superficial surface stains, leaving any deeper discoloration behind.
This decision tree is a great way to visualize if professional at-home whitening is the right path for you, based on your goals and current oral health.
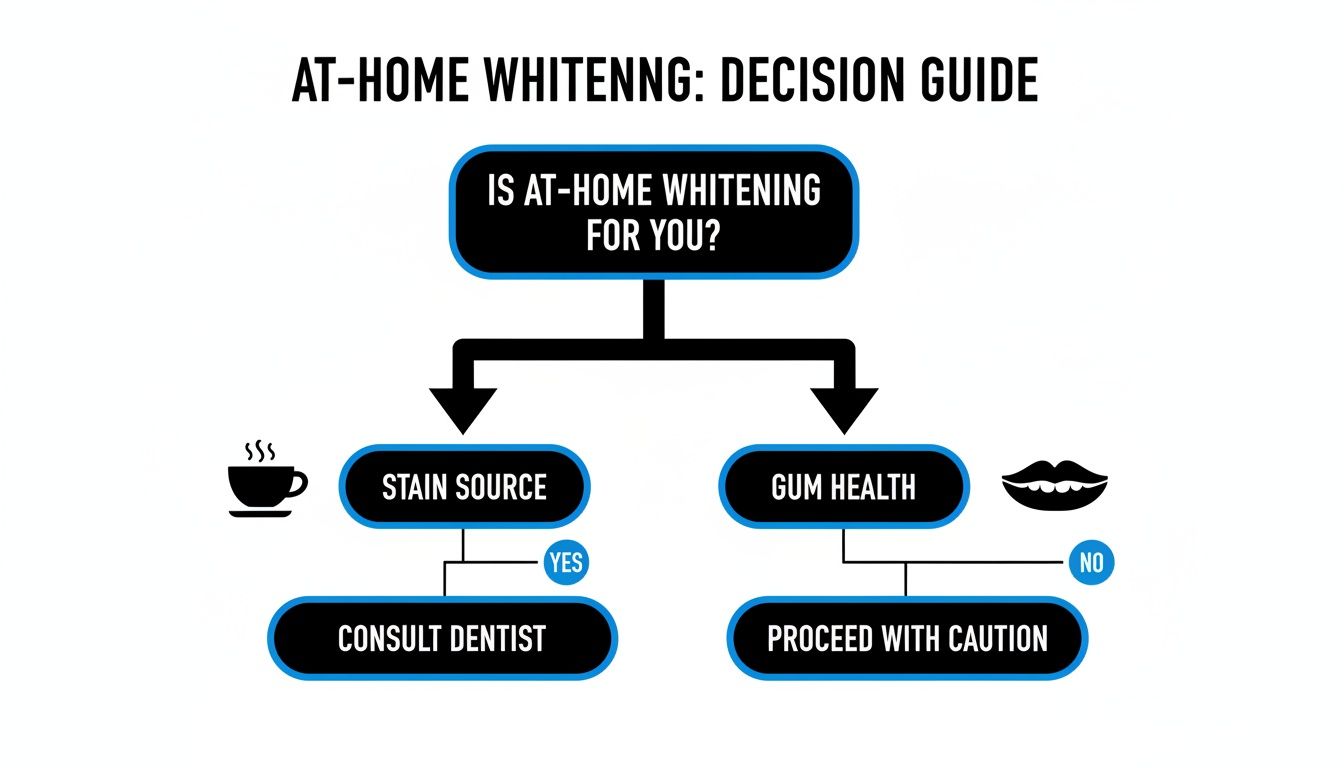
As the flowchart shows, targeting deep-set stains from things like coffee is a major reason to go this route, while having unhealthy gums is a clear sign to stop and consult a dentist first.
Custom Fit: The Secret To Even Results
Another absolute game-changer is the custom-molded trays. Those store-bought strips are flat and generic, meaning they often fail to make good contact with the curves and in-between spaces of your teeth. This is what leads to the most common complaint with OTC products: uneven, splotchy whitening.
Custom trays, however, are made to be a perfect mirror of your unique smile. This exact fit delivers two huge benefits:
- Total Coverage: The trays hold the whitening gel snugly and evenly against every single tooth surface, ensuring you get consistent, predictable results across your entire smile.
- Gum Protection: A precise fit creates a seal right at the gumline. This is crucial because it prevents the powerful whitening gel from leaking out and irritating your sensitive gum tissue.
This superior application method doesn't just deliver better whitening; it makes the whole process safer and way more comfortable.
To really see the difference, it helps to put these two options side-by-side.
Professional Kits vs OTC Whitening: A Detailed Comparison
| Attribute | Professional At-Home Kits | Over-the-Counter (OTC) Products |
|---|---|---|
| Whitening Agent Strength | Higher concentration (10% - 35% carbamide peroxide) for deep stain removal. | Lower concentration for surface-level stain removal only. |
| Application Method | Custom-molded trays that perfectly fit your teeth for even coverage. | Generic strips or one-size-fits-all trays that often miss spots. |
| Results | More dramatic, consistent, and long-lasting whitening. Lifts years of stains. | Modest, often uneven results. May only lighten teeth by a shade or two. |
| Gum & Enamel Safety | Custom trays protect gums from gel exposure. Formulations often include desensitizers. | Strips and ill-fitting trays can lead to significant gum irritation. |
| Guidance | Based on dental science with clear, precise instructions for safe and effective use. | General, less specific instructions for a broad consumer base. |
| Cost | Higher initial investment for a far superior and lasting result. | Lower upfront cost, but may require repeat purchases for minimal results. |
This table makes it clear: while OTC options are cheaper and more accessible, professional kits are designed from the ground up for effectiveness, evenness, and safety, making them a much better investment for a truly radiant smile.
Safety And Guidance Make The Difference
Finally, professional kits always come with an implicit layer of professional guidance. Even when you buy them directly, they are built on systems developed for and used by dentists. The formulas are clinically tested, the instructions are incredibly precise, and the whole system is designed to minimize common side effects like tooth sensitivity.
That guided approach is essential for getting the best, safest outcome. If you want to dig deeper into why professional supervision leads to better results, you can read an excellent breakdown in this article on the 5 Reasons To Choose Professional Teeth Whitening Over At Home Kits.
Ultimately, choosing a professional kit is an investment in a more effective, safer, and far more reliable whitening journey. If you're ready to move past the basic options in the store, check out our guide on finding the best teeth whitening products to discover a solution that actually delivers.
Safely Managing Tooth Sensitivity During Whitening
Let's address the elephant in the room. The number one question most people have before starting a professional teeth whitening at home journey is simple: "Will it hurt?"
It’s a totally valid concern. Tooth sensitivity is the most common side effect of whitening, but the good news is that it’s almost always temporary and completely manageable, especially when you're using professional-grade kits designed with your comfort in mind.
To understand how to prevent it, you first have to know why it happens. The active whitening ingredients in the gel work by opening up microscopic pores in your tooth enamel. This allows the gel to get inside and break down the deep-set stains. In the process, however, it can temporarily expose the delicate nerve endings inside your teeth, making them a bit more reactive to things like hot coffee or a cold drink.
Think of it like leaving a window open on a chilly day. The cold air gets in and gives you a shiver, but as soon as you close it, you’re comfortable again. The same idea applies here—the sensitivity is just a temporary state, not permanent damage.
Proactive Steps for a Comfortable Experience
The best way to deal with sensitivity is to get ahead of it before it even starts. Many professional whitening systems are formulated with ingredients to help with this, but a few simple strategies on your end can make a huge difference.
About a week or two before you plan to start whitening, switch to a desensitizing toothpaste. These toothpastes contain active ingredients like potassium nitrate or stannous fluoride, which work by blocking the tiny pathways to your tooth's nerves. You're essentially building up a protective shield before the whitening process even begins.
Expert Tip: Don't feel like you have to whiten every single day. Whitening every other day gives your teeth some downtime to recover and can dramatically reduce sensitivity without affecting your final results.
Smart Whitening Habits to Protect Your Teeth and Gums
How you apply the gel is just as critical as the gel itself. Getting the application right is your best defense against both tooth sensitivity and gum irritation. You want to make sure the powerful whitening agent stays exactly where it needs to be: on your teeth, and nowhere else.
Follow these key steps for a safer, more comfortable application:
- Use the Right Amount of Gel: This is the most common mistake people make. You only need a tiny drop of gel for each tooth in the tray. Using more just causes it to squeeze out onto your gums, leading to unnecessary irritation.
- Protect Your Gums: For extra protection, you can apply a small amount of petroleum jelly to your gums before putting in the trays. It creates a simple barrier that shields the soft tissue from any gel that might seep out.
- Wipe Away Excess Gel: After you've seated the trays in your mouth, take a soft toothbrush or a cotton swab and gently wipe away any gel that has oozed onto your gums. It's a quick step that's incredibly effective at preventing discomfort.
- Stick to the Recommended Time: Never, ever leave your whitening trays in for longer than the instructions recommend. Trying to speed up the process by wearing them longer is a fast track to significant sensitivity.
Managing Discomfort If It Occurs
Even with the best preparation, you might still feel some mild sensitivity, and that’s perfectly okay. The trick is knowing how to manage it so you can continue your treatment comfortably.
If you notice your teeth feeling a bit tender, the first thing to do is take a break. Skip whitening for a day or two to let your teeth settle down. During that time, try to avoid ice-cold water, hot coffee, or sugary sodas, as that can provide immediate relief.
Keep using your desensitizing toothpaste to help calm the nerves. For more targeted help, you can look into specialized products designed for this exact purpose; learning about Fluoridex sensitivity relief is a great place to start. By taking these simple, proactive measures, you can make sure your journey to a brighter smile is as comfortable as it is effective.
Making Your Bright Smile Last
You’ve done it. After using a professional teeth whitening at home kit, you’ve got that brilliant smile you were hoping for. But the journey doesn't stop once the last tray comes out. Now it's all about protecting your investment and keeping that smile as bright as possible for as long as possible.
With the right aftercare and a few smart habits, you can make your results last for years, not just a few months. It really comes down to understanding what to expect and knowing how to shield your newly brightened teeth from the very things that caused stains in the first place.
Setting Realistic Expectations for Your Results
One of the first questions on everyone's mind is, "Just how white will my teeth get?" While the results from professional at-home kits are impressive, they aren't magic. A realistic goal is to see your teeth lighten by several shades on the dental color chart.
Your final result hinges on a few key things:
- Your Starting Shade: If your teeth have years of coffee or smoking stains, the transformation is going to look much more dramatic.
- The Cause of Stains: Yellowish stains from food, drinks, and age respond beautifully to whitening. Grayish tones, which can be due to genetics or certain medications, are often a bit more stubborn.
- Consistency: Sticking to the treatment schedule is the single best way to ensure you get the best possible outcome.
The growing popularity of these kits is a testament to how well they work. The entire market is shifting as powerful kits offer up to 10-shade improvements for way less than you'd pay for an in-office procedure. You can read more about the trends shaping the teeth whitening industry to see just how big this shift has become.
Protecting Your Smile from New Stains
Right after you whiten, your tooth enamel is a little more porous than usual, making it extra susceptible to picking up new stains. This is crunch time for aftercare. For the first 48 hours after your final treatment, it’s a good idea to follow a "white diet."
This just means sticking to light-colored foods and drinks while steering clear of the usual suspects. Think of your teeth like a freshly painted white wall—you wouldn't risk spilling red wine on it right away.
Key Maintenance Tip: Small, daily habits can make a huge difference. Just rinsing your mouth with water after you have coffee or tea can wash away a lot of the staining compounds before they have a chance to settle.
Even after that initial 48-hour window, just being mindful of what you eat and drink is the best way to keep your smile bright. The main offenders are pretty well known:
- Dark Beverages: Coffee, black tea, red wine, and colas are the biggest culprits.
- Colorful Sauces: Things like soy sauce, tomato sauce, and balsamic vinegar can dull your smile over time.
- Vibrant Fruits: While healthy, berries like blueberries and blackberries are packed with pigments that can stain.
- Tobacco Use: Smoking or chewing tobacco will quickly undo all your hard work, leading to deep yellow and brown stains.
When to Consider a Touch-Up Treatment
Let's be realistic: no teeth whitening is permanent. Life happens, and over time, your daily habits will introduce some new discoloration. The great thing about professional at-home kits, though, is that maintenance is incredibly simple and affordable.
Most people find that a quick touch-up session every six months to a year is all it takes to keep their smile looking its best. This might just mean wearing your trays for a night or two—an easy way to bring back that initial brilliance without going through a full treatment again. By adopting these simple strategies, you can enjoy a radiant, confident smile for years to come.
Who Should Consider Professional At-Home Whitening?
Professional at-home whitening can deliver some truly fantastic results, but it’s definitely not a one-size-fits-all solution. Think of it like a specialized tool—it works wonders on the right project, but it’s not meant for every single job. Figuring out if you’re a good candidate is the most important first step you can take.
The best person for this kind of treatment usually has healthy teeth and gums and wants to get rid of common, everyday stains. We’re talking about those yellowish discolorations that build up over years of enjoying things like coffee, tea, or red wine. For these kinds of stains, professional kits can make a remarkable difference.
However, some situations call for a bit of caution. If you have any active oral health problems, you really need to hit pause and talk to your dentist first. Whitening gel can easily aggravate existing issues, turning what should be a simple cosmetic treatment into a painful ordeal.
Proceed with Caution or Avoid Whitening
Certain people should either steer clear of at-home whitening or only move forward after getting the green light from their dental professional. Putting powerful whitening agents on an unhealthy mouth is like trying to paint over a wall with structural damage—you have to fix the foundation first.
It’s absolutely critical to address these issues before you even think about starting a whitening routine:
- Gum Disease: If you have gingivitis or periodontitis, your gums are already inflamed, tender, and sensitive. Whitening gel can cause major irritation and discomfort.
- Untreated Cavities: Applying peroxide to a cavity is a bad idea. It allows the chemical to seep deep inside the tooth, potentially reaching the nerve and causing some serious pain.
- Exposed Tooth Roots: When gums recede, they can leave the roots of your teeth exposed. This part of the tooth isn't protected by enamel and is extremely sensitive to whitening agents.
A pre-whitening dental check-up isn't just a friendly suggestion—it's a crucial safety measure. It’s the only way to know for sure that your mouth is healthy enough to handle the process and avoid painful complications down the road.
The Challenge of Existing Dental Work
One of the most important things to consider is any dental work you already have. The materials used for things like crowns, veneers, fillings, and dental bonding are carefully color-matched to your teeth when they are placed. Crucially, these materials will not change color when you use whitening agents.
What does that mean for you? If you whiten all the natural teeth around your dental work, that crown or filling will suddenly stick out, creating an uneven, mismatched smile. For instance, a front-tooth crown that once blended in perfectly could end up looking noticeably darker after your natural teeth have lightened by several shades.
This is exactly why a conversation with your dentist is so important before you start. They can help you come up with a smart plan, which might involve whitening your natural teeth first and then replacing the old dental work to match your new, brighter shade. Skipping this step is one of the most common reasons people end up with disappointing results.
Common Questions About Professional Home Whitening
Even when you feel ready to start whitening at home with a professional-grade kit, it's normal for a few last-minute questions to pop up. Getting clear, honest answers is the final step to making sure you move forward with total peace of mind. Let’s clear up some of the most common ones.
How Long Will My Whitening Results Last?
After putting in the effort, you definitely want your brilliant results to stick around. With a professional system, you can expect your brighter smile to last anywhere from one to three years.
Why the big range? It has less to do with the product and almost everything to do with your daily habits. Think of your newly whitened teeth like a fresh white shirt—how long it stays pristine depends entirely on what you expose it to.
Your lifestyle is the main actor here:
- Dietary Habits: If you regularly enjoy coffee, black tea, red wine, or dark sauces, you'll find that stains can slowly creep back in.
- Oral Hygiene: Brushing twice a day and flossing daily is your absolute best defense. This simple routine removes the plaque that stains love to grab onto.
- Tobacco Use: Smoking or using other tobacco products is one of the fastest ways to undo all your hard work, leading to stubborn yellow or brown discoloration.
Just by being mindful of these things—maybe using a straw for that morning coffee—you can dramatically extend the life of your bright new smile.
Will Whitening Work on My Crowns or Fillings?
This is a critical question to ask before you start. The short and simple answer is no. Whitening gels, whether they use carbamide or hydrogen peroxide, are only designed to work on natural tooth enamel. They have zero effect on the color of dental restorations.
This applies to all common dental work, including:
- Crowns
- Veneers
- Fillings (composites)
- Dental bonding
If you whiten your natural teeth, all that existing dental work will stay the exact same shade it was before. This can create a noticeable and uneven look, especially if the restorations are on your front teeth. Always chat with your dentist about your whitening plans first so you can map out a strategy for a beautiful, uniform result.
Carbamide Peroxide vs. Hydrogen Peroxide
Seeing different active ingredients listed on whitening products can feel confusing, but the concept is actually pretty simple. Think of carbamide peroxide and hydrogen peroxide as two different roads that lead to the same destination: a whiter smile. Hydrogen peroxide is the "raw" whitening agent—it's powerful and works quickly.
Carbamide peroxide, on the other hand, is a more stable compound that breaks down into hydrogen peroxide slowly, over several hours. This gradual release of whitening power is what makes it a much gentler option for many at-home kits, often resulting in far less sensitivity.
This slower, more sustained action is perfect for overnight or extended-wear trays. It delivers effective whitening with a much lower risk of discomfort, which is a major reason why so many professional systems use it for at-home whitening. Both get the job done, but carbamide peroxide’s gentle nature makes it a comfortable favorite for achieving professional results.
Ready to find the perfect professional-grade products for your whitening journey? At DentalHealth.com, we stock the top dentist-recommended brands to help you achieve and maintain your brightest smile safely and effectively.
Explore our full selection of teeth whitening solutions at https://dentalhealth.com and enjoy free shipping on all USA orders.
Article created using Outrank