
What Is Carbamide Peroxide? Whitening Strength and Safety
Carbamide peroxide is a compound of urea and hydrogen peroxide that releases hydrogen peroxide gradually, which is why it's the common ingredient in at-home whitening gels. Why do shoppers assume a higher percentage must mean faster whitening and much more pain, when the wear time, tray fit and condition of your enamel can matter just as much?
That gap is where most confusion starts. People read a number on a syringe and treat it as the whole story, then wonder why a friend tolerated a strong gel easily while they felt zingy after a milder one, or why a crown stayed the same color while the teeth around it lightened. If you're asking what is carbamide peroxide, you're really asking three linked questions. What is it, how does it release its whitening power, and how do you match a strength to your own teeth without guessing?
What Carbamide Peroxide Is and Where It Came From
Think of carbamide peroxide like a timed-release capsule. It doesn't deliver all of its active ingredient at once. It holds hydrogen peroxide in a more stable form, paired with urea, and lets it go gradually once the gel is on your teeth.
That slow delivery is the whole point. A dentist in an office can protect your gums, place a stronger gel precisely and watch the clock for you. At home, you're fitting a tray in your bathroom mirror and then reading, working or sleeping while it sits in place. A gradual release suits that longer, unsupervised contact much better.
An accidental discovery in a tray
The modern use of this ingredient didn't start as a whitening product. A historical review in Sage Journals describes how, in the late 1960s, an orthodontist observed tooth lightening after patients used an antiseptic containing 10% carbamide peroxide in a tray for gingivitis treatment, an observation that led to the modern night-guard bleaching approach.
The patients weren't trying to whiten. They were wearing trays to help their gums, and their teeth happened to look lighter afterward. That kind of accidental finding matters in dentistry because it points to something patients can tolerate wearing for hours at home.
More than two decades passed before that observation was formalized for other dentists to use. The delay tells you something reassuring. This wasn't a cosmetic fad rushed to market. It became a dentist-supervised, take-home method built around a tray, a modest concentration and repeated wear.
Why that history still shapes products today
- Tray-based delivery comes directly from that early use, because a tray keeps gel against the teeth for the extended contact this ingredient needs.
- Modest starting strengths became the reference point, since a lower concentration worn longer could lighten teeth without an office visit.
- Dentist supervision remained part of the model, even though the treatment happens at your kitchen table or bedside.
A useful way to picture it is this. The tray is the container, the gel is the slow feeder, and your wear time is the dose control.
So carbamide peroxide isn't a stain scrubber and it isn't bleach in the household sense. It's a peroxide precursor, meaning it becomes the active whitening agent after it breaks down. That distinction explains nearly everything else about how it feels, how long it takes and why the percentage on the label can be so misleading if you read it on its own.
Whitening also started to change socially at that point. It moved from something done only in a chair, in one sitting, to a routine you could repeat in small steps and stop or slow down if your teeth reacted.
How Carbamide Peroxide Breaks Down Into Hydrogen Peroxide
Once the gel touches moisture in your mouth, the compound begins to split. Carbamide peroxide decomposes into hydrogen peroxide and urea. The hydrogen peroxide does the main whitening work. The urea is a byproduct of that split and, depending on the formula, can influence how the gel breaks down.
The diagram below shows that breakdown as a simple three-step flow, from stable gel to active peroxide in the tray.
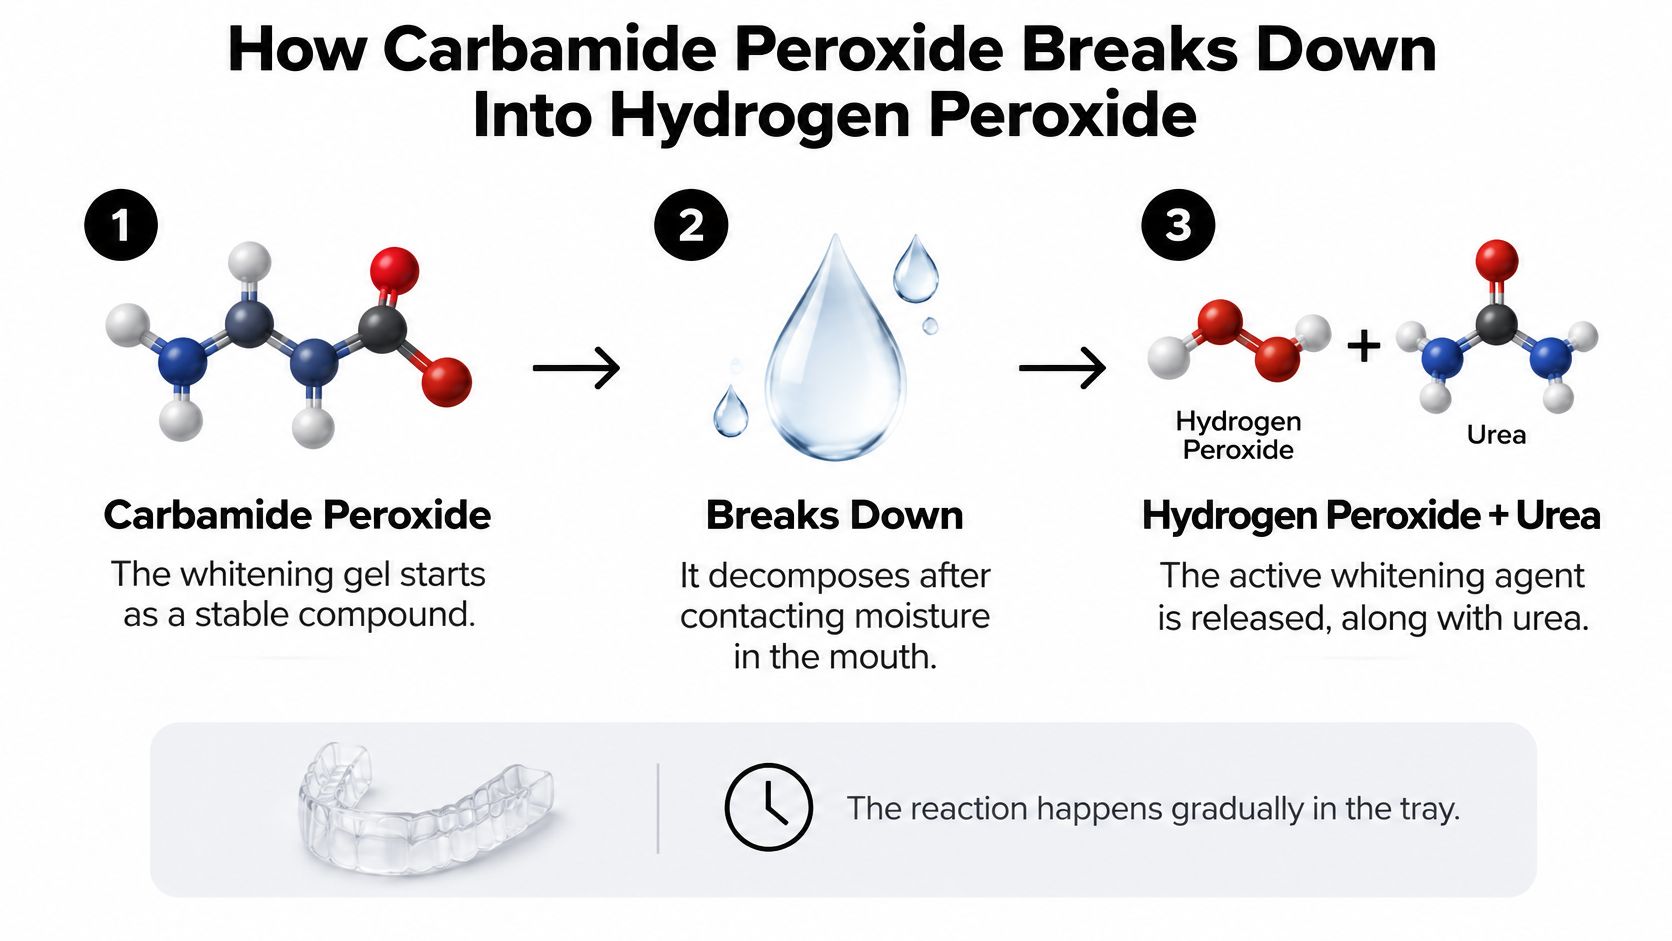
Don't picture a flood. Picture a slow drip into a sponge. The gel keeps supplying a small amount of new hydrogen peroxide as the earlier amount gets used up, which is why a tray session is measured in hours rather than a quick rinse.
Step by step inside the tooth
- Contact starts the split. Moisture in saliva and in the gel itself begins breaking the compound down after application.
- Hydrogen peroxide is released gradually. The American Dental Association explains that approximately one-third of a carbamide peroxide formulation corresponds to hydrogen peroxide, so the number on the label is not the same as a hydrogen peroxide number.
- Peroxide moves into the tooth. It diffuses through the tiny interprismatic spaces in enamel, which are the small gaps between enamel's structural rods, and continues into dentin underneath.
- Stain molecules are oxidized. In that deeper layer, peroxide disrupts the light-absorbing structure of chromogenic molecules, the pigmented compounds that make a tooth look yellow or dull.
Oxidation sounds technical, but the idea is plain. Large, color-holding molecules get broken into smaller pieces that reflect light differently. Your tooth then looks lighter, even though nothing has been sanded off its surface.
Chemical, not abrasive
This is a point many shoppers miss. Carbamide peroxide doesn't whiten by scraping or polishing stain away like a gritty toothpaste. It's a chemical process happening inside enamel and dentin while the gel sits still.
That also explains why scrubbing harder won't make a tray gel work faster. Once the gel is placed, time and contact do the work. Brushing is a separate, mechanical action with its own effects on enamel, and mixing the two ideas together leads people to blame the gel for wear that brushing habits may have contributed to.
Practical rule: If you have to force it, flood it or scrub it, you're working against how this ingredient is meant to perform. Thin gel, steady contact and patience are the mechanism.
The rate of release is the defining trait here. A stronger, direct hydrogen peroxide gel spends its strength quickly. Carbamide peroxide spends its strength across the whole wear period, which gives peroxide more time to reach stain molecules below the surface.
Carbamide Peroxide Versus Hydrogen Peroxide
A fair question follows from that mechanism. If hydrogen peroxide does the whitening, why not skip the middle step and use hydrogen peroxide alone? The answer is not that one is good and the other is bad. It's about how the peroxide is delivered.
Hydrogen peroxide acts fast and is spent fast. That suits a supervised office setting, where a clinician isolates your gums and controls a short session. Carbamide peroxide releases its peroxide over a longer window, so a tray worn at home keeps working after you've stopped thinking about it.
Three ways to compare them
- Speed of action: Hydrogen peroxide starts at full strength right away. Carbamide peroxide builds its effect gradually as it continues to break down.
- Control over exposure: A slower release is easier to adjust by shortening wear time or taking a night off. You're managing a drip, not a single strong dose.
- Where each fits best: Fast gels fit short, protected sessions. Slow-release gels fit trays, repeated home use and incremental lightening.
Label math trips people up here, because the percentages look dramatic side by side. The Australian Dental Association notes that 18% carbamide peroxide approximates 6% hydrogen peroxide, and describes carbamide peroxide's advantage as its comparatively gradual release compared with an equivalent hydrogen peroxide dose. A carbamide peroxide label will almost always show a bigger number for a gentler delivered dose.
If you're comparing home options, this overview of at-home teeth whitening with hydrogen peroxide sets out how direct peroxide products are positioned differently from tray gels.
The urea side of the split
Urea isn't the whitening agent, but it isn't inert filler either. It contributes to the formulation's breakdown and can increase alkalinity, depending on the product vehicle. That surrounding gel base matters. Two products with the same headline percentage can feel different because their vehicles hold and release the ingredient differently.
It's tempting to ask which peroxide is safer, full stop. That's the wrong frame. Safety depends on the delivered dose, contact with gums, wear time and the condition of the teeth being treated. A mild product worn far too long can irritate you. A stronger product used briefly and carefully may not.
For home use, dentists often favor the gradual form for a practical reason. It gives you more room to notice sensitivity, adjust the schedule and stop early, while still reaching stains below the enamel surface.
Choosing Between 10% and 35% Carbamide Peroxide
Most product pages push you to shop by percentage alone. That's understandable, because a single number is easy to compare. Unfortunately, it's also incomplete. Whitening depends on concentration multiplied by contact time, repeated over days, and on how well the tray holds gel on the teeth instead of on your gums.
Consider the evidence for lower tray strengths. In a double-blind randomized trial involving 92 volunteers, participants used either 10% or 16% carbamide peroxide in trays for two hours daily over three weeks, and both concentrations produced significantly lighter teeth at the four-week assessment, with both regimens judged equally effective and safe for that period. If the higher of those two numbers were automatically superior, that result would look very different.
The wider market stretches beyond those studied options. At-home systems commonly span lower strengths meant for longer wear through to high-strength options meant for short, directed contact, and daily wear times shrink as concentration climbs.
Common Carbamide Peroxide Strengths and Trade-Offs
| Concentration | Typical Use Pattern | Main Trade-Off |
|---|---|---|
| 10% | Longer tray wear, often the starting point for sensitive users | Slower visible change, more sessions to plan |
| 16% | Moderate daily tray sessions | A middle balance of speed and wear time |
| 22% | Shorter tray sessions | Less time in the tray, more attention needed to comfort |
| 35% | Short, directed contact in higher-strength kits | Fastest sessions, least forgiving of overfilling or extra wear |
Read that table as a pattern, not a prescription. Your product's own directions set the wear time for its specific gel, vehicle and tray design. Borrowing the schedule from a different strength is where people get into trouble.
Questions that matter more than the biggest number
- What's your sensitivity history? If cold drinks already make you wince, a longer, gentler protocol is usually the sensible starting point.
- What condition is your enamel in? Erosion, exposed dentin or heavy recession change the conversation and deserve a dentist's input first.
- How patient are you? Someone happy to wear trays while reading each evening can use time instead of strength.
- What's the goal? Maintaining previous whitening needs less intensity than tackling years of coffee stain.
A higher percentage mainly buys you shorter sessions. It doesn't guarantee a lighter end point, and it narrows your margin for error. The right strength is the one you can use consistently, exactly as directed, without dreading the next application.
Safety, Sensitivity and Side Effects
Is carbamide peroxide safe or unsafe? That binary question is the problem. It's a dose and context question. A person with intact enamel who uses a modest strength as directed faces a different picture from someone with erosion, exposed dentin and a hard-bristled toothbrush who leaves gel on too long.
The predictable effects are well known. Temporary tooth sensitivity and soft-tissue irritation are the principal adverse effects, especially when gel contacts the gums or wear time is exceeded. Sensitivity often shows up as a brief zing with cold air or drinks, then settles after treatment pauses.
How common is it? A European Commission scientific review reported 55% tooth sensitivity after two weeks of 10% carbamide peroxide exposure in clinical studies, alongside gingival irritation. That figure comes from the milder end of the range, which shows why you shouldn't assume a low percentage means no reaction at all.
Why stronger doesn't always mean sorer
You'd expect sensitivity to rise in a neat straight line with concentration. It doesn't always. Protocol interferes with the pattern. Shorter wear with a stronger gel can, for some people, feel similar to longer wear with a weaker one, because total exposure is what the tooth experiences.
That doesn't mean strength is irrelevant. Higher concentrations act faster and can raise concerns about sensitivity, enamel alteration and gum irritation. It means you can't predict your own comfort from the label alone. Tray fit, how much gel you load, your enamel condition and whether you already have sensitivity all feed into the result.
For a closer look at common reactions and how people manage them, this guide to teeth whitening gel side effects covers the patterns to watch.
Separating chemical effects from brushing wear
Here's an underserved distinction. The same European review noted evidence of increased enamel wear when bleaching was combined with tooth-brushing abrasion. Those are two different mechanisms. Peroxide works chemically inside the tooth. Aggressive brushing works mechanically on the surface.
Don't lump every rough or worn feeling after whitening onto the gel alone. Ask what your brush, pressure and timing around treatment are contributing.
Finally, remember the material limit. Peroxide changes natural tooth structure. It does not reliably lighten crowns, veneers, fillings or sealants. If a visible front tooth is restored, whitening the neighbors can create a mismatch you didn't plan for, so map your restorations before you start, not after.
Using Carbamide Peroxide Safely and When to See a Dentist
Good results are mostly a set of small, repeatable habits. None of them are complicated, but skipping one, such as wiping excess gel off your gums, undoes the care you took choosing a sensible strength.
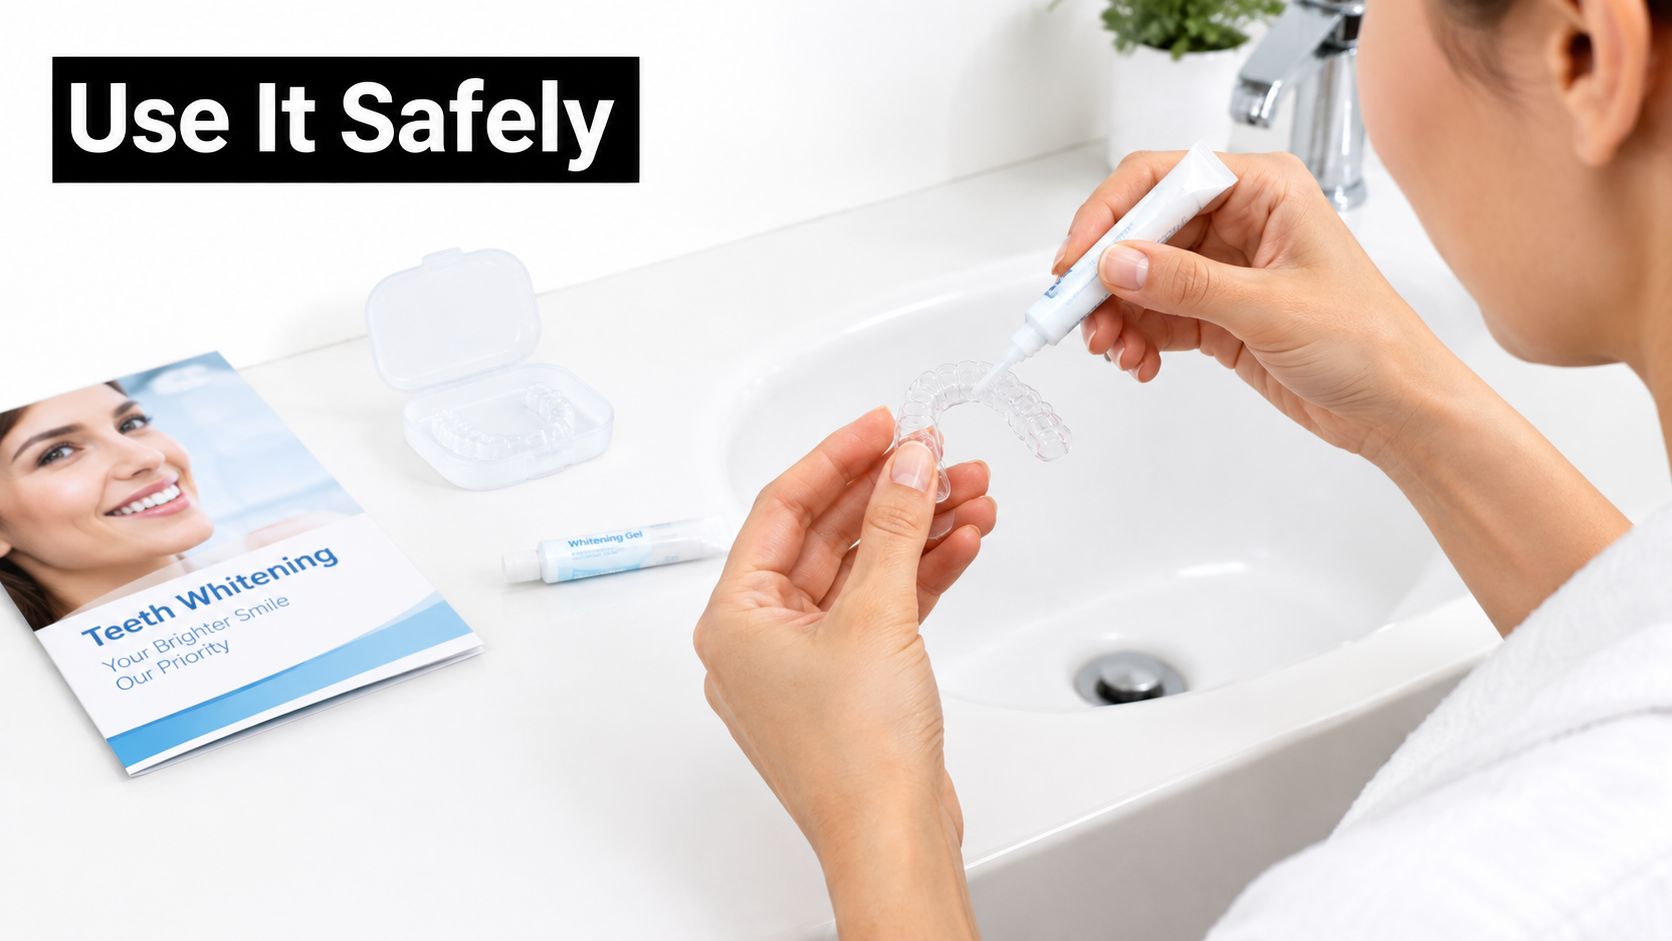
The photo below shows the core skill, placing gel into a clear tray in a controlled amount before it goes anywhere near your mouth.
A routine you can actually follow
- Start with the lowest effective concentration for your goal, particularly if you've never whitened or you already react to cold.
- Load the tray sparingly. A small amount per tooth is enough. Overfilled gel has nowhere to go except onto the gum margin.
- Seat the tray, then wipe. Remove excess gel from the gingival margin with a clean finger or cotton swab right away.
- Follow the prescribed wear time. Don't extend a session to speed things up. Extra hours mainly buy extra exposure for your gums and nerves.
- Rinse and check. After removal, rinse your mouth and the tray, then notice any spots that feel sore so you can load less gel there next time.
Tray fit deserves its own mention. A loose tray pumps gel outward as you talk or swallow, spreading it onto soft tissue. A well-fitting tray holds a thin, even layer against enamel, so more of the dose goes where it's intended and less goes where it irritates.
The video below demonstrates tray use in practice, which is helpful if written directions leave you unsure how much gel a small drop really is.
Pause signals and red flags
Pause treatment if sensitivity or irritation persists rather than fading between sessions. Sore, blanched or persistently irritated gums are a reason to stop and reassess, not a hurdle to push through. Pain focused in one tooth also deserves attention, because whitening can draw your notice to a crack, cavity or exposed root that needs care first.
See a dentist before you begin if you have untreated decay, gum disease, erosion, exposed dentin or aggressive brushing habits you haven't corrected. Dental associations frame peroxide bleaching as safe and effective when used according to professional directions or under dental supervision, and that guidance is practical, not gatekeeping. A dentist can match a strength and wear schedule to your enamel, check restorations that won't change color and tell you if whitening should wait until other treatment is done.
Shopping for Professional-Grade Carbamide Peroxide Kits
By the time you're comparing kits, you already know the chemistry. Your job now is translation. You're matching a label percentage, a wear schedule and a tray system to your sensitivity history and the result you want, without letting the largest number make the decision for you.
Start with the label, but don't stop there. Confirm the exact carbamide peroxide percentage, then find the recommended wear time for that specific product. Those two facts only make sense together. A short-contact strength used on a long overnight schedule is misuse, even if the gel itself is a legitimate professional product.
A short decision checklist
- Confirm the percentage and translate it mentally. Remember that roughly a third becomes hydrogen peroxide, so cross-category comparisons need that adjustment.
- Check the wear time and course length and ask whether you'll realistically keep that routine on work nights and weekends.
- Assess tray fit. Decide whether you'll use dentist-made trays, moldable trays or a pen format, and be honest about which you'll load carefully.
- Look for sensitivity-aware options if you've reacted before, including lower strengths you can step down to without abandoning treatment.
- Decide on dentist guidance first if you have restorations on front teeth, erosion, exposed dentin or existing sensitivity.
For a structured comparison of formats and brands, this roundup of the best professional teeth whitening kits is a useful companion to the checklist above.
One retail option is DentalHealth.com, an online retailer based in Lenexa, Kansas, which stocks professional-grade whitening brands such as Opalescence, Zoom, PolaDay and Captivate by Nupro, including high-concentration options such as PolaDay CP 35%. It offers phone support, free shipping on all USA orders and easy returns, which matters practically if you choose a strength and then realize a milder one suits you better.
Treat branding as secondary to fit. A recognizable professional name tells you the gel was made for dental use, but it can't tell you whether your tray seals well or whether your enamel needs checking. Those answers come from your mouth and, ideally, a quick conversation with your dentist.
Buy the strength you can use correctly every session, not the strength that sounds most impressive in a product title.
Your next step is concrete. Browse whitening gels and kits with your checklist open, match the strength to your sensitivity history and treatment goal, note any crowns or veneers that won't lighten, and confirm the plan with your dentist before your first session. That ten-minute confirmation is the cheapest insurance in the whole process.
Ready to put this into practice? Visit DentalHealth.com to browse professional-grade carbamide peroxide gels and kits from brands including Opalescence and PolaDay, compare strengths and wear times side by side, and get phone support if you're unsure which option fits your sensitivity history. Choose your strength deliberately, confirm it with your dentist, and start your first tray session with a plan you understand.