

The Best Teeth Whitening for Sensitive Teeth That Actually Works
The search for the best teeth whitening for sensitive teeth can feel like you're forced to choose between a brighter smile and avoiding that sharp, shooting pain. But you don't have to compromise. It's entirely possible to get a brilliantly white smile without the dreaded "zings" by picking products that are smart about their ingredients.
Your Guide to a Brighter Smile, Pain-Free

Let's be honest, the biggest question on anyone's mind when considering teeth whitening is: "Is this going to hurt?" If you have sensitive teeth, that fear is amplified. This guide is here to put that concern to rest. You can get stunning results without gritting your teeth through the process.
The secret isn't about toughing it out; it's about understanding what causes that sensitivity in the first place and choosing gentle, effective solutions. We've moved past the harsh, high-peroxide formulas that were common years ago.
Think of this as your complete roadmap. We'll start with the science behind tooth sensitivity, dive into the gentle ingredients that make all the difference, and compare the methods that work best. By the end, you'll be able to build a personalized, pain-free whitening plan. For a different perspective, you can also check out this expert guide to teeth whitening for sensitive teeth.
Why Gentle Whitening Matters More Than Ever
If whitening has left you wincing, you are definitely not alone. Tooth sensitivity is a reality for a staggering 67% of people who try whitening, turning what should be a confidence boost into a painful chore. This common problem is exactly why finding the right options for sensitive teeth is so critical.
This guide is designed to empower you with knowledge, making sure your journey to a brighter smile is as comfortable as it is successful. Here's what we'll cover:
- The Science of Sensitivity: We'll break down what causes that sharp, sudden pain and how whitening agents can sometimes be the trigger.
- Decoding Product Labels: You'll learn how to spot gentle-but-effective whitening ingredients and their crucial, soothing allies on any product label.
- Comparing Your Options: We'll walk through the pros and cons of strips, gels, and trays to help you find the perfect match for your comfort level.
- Building a Safe Regimen: A step-by-step plan for whitening that minimizes irritation from the very first application to the last.
The old "no pain, no gain" mentality has no place here. Effective teeth whitening for sensitive individuals is all about smarter, gentler chemistry that lifts stains without agitating the tooth's nerve.
Once you understand the fundamentals, you can confidently pick products that align with your smile goals. To get a solid foundation, it's worth reviewing these 10 things you should know about teeth whitening before you start. Our approach is simple: give you the facts to make informed, pain-free choices.
Understanding Why Teeth Whitening Can Hurt
To figure out the best approach to whitening sensitive teeth, we first need to get to the bottom of that infamous "zing." That sharp, sudden jab of discomfort isn't a sign you're doing permanent damage. It’s actually a temporary overstimulation of the tooth's nerve, and understanding how it happens is the key to a pain-free experience.
Think of your tooth less like a solid rock and more like a layered structure. The very outside is the hard, protective enamel. Just beneath that is a softer, more porous layer called dentin.
This dentin layer is crisscrossed by thousands of microscopic channels called dentinal tubules. These act like tiny, direct pipelines straight to the tooth's nerve center, the pulp. When your enamel is in good shape, these tubules are sealed off, shielding the nerve from whatever is happening in your mouth.
The Science Behind the 'Zing'
That zinging sensation happens when these tiny channels become exposed. This can be caused by anything from enamel wear to gum recession, which uncovers the root surfaces of your teeth.
When a whitening agent like hydrogen peroxide gets to work, its job is to penetrate the enamel to break down stain molecules. But in doing so, it can also seep into any open dentinal tubules it finds along the way.
Once inside, the peroxide can temporarily irritate the nerve, triggering that sharp, shooting pain. It’s a direct message from the nerve saying it’s being stimulated by something. For a deeper dive, understanding tooth sensitivity and its common triggers is a great next step.
It's crucial to remember that this sensitivity is a temporary reaction, not a permanent injury. The whitening agent is simply reaching the nerve through these open channels, causing a brief, albeit uncomfortable, response.
This is exactly why choosing the best teeth whitening for sensitive teeth is about more than just grabbing a popular brand off the shelf. It means finding a product that works with your tooth’s delicate biology, not against it.
Common Triggers for Tooth Sensitivity
While whitening is a well-known cause of temporary sensitivity, it’s rarely the only culprit. Knowing what else might be contributing can help you manage your comfort and prep your teeth for a much better whitening experience.
In fact, many people already deal with some level of sensitivity before they even think about whitening. Pinpointing these underlying issues is key.
Common sensitivity triggers include:
- Gum Recession: When gums pull back, they expose the root of the tooth. This part is covered by a layer called cementum, which is much softer and more porous than enamel, leaving those dentinal tubules wide open.
- Enamel Erosion: A diet heavy in acidic foods and drinks—think citrus, soda, and coffee—can slowly wear away your enamel, thinning the protective barrier between the outside world and the sensitive dentin layer.
- Teeth Grinding (Bruxism): Clenching or grinding your teeth, often at night, puts a massive amount of stress on your enamel. Over time, this can lead to tiny cracks or wear it down, increasing sensitivity.
- Overly Aggressive Brushing: Using a hard-bristled toothbrush or just brushing with too much force can literally scrub away enamel and push your gums back. It’s a double-whammy for sensitivity.
If any of this sounds familiar, don’t worry—it doesn't mean whitening is off the table. It just means you need to be a bit more strategic. By understanding that sensitivity is a mechanical issue (open channels leading to a nerve), you can take control by choosing gentle formulas or taking steps to block those channels before you start.
Decoding Ingredients for Gentle Whitening
To find the right whitening product for sensitive teeth, you have to become a savvy label-reader. Think of it like this: every whitening formula has a team of ingredients. You have your "Whitening Engines"—the power players that actually lift the stains—and your "Soothing Allies," the ones that keep your teeth comfortable and happy through the whole process.
Getting a feel for this dynamic is the secret to picking a product based on real science, not just clever marketing. A formula that perfectly balances both sides of this team is what separates a truly gentle and effective whitener from one that just leaves you wincing.
This move toward balanced, comfort-focused formulas isn't just a fleeting trend; it’s a massive shift in the dental industry. The global teeth whitening market is expected to jump from $8.93 billion in 2025 to $12.77 billion by 2032, but the biggest roadblock has always been sensitivity. This reality has fueled a wave of innovation, pushing gentle formulas to the forefront of new product development. You can get the full scoop on this market shift from Fortune Business Insights.
The Whitening Engines: Peroxide and Beyond
The main ingredients that get the job done are oxidizing agents. Their mission is to break down the colored molecules causing stains on your teeth, which makes them look brighter and whiter.
The two workhorses you’ll see most often are:
- Hydrogen Peroxide: This is the fast-acting powerhouse. It gets to work quickly, releasing its whitening power for noticeable results in less time. That speed, however, can sometimes be too much for sensitive teeth. That's why at-home products stick to lower, safer concentrations, usually between 3-10%.
- Carbamide Peroxide: Consider this the "slow and steady" option. Carbamide peroxide gradually breaks down into hydrogen peroxide, releasing its whitening potential over several hours. This slower, more controlled release is often much gentler, making it a go-to for sensitive formulas. For context, a 10% carbamide peroxide gel is about as strong as a 3.5% hydrogen peroxide gel.
The bottom line is pretty simple: lower peroxide concentrations mean a lower risk of sensitivity. You might need a few extra whitening sessions to get to your goal, but you'll have a much more comfortable experience along the way.
There’s also a newer player on the scene, designed from the ground up to be gentle. Phthalimidoperoxycaproic Acid (PAP) is a peroxide-free whitening agent. It oxidizes stains without releasing the byproducts that can sometimes irritate the tooth's nerve, making it a fantastic alternative for anyone who finds traditional peroxides too intense.
Soothing Allies That Protect and Calm
The best whitening products for sensitive teeth don't just blast away stains; they actively work to protect and calm your teeth. These are the ingredients that make a pain-free whitening experience possible.
Keep an eye out for these key allies on the ingredient list:
- Potassium Nitrate: This is the gold standard for calming down sensitive nerves. It works by traveling down the tiny tubules in your dentin to interrupt the pain signals between the nerve and your brain. In short, it tells the nerve to chill out, stopping that "zing" before it even starts.
- Nano-Hydroxyapatite (n-Ha): This ingredient is a synthetic version of the natural mineral that makes up your tooth enamel. It helps by physically plugging up and remineralizing any exposed dentinal tubules, building a barrier that stops hot, cold, or sweet triggers from reaching the nerve.
- Fluoride: A true dental hero, fluoride is famous for its ability to strengthen enamel by promoting remineralization. When your enamel layer is stronger and healthier, it’s naturally less susceptible to sensitivity, making fluoride a valuable part of any whitening routine.
If you want to build up your teeth's natural defenses before you start, learning about how specialized formulas can reduce tooth sensitivity is a great first step toward a successful whitening journey.
By scanning a product's label for a smart combination—a gentle "whitening engine" plus one or more of these "soothing allies"—you can confidently pick a formula designed for both results and comfort. This strategy lets you look past the marketing hype and choose a product that truly respects what your sensitive smile needs.
Comparing Whitening Methods For Sensitive Teeth
Now that you know how to spot the right ingredients on a product label, let's talk about how they get onto your teeth. Choosing the best whitening method when you have sensitive teeth isn't just about the formula—it's also about the delivery system. Each approach, from simple whitening strips to a full in-office treatment, has its own trade-offs when it comes to results, control, and comfort.
Think of it like choosing the right tool for a job. You wouldn't use a sledgehammer to hang a picture frame, and the same idea applies here. Let's break down the most common options to see which one really fits what you need.
This handy guide can help you figure out where to start.
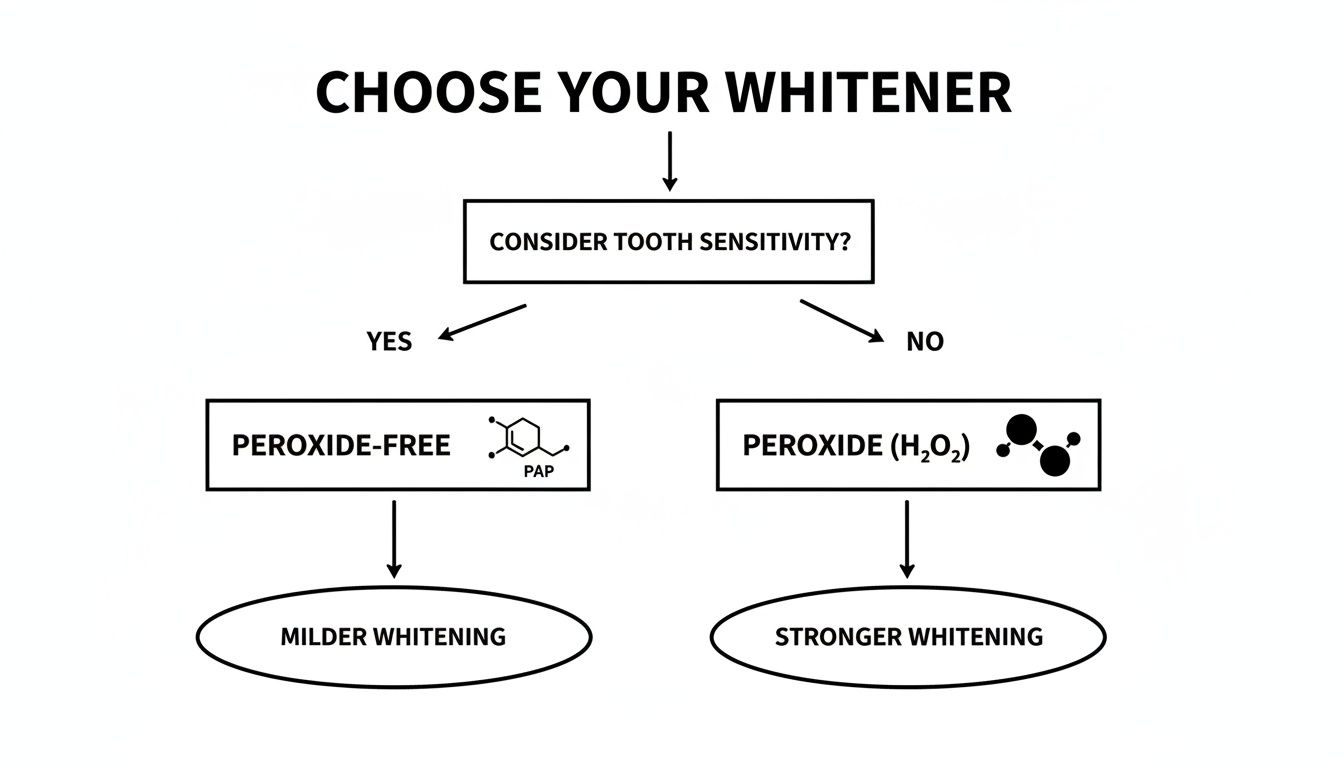
As you can see, your choice really comes down to whether you prefer the proven strength of peroxide or the gentler approach of modern alternatives like PAP.
H3: Over-the-Counter Whitening Strips
Whitening strips are usually the first thing people grab when they want a brighter smile, mostly because they're cheap and easy to find. The good news is that many brands now offer versions specifically for sensitive teeth, which use a lower concentration of hydrogen peroxide and often add in soothing ingredients.
But their biggest strength—simplicity—can also be their weakness. The "one-size-fits-all" design means they might not stick perfectly to the unique curves of your teeth, which can lead to splotchy results. More importantly for us, the whitening agent can easily ooze onto your gums, causing irritation, especially if your gums have receded at all.
H3: Brush-On Gels and Pens
Brush-on gels give you a lot more control than strips. Using a small brush, you can paint the gel directly onto each tooth, letting you target stained areas while carefully avoiding your gumline and any particularly sensitive spots.
This precision is a huge plus if you’re worried about triggering sensitivity. The main drawback is that your saliva can dilute the gel or wash it away before it's had a chance to really work its magic. This sometimes means you'll need to apply it more often to see the results you're after.
H3: Custom-Fit Trays From a Dentist
If you're looking for that perfect sweet spot between powerful results and total control, custom-fit trays from your dentist are hard to beat. The process starts with your dentist taking an impression of your teeth to create trays that are a perfect match for your mouth.
This custom fit does two crucial things: it makes sure the whitening gel covers every tooth surface evenly, and it keeps the gel locked in, away from your sensitive gums. You'll typically get a lower-concentration carbamide peroxide gel to use at home, which releases its whitening power slowly and gently.
While this method has a higher upfront cost for the trays, it gives you a professional-level, highly controlled whitening experience at home. It’s often considered the gold standard for anyone with sensitive teeth who wants serious results without the pain.
H3: Professional In-Office Whitening
For the fastest, most dramatic change, nothing beats an in-office treatment. Dentists use powerful, high-concentration bleaching agents that can lighten your smile by several shades in just one appointment. Of course, with great power comes a higher risk of sensitivity.
Luckily, your dentist has plenty of ways to manage it. They'll start by applying a protective barrier to shield your gums and might even use a desensitizing gel before the whitening begins. They can also adjust the intensity and timing on the fly if you start to feel any zings or discomfort.
This is the most expensive and intense option, but you’re paying for immediate, professional results under the safest possible supervision. Your dentist can tailor every step of the process to your specific needs, making it a surprisingly comfortable experience despite the strong whitening agents involved.
Ultimately, by weighing these factors—convenience, control, cost, and comfort—you can zero in on the right choice. For those of us with significant sensitivity, methods that give you more control, like custom trays or brush-on gels, are usually the most reliable path to a brighter smile.
Your Step-by-Step Gentle Whitening Plan
Alright, now that you understand the "why" behind sensitive teeth whitening, let's get to the "how." This is the exciting part—moving from theory to action. A successful, comfortable whitening experience doesn't happen by accident. It's all about having a smart, strategic plan.
This is your blueprint for getting that brighter smile without the painful zings. By prepping your teeth, applying the product carefully, and following up with good aftercare, you can avoid the sensitivity that makes so many people give up. Let's walk through it, step-by-step.
Phase 1: Prepare Your Teeth for Whitening
Before you even think about opening that whitening kit, the most important work has already begun. The secret to a pain-free session is building up your teeth's natural defenses ahead of time. Think of it like training for a marathon; you wouldn't just show up on race day without any prep.
Start this phase about two weeks before you plan to whiten:
- Switch to a Desensitizing Toothpaste: Grab a toothpaste with potassium nitrate or nano-hydroxyapatite. These ingredients are your first line of defense, working to block those tiny tubules in your dentin and build a shield against sensitivity.
- Be Gentle with Your Brush: Now is not the time for aggressive scrubbing. Use a soft-bristled brush and light pressure. Brushing too hard can wear down enamel and irritate your gums, leaving your teeth more vulnerable when it's time to whiten.
- Go Easy on the Acid: For a few days before your first session, try to cut back on acidic stuff like citrus, soda, and coffee. These can temporarily soften your enamel, making discomfort more likely.
Phase 2: Smart Application Techniques
How you put the whitener on is just as crucial as the product you choose. Your goal is simple: get the gel on your enamel and keep it off your sensitive gums and root surfaces.
When you're ready to whiten, follow these simple rules:
- Less Is More: Use just a tiny, thin layer of gel. If you overload trays or strips, the excess will ooze onto your gums, which is one of the biggest causes of irritation.
- Start with Shorter Sessions: For your first couple of treatments, cut the recommended application time in half. If everything feels fine, you can slowly work your way up. It's far better to whiten for 15 minutes without pain than to push through 30 minutes of regret.
- Wipe Away the Excess: After you put on your strips or trays, take a cotton swab and gently wipe any extra gel off your gumline. This one little step can make a world of difference.
Adopting these careful techniques can drastically change your outcome. Sensitivity hits anywhere from 30% to over 78% of whitening patients, but modern, gentle approaches deliver comparable results with far less discomfort. This has made them the new standard in a market projected to surpass $10 billion by 2030, as you can discover in these teeth whitening effectiveness statistics.
Phase 3: Post-Whitening Care and Maintenance
Once the whitening session is done, your job shifts to protecting your results and keeping your teeth comfortable. For the next 24-48 hours, your teeth are extra porous and more susceptible to both staining and sensitivity.
Here’s what to do after each treatment:
- Stick to a "White Diet": For at least a day, avoid the usual suspects—coffee, tea, red wine, soy sauce, and berries.
- Rinse with Lukewarm Water: Right after you remove the product, rinse your mouth with lukewarm water. Using cold water can shock the nerves and cause a jolt.
- Keep Using Your Desensitizing Toothpaste: Continue using it throughout your entire whitening treatment and for a week afterward to keep that protective barrier strong.
- Space Out Your Sessions: Don't try to whiten every single day. Give your teeth a break. Start by whitening every three days and see how you feel. For more detailed advice, check out our complete guide on how to whiten teeth safely at home.
When You Should Talk to Your Dentist First
While at-home teeth whitening kits offer incredible convenience, they aren't a one-size-fits-all solution. For anyone looking for the best teeth whitening for sensitive teeth, a quick chat with your dentist is the most important first step you can take. This isn't just a suggestion; it's a critical safety measure to make sure you get the pearly whites you want without causing any real harm.
Think of your dentist as a detective for your smile. They can pinpoint the real reason your teeth are discolored. Sometimes, stains are intrinsic, meaning they're deep inside the tooth, often from things like medication (tetracycline is a common culprit) or an old injury. These types of stains just won't budge with over-the-counter bleaching agents. Trying to whiten them is a recipe for frustration and a whole lot of unnecessary sensitivity.
Why a Dental Exam Is Non-Negotiable
Before you even think about applying a whitening product, you need a clean bill of oral health. Putting powerful whitening agents on top of existing dental problems can lead to some serious pain and make those issues much, much worse.
Your dentist will be on the lookout for a few specific red flags that make at-home whitening a terrible idea:
- Untreated Cavities: Whitening gel seeping into a cavity can cause excruciating pain by getting way too close to the tooth's nerve.
- Leaky Fillings or Crowns: If your existing dental work has tiny gaps, the whitening agent can sneak underneath, causing deep, internal sensitivity.
- Gum Disease or Recession: Applying peroxide to inflamed or receded gums can lead to nasty chemical burns and major discomfort.
- Veneers or Bonding: This is a big one. Whitening products do not work on dental restorations. If you whiten the natural teeth around them, you’ll end up with a mismatched, two-toned smile.
A pre-whitening check-up is like getting a permit before starting a construction project—it ensures your smile is a safe zone for cosmetic work. A dentist's green light means your teeth and gums are healthy enough to handle the process, preventing painful surprises down the road.
Ultimately, your dentist is your best partner in this. They can provide custom-fit trays that keep the gel off your gums or recommend professional-grade desensitizing treatments before you even start. Working with them sets you up for a safe, comfortable, and effective whitening journey from day one.
Your Whitening Questions, Answered
When you're dealing with sensitive teeth, trying to figure out whitening can feel a bit overwhelming. Let's clear up some of the most common questions so you can move forward with confidence.
Can I Still Whiten My Teeth If I Have Receding Gums?
Yes, you can, but you absolutely have to be careful, and I’d strongly suggest a chat with your dentist first. When your gums recede, they expose the root of the tooth. That part is way more sensitive than the tough outer enamel.
The key here is precision. You need a product that lets you control exactly where the whitening gel goes, like a custom-fitted tray or a brush-on gel. This is non-negotiable because you must avoid getting the whitening agent on those exposed root surfaces. And always, always look for a formula that has a desensitizing ingredient like potassium nitrate built right in.
Are "Natural" Whitening Methods a Safer Bet for Sensitive Teeth?
You'd think so, but not really. Things like activated charcoal or baking soda might be peroxide-free, but they're often incredibly abrasive. Their whole game is to physically scrub off surface stains, which sounds good until you realize they can also scrub away your protective enamel along with it.
Once that enamel starts to wear down, you're looking at a long-term increase in tooth sensitivity, which is the exact opposite of what you want. This is why professionally formulated products with low, controlled peroxide levels and soothing ingredients are almost always a safer, more effective choice.
The bottom line: Abrasive "natural" methods can actually make your sensitivity worse over time by damaging your enamel. Gentle, chemically-based formulas are usually the smarter way to protect your teeth while you whiten.
How Long Will My Whitening Results Actually Last?
This one comes down almost entirely to your daily habits and lifestyle. If you follow a gentle at-home whitening plan, you can generally expect your brighter smile to last anywhere from a few months up to a year.
To keep that shine, you'll need to be mindful of staining culprits like coffee, tea, and red wine. Of course, a rock-solid oral hygiene routine—consistent brushing and flossing—is your best defense against new stains trying to move in.
Ready to find a gentle solution that actually works for your smile? At DentalHealth.com, we have a hand-picked selection of professional-grade whitening products and sensitivity-relief toothpastes from brands that dentists trust. You can explore our full range of at-home dental care products and get started today.