
How to Teeth Whitening at Home
You're standing in front of the bathroom mirror with a whitening strip in one hand and a coffee-stained smile in the other, wondering whether this will work or just leave your teeth aching. I've been through that routine more times than I can count, including the tempting mistake of wearing a product longer because I wanted faster results. The reliable approach is less dramatic: use the right peroxide, apply a small amount correctly, and manage sensitivity before it makes you quit.
Home whitening can brighten natural teeth, but it isn't a way to repaint every part of your smile. The method matters, and so does knowing which stains will respond, how long change takes, and when a darker tooth needs a dentist rather than another round of gel.
Why Home Whitening Actually Works
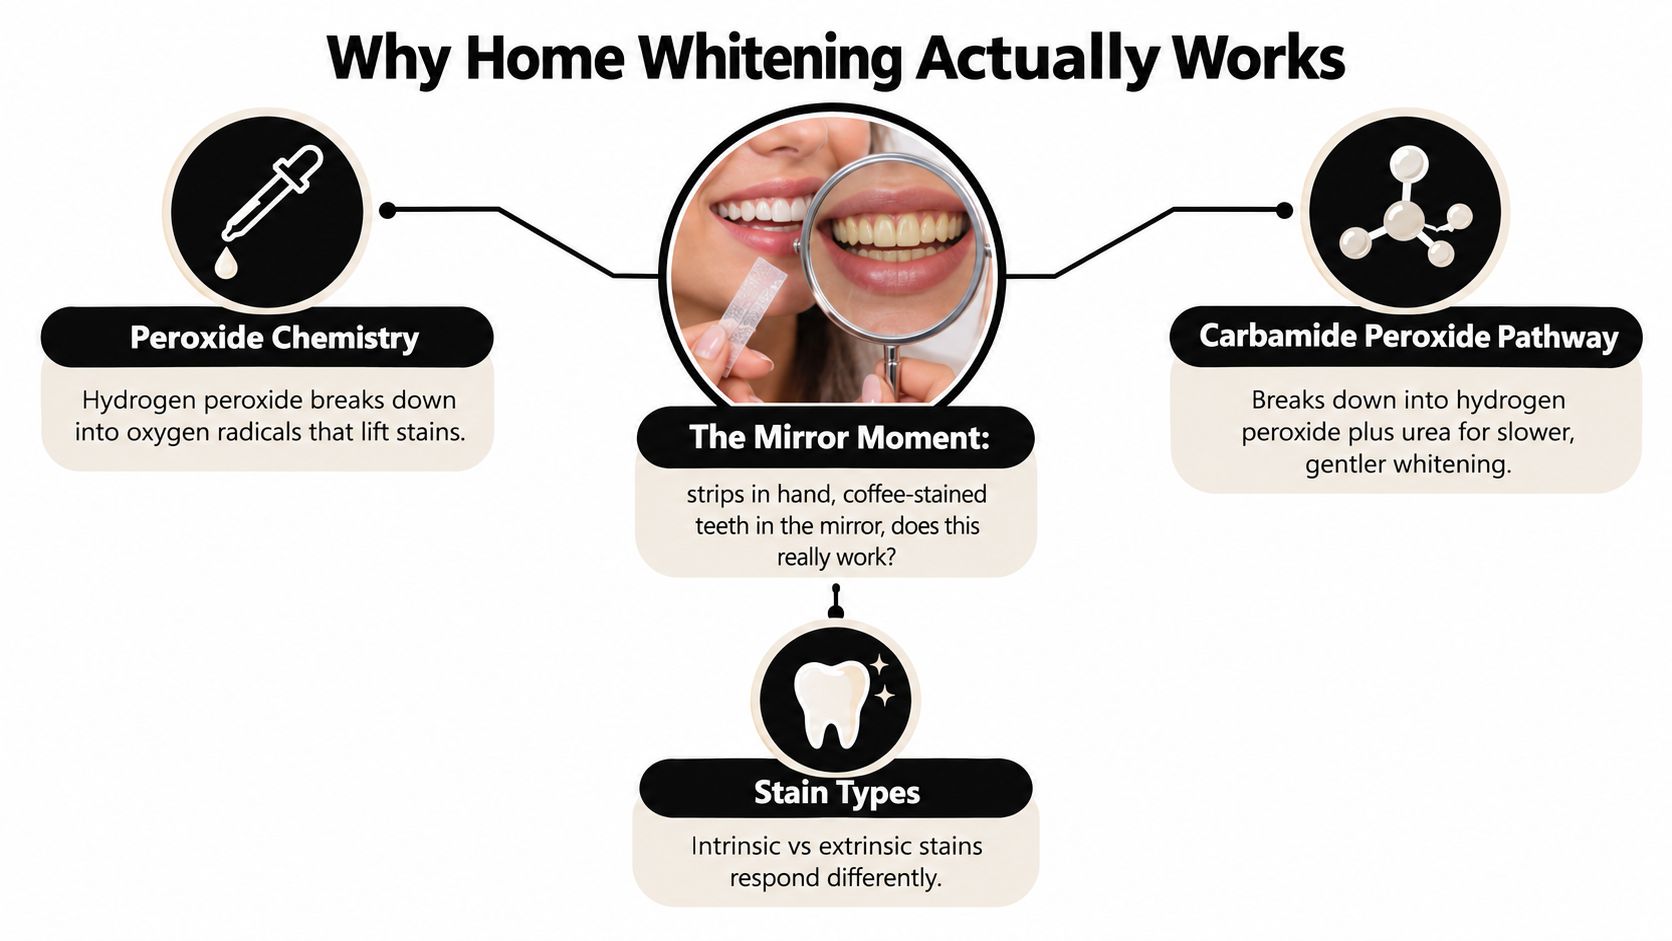
The chemistry is straightforward. Most whitening gels use hydrogen peroxide or carbamide peroxide. Hydrogen peroxide breaks down into reactive oxygen compounds that move through enamel and dentin, where they break apart stain molecules. Carbamide peroxide releases hydrogen peroxide more gradually, along with urea, which is why it tends to work more slowly and comfortably in a tray.
The modern home-whitening template began in 1989, when Dr. Van B. Haywood described placing about 10% carbamide peroxide in a custom tray worn overnight, as documented in this review of home bleaching. Later home systems kept the same basic idea: hold a low-concentration peroxide against the teeth for enough time to change the color of stain molecules below the surface.
What peroxide can and cannot change
Coffee, tea, wine, tobacco, and ordinary aging often create stains that peroxide can soften. These include surface stains on enamel and many deeper discolorations within natural teeth. A strip or tray works because it keeps the active ingredient in contact with the tooth instead of washing it away like a rinse.
Charcoal and baking soda are different. They may scrub or polish some surface discoloration, but they don't reliably change the underlying yellow or brown tint inside the tooth. Acidic homemade mixtures are an especially poor trade, because repeated abrasion or acid exposure can make enamel look rougher and more noticeable over time.
Peroxide won't lighten veneers, crowns, fillings, or bonding in the same way as natural enamel. It also struggles with some dark intrinsic stains, including tetracycline banding and a gray tooth caused by a damaged or dead pulp. Those cases need an examination, not a stronger strip.
A home kit is best understood as controlled chemistry in real time. It can produce a visible change, but the gel needs the right concentration, contact, and schedule. More product doesn't automatically mean a better smile.
Choosing the Right At-Home Whitening Method
The best option depends on the stain, the shape of your teeth, and how consistently you'll use the product. A tray filled with carbamide peroxide usually gives more even contact than a strip, while a pen is better for a small correction than a full smile.
| Method | Active Agent | Wear Time | Best For | Limitation |
|---|---|---|---|---|
| Whitening strips | Hydrogen peroxide, depending on brand | Often about 30 minutes per session | Mild, fairly uniform staining on front teeth | Can slip on curved teeth and molars |
| Custom or fitted trays | Carbamide peroxide or hydrogen peroxide | Brand-specific, from short daytime sessions to overnight use | Moderate staining and maintenance | Requires accurate loading and fit |
| Whitening pens | Peroxide gel, depending on brand | Short setting period | One or two darker natural teeth or travel touch-ups | Too little gel for dependable full-arch whitening |
| LED kits | Usually peroxide gel plus blue light | Brand-specific | People who prefer a kit format and shorter routines | Light isn't a substitute for appropriate peroxide |
| Whitening toothpaste | Mild abrasive or polishing ingredients | Used during normal brushing | Surface stains from food and drinks | Won't substantially change intrinsic tooth color |
Match the method to your real situation
Choose strips if the front teeth are mildly and evenly yellow, your budget is limited, and you want a simple routine. Crest 3D Whitestrips helped make this format mainstream, with reported first-year sales of about $200 million in 2001 and close to 90% of the emerging strips category, according to this review of home whitening use and product history.
Choose a tray and gel such as Opalescence PF or PolaDay CP if you have moderate staining, want more uniform coverage, or plan to maintain a previous professional whitening result. A tray also lets you adjust the schedule when sensitivity appears, which is much harder with a fixed strip routine.
Pens have a narrow but useful role. They can touch up one natural tooth or help before travel, but brushing gel over an entire arch usually produces patchy coverage. LED devices can be convenient, yet the peroxide still does the whitening. The light doesn't rescue an unsuitable concentration or poor contact.
If you're also comparing broader oral-care routines, resources about natural brightening supplements may be useful for understanding non-bleaching options. Just don't confuse a supplement or polishing product with peroxide whitening. They work through different routes.
A simple decision rule works well: mild stain and low budget means strips or toothpaste; moderate stain plus patience means tray gel; one uneven natural tooth means a pen or dentist visit.
Using Tray-Based Whitening Gels Step by Step
Tray whitening works well when the trays fit and the gel stays on the teeth. With products such as Opalescence PF and PolaDay CP, you control the gel amount and wear schedule. That flexibility helps you continue through mild sensitivity instead of quitting, provided the tray does not press gel onto your gums.
Prepare before the gel goes in
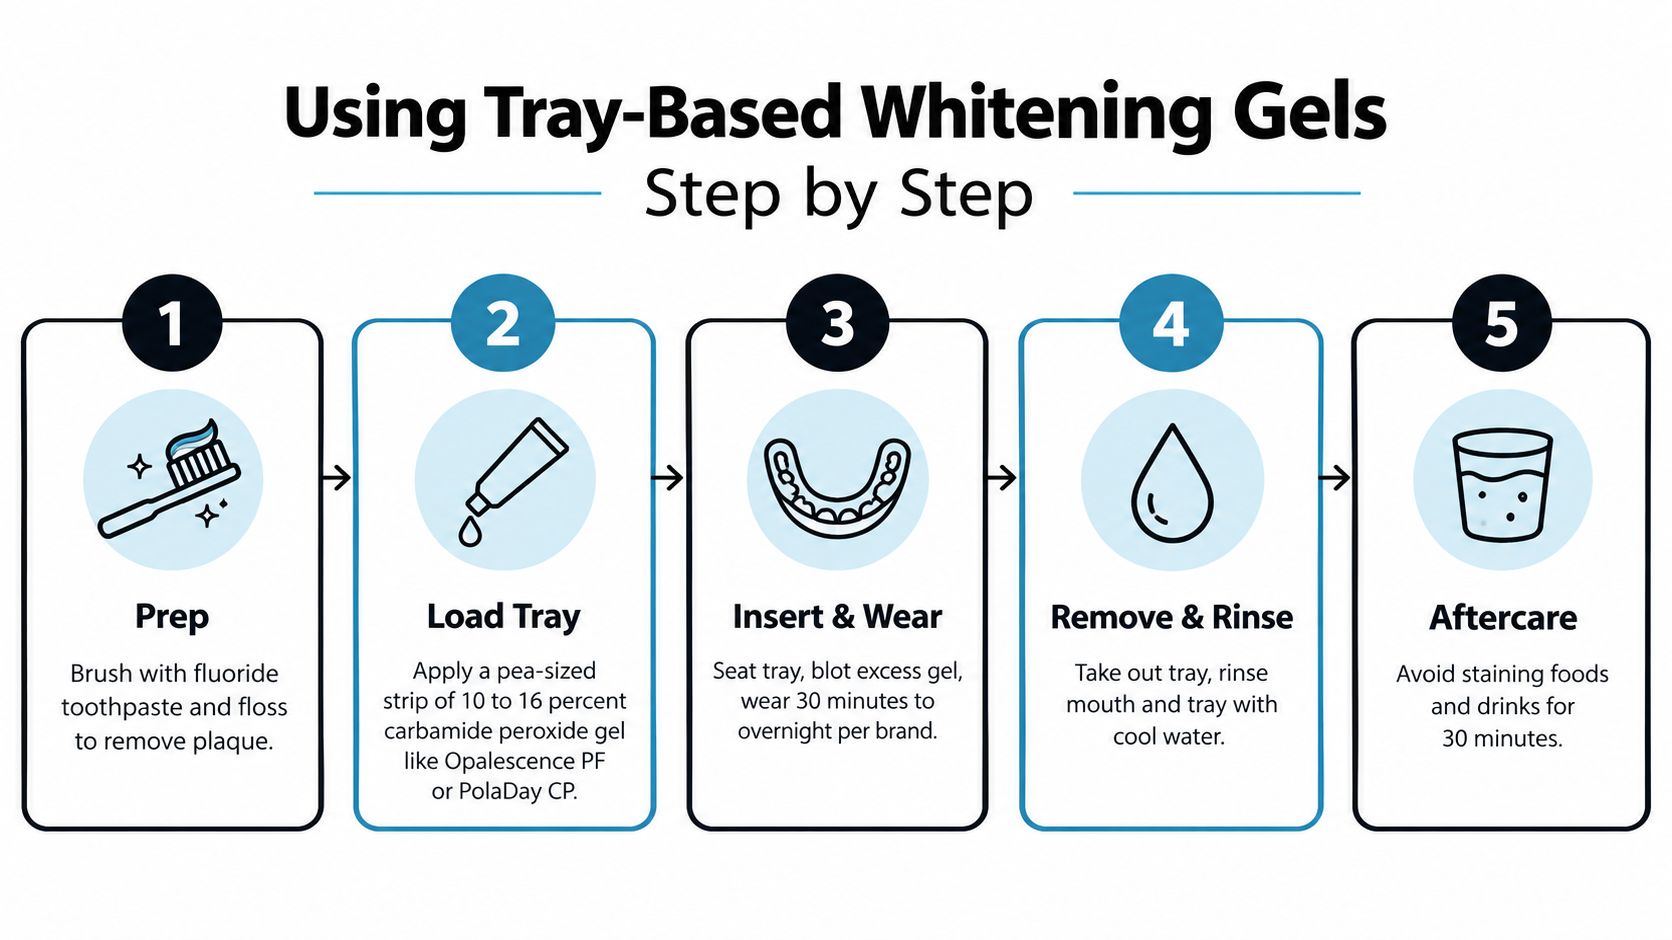
Brush with regular fluoride toothpaste, floss, and rinse about 30 minutes before inserting the tray. Whitening straight after vigorous brushing or flossing can irritate the gum tissue and make the session sting. Clear away heavy plaque first, since buildup blocks even contact between gel and enamel.
For a practical walkthrough of tray placement and cleanup, follow this guide to using dental whitening trays.
Load less gel than you think
Put a small bead in the front of each tooth reservoir, about the size of a baked bean for that tooth. Keep it below the gum edge. Once seated, the tray should spread gel over the tooth without forcing it onto the gums.
Press the tray into place, then wipe away any gel that squeezes out with a dry finger or cotton swab. White gum patches, burning, or a sharp sting in one spot signals contact with soft tissue. Remove the excess before continuing. These Skin Perfection hydrogen peroxide tips reinforce the same safety point: keep peroxide products away from tissue they are not intended to treat.
Follow the wear time on the product label or from your dentist. A 10% carbamide peroxide gel is commonly worn for about 8 hours per day, while 15% to 20% formulas are commonly used for about 3 to 4 hours per day. Do not extend the session because the first use felt comfortable. Longer wear can leave you with more sensitivity without making the result proportionally brighter.
Remove, rinse, and store
Take out the tray, rinse your mouth, and brush gently if gel remains. Clean the tray with cool water and mild soap, let it dry, and store it in its case. Saliva can draw some gel out during wear. That does not mean the session failed.
Repeat sessions according to the product instructions and your comfort. If zingers continue during or after treatment, shorten the next session rather than adding gel. A controlled routine keeps whitening going through the sensitivity phase, which is more useful than an aggressive session followed by a long break.
Using Whitening Strips and Pens the Right Way
Strips are the easier route when you don't want impressions, trays, or a bedtime routine. They work best on the visible front teeth, where the gel can sit flat against relatively even surfaces. They're less reliable around crowded teeth, pronounced curves, and teeth that sit behind the main arch.
A clean strip routine
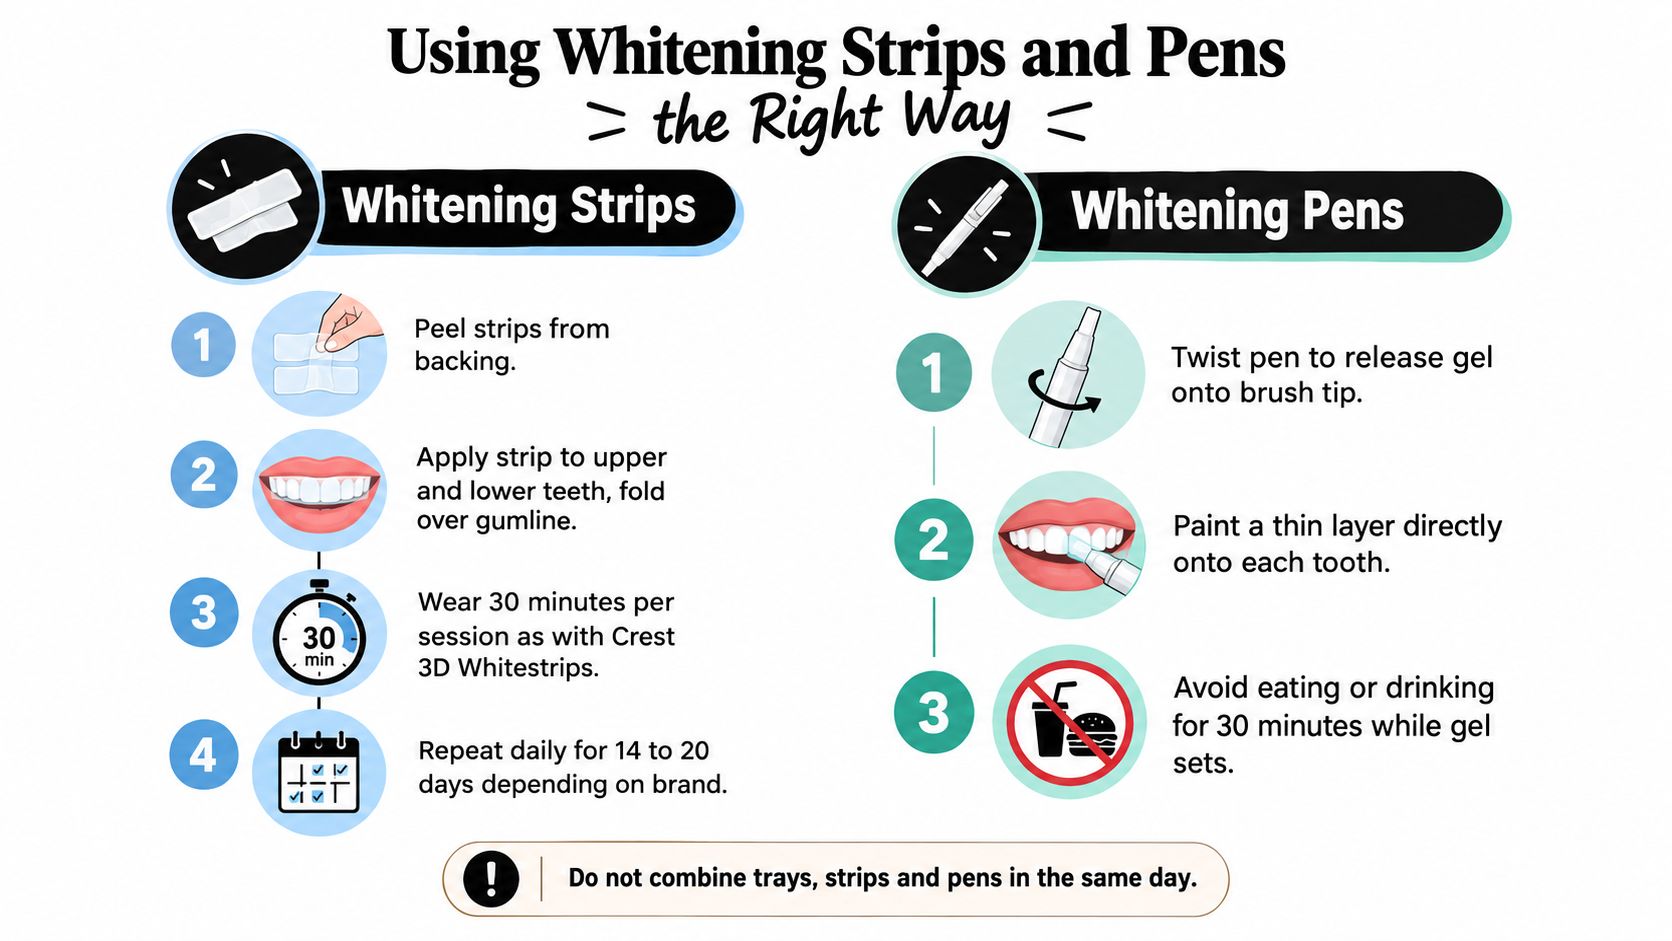
Brush earlier rather than immediately before application if your gums are sensitive. Peel the strip from its backing, place the gel side against the teeth, and align the lower edge with the tooth surfaces. Press it down firmly, then fold the excess behind the teeth. Keep the strip off the gums as much as possible.
Crest 3D Whitestrips are commonly worn for about 30 minutes per session, with some routines lasting 14 to 20 days, depending on the product. Follow the specific label rather than borrowing timing from another box. More time can mean more sensitivity without producing a proportionally brighter result.
Don't eat, drink, or rinse during wear. After removal, spit and rinse gently, then wait before consuming acidic drinks or foods. Never reuse a strip, and don't apply a strip on top of a fresh tray session the same day.
For a closer look at the mechanics, use this explanation of how whitening strips work.
Pens are for precision, not a full smile
A whitening pen makes sense for a small spot, a travel touch-up, or one natural tooth that looks slightly darker. Twist the pen until gel reaches the brush, paint a thin layer over the clean tooth, and keep your mouth open for the first minute so saliva doesn't immediately spread the product.
Don't coat the gums, and don't eat or drink while the gel sets. Pens often live in warm, humid bathrooms, but heat and moisture can shorten the useful life of peroxide gel. Store yours according to the label, preferably somewhere cool and dry.
The video below shows the basic strip and pen workflow in action.
Managing Sensitivity So You Can Keep Going
That sharp jolt from a cold drink does not mean you have permanently damaged your teeth. It means the peroxide is irritating the pathways between enamel and the nerve. With tray gels such as PolaDay CP or Opalescence, sensitivity usually means your schedule or amount needs changing, not that you must quit.
Receding gums, exposed roots, cracks, and recently irritated gums react sooner. Stronger gel and longer wear also increase the chance of discomfort. Start with a lower concentration, use a well-fitting tray, and keep gel off the gums. Increasing strength is a poor shortcut. Research links stronger home-bleaching formulas with more sensitivity and oral irritation, as shown in the evidence on concentration and adverse effects.
Adjust the schedule before abandoning treatment
A 10% carbamide peroxide routine is a practical starting point for many people. A review of at-home bleaching concentrations found that 10% carbamide peroxide can whiten about as effectively as stronger gels while causing less sensitivity. Visible improvement can be gradual, with roughly a 1 to 2 shade improvement taking up to 3 months, so judge the result over the full routine rather than after one session. See the review of at-home bleaching concentrations for the comparison.
Change one variable at a time. Cut a 30-minute session to 15 minutes, switch to alternate-day whitening, or place a desensitizing gel in clean trays after treatment. If your gums still feel sore after a professional cleaning, wait until they settle before whitening.
Practical rule: A brief, manageable tingle is different from pain that lingers. If the zingers continue well after removal or remain into the next day, reduce the concentration or frequency.
| Product | Active Ingredient | How to Use | Best For |
|---|---|---|---|
| Sensodyne | Potassium nitrate, depending on formulation | Use as your regular toothpaste before and during whitening | People preparing for a whitening routine |
| Fluoridex | Fluoride, formulation-specific | Use as directed, often as part of a sensitivity-control routine | Users with sensitivity concerns and elevated cavity risk |
| MI Paste | Recaldent-based remineralizing ingredients, formulation-specific | Apply as directed or place in trays after treatment | Users wanting a post-whitening comfort step |
| Desensitizing gel such as UltraEZ | Desensitizing ingredients, formulation-specific | Wear in clean trays for the labeled time after whitening | Zingers that appear during a tray program |
For practical comfort adjustments, follow this guide to reducing sensitivity after whitening. Avoid very hot or cold drinks for several hours after treatment, and never double the gel to compensate for a slower result.
Realistic Results and Common Pitfalls to Avoid
You finish a few tray sessions, check the mirror, and wonder why the change looks subtle. That is normal. Home whitening rewards a steady routine, especially with carbamide peroxide gels such as PolaDay CP or Opalescence. Yellow and brown stains usually respond better than gray discoloration, while tetracycline banding may stay uneven. Front teeth can brighten first because the gel contacts them most directly.
Home whitening works more slowly than an in-office procedure. Lower-concentration treatment may take weeks or months to show its full effect, so judge progress with photos taken in the same lighting rather than by checking after every session. Keep going through a mild sensitivity phase by spacing treatments out and following the comfort plan from the previous section. Quitting after a few uncomfortable sessions often leaves you with an incomplete result.
The shortcuts that backfire
Do not switch straight to very strong carbamide peroxide because a gentler gel feels slow. Higher concentrations can increase sensitivity, and stronger is not a dependable shortcut to a better final shade.
Skip overnight tray wear unless the product instructions and your dentist specifically approve it. Do not combine strips, pens, and tray gel on the same day. Lemon mixtures and abrasive charcoal pastes can irritate tissue, roughen enamel, and leave stains more noticeable. Controlled peroxide, used as directed, is the safer choice.
Restorations create another limitation. Bonding, veneers, crowns, and composite fillings don't whiten like natural enamel, so whitening nearby teeth can reveal a mismatch at the margin. A single gray, sharply darker, or painful tooth needs a dental assessment rather than more cosmetic gel.
Claims of eight shades in three days are marketing, not a sensible treatment plan. Protect your gums and enamel, use the schedule consistently, and let the result develop at its own pace.
Your Whitening Checklist and Quick Answers
Before starting, put the routine together instead of improvising halfway through.
- Check your teeth first: Arrange a dental checkup if you have pain, cracks, untreated cavities, bleeding gums, or a single dark tooth.
- Take a baseline photo: Use the same lighting and angle so gradual change doesn't fool you.
- Choose one system: Use trays, strips, or a pen according to its label. Don't stack formats.
- Prepare for sensitivity: Keep a sensitivity toothpaste such as Fluoridex or Sensodyne available, and consider a desensitizing gel such as UltraEZ or MI Paste.
- Confirm the fit: A tray should sit securely without pressing gel into the gumline.
- Plan your habits: Reducing coffee and wine during a whitening routine can make stain control easier, but don't compensate for either drink by extending wear time.
Are home gels safe for enamel?
Peroxide gels are generally used safely when the product is appropriate and you follow the labeled concentration and wear time. The trouble starts with overloading, extending sessions, or repeating treatment despite pain. White spots on the gums, burning, or persistent zingers are reasons to pause.
Can crowns or veneers become whiter?
No. Whitening changes natural tooth structure, not most restorative materials. If your natural teeth brighten around a crown, veneer, or bonding, the restoration may look darker by comparison.
What if gel touches the gums?
Wipe it away promptly and rinse. Temporary white gum patches usually reflect peroxide contact, but burning or soreness means the tray is overloaded or poorly fitted. Reduce the amount and check the fit before trying again.
How long will the result last?
The answer depends on your diet, tobacco exposure, oral hygiene, enamel color, and whether the original stain returns. Use maintenance sessions only when the shade has noticeably darkened, not automatically every day.
When should you stop and call a dentist?
Stop if pain continues beyond 24 hours, a tooth develops lingering sensitivity, a gum sore doesn't settle, or one tooth becomes noticeably darker. Dark intrinsic stains, gray tetracycline discoloration, restorations, and unexplained tooth pain deserve a dentist-supervised plan.
PolaDay CP, Opalescence, and other professional products can be effective, but concentration doesn't override technique. Follow the instructions, use less gel rather than more, and let comfort determine whether you continue the next session.
DentalHealth.com offers professional-grade at-home whitening gels, trays, sensitivity products, and practical guidance for routines built around brands such as Opalescence, PolaDay, Fluoridex, and MI Paste. Visit DentalHealth.com to compare products and choose the supplies that fit your whitening and sensitivity plan.