

How to whiten sensitive teeth: Safe, gentle whitening tips
It’s absolutely possible to whiten your teeth even if they're sensitive. The whole process really boils down to a smart strategy: preparation, gentle products, and smart application.
The key is to build up your enamel's resilience before you start, choose a low-concentration whitener, and apply it in short, spaced-out sessions. This approach helps you dodge the irritation and achieve that brighter smile without the painful 'zing.'
Your Guide to a Brighter Smile Without the Pain

The desire for a brilliant smile often runs headfirst into the fear of those sharp, shooting pains—a common dilemma for anyone with sensitive teeth. But it's a hurdle you can clear. This guide is all about moving past the anxiety of that dreaded 'zing' and giving you a practical, comfortable path to the results you want.
First, let's get into why the sensitivity happens. It's not just in your head. The main culprit is the whitening agent itself, usually a peroxide, which seeps through your enamel to the layer beneath it called dentin. This dentin layer is filled with tiny tubes that lead straight to the tooth's nerve, making it super reactive.
It’s a real concern, too. Tooth sensitivity is one of the biggest roadblocks to whitening, affecting anywhere from 30% to over 78% of people during treatment.
While the discomfort is usually mild and doesn't last long, it’s often enough to make people give up. But when you know what’s causing it, you can take steps to manage it effectively.
A Practical Framework for Success
Think of this as a complete game plan, one that tackles sensitivity from every angle so you can whiten comfortably and see real results.
Here’s how we'll break it down:
- Preparing Your Teeth: We’ll cover how to build up your enamel's natural defenses in the weeks before you even open a whitening kit. It's like creating a stronger barrier.
- Choosing Gentle Products: The goal is to find whitening agents with lower, more tolerable concentrations that are still effective without being too aggressive.
- Applying with Care: It's all about smart application. Little tweaks in your technique can minimize gum irritation and dramatically reduce sensitivity flare-ups.
- Soothing Afterward: Post-whitening care is crucial. I'll share routines to calm your teeth and lock in that new, brighter shade.
Forget the old "no pain, no gain" mindset. This is about a smarter, gentler approach. While this guide focuses on things you can do at home, understanding professional teeth whitening services is also valuable, especially if your sensitivity is a persistent issue. By following this process, you can get that radiant smile you’ve been wanting, without having to grit your teeth through the pain.
How to Prepare Your Teeth for a Gentle Whitening Experience
Successful, pain-free whitening isn’t about just grabbing a kit and hoping for the best. It really starts weeks before you even think about applying a whitening gel. I like to call this prep phase a 'sensitivity bootcamp' for your teeth. The whole point is to build up your enamel's defenses so it can handle the whitening process gracefully.
This proactive approach is honestly the single most important part of whitening sensitive teeth without pain. By creating a more resilient foundation, you’re not just managing sensitivity—you're actively stopping it from ruining your goal of a brighter smile. The best results I've seen come from a patient, two-week prep routine.
Start with a Desensitizing Toothpaste
Your first move is simple but incredibly powerful: switch your daily toothpaste. About two weeks before you plan to start whitening, make the swap to a toothpaste specifically made for sensitive teeth. This isn't just clever marketing; these toothpastes have active ingredients that make a real, tangible difference.
You’ll want to look for one of these key ingredients on the label:
- Potassium Nitrate: This stuff works by calming the nerves deep inside your teeth. It makes them way less likely to fire off those sharp pain signals when they're exposed to things like whitening agents.
- Stannous Fluoride: This is a fantastic multi-tasker. It gives you the classic cavity protection of fluoride, but it also creates a microscopic barrier over the tiny tubules in your dentin, physically blocking triggers from ever reaching the nerve.
Using this kind of toothpaste twice a day for a couple of weeks gives the active ingredients enough time to build up their protective effects. You're essentially turning down the volume on your teeth's sensitivity.
Reinforce Your Enamel with Remineralizing Agents
While a desensitizing toothpaste blocks pain signals, a remineralizing paste goes a step further by actively helping to repair your enamel. Think of it this way: your enamel is naturally porous, and whitening agents can temporarily make it even more so. Remineralizing products are like patching up tiny potholes before you start the journey.
These pastes are packed with minerals like calcium and phosphate—the literal building blocks of your tooth enamel. When you apply them, they help fill in microscopic weak spots, making your enamel denser and less permeable. For those looking for some great options, you can learn more about remineralizing products like MI Paste and see how they work to fortify teeth.
A strong, well-mineralized enamel surface is your best defense. It acts as a thicker, more robust shield between the whitening gel and the sensitive dentin layer underneath.
A common and effective routine is to use a remineralizing paste once a day, usually at night right after you brush. You just apply a small amount to your teeth and let it sit for a bit. This gives the minerals time to absorb and really strengthen your smile from the inside out.
Adjust Your Diet and Habits
What you eat and drink can either weaken or strengthen your enamel. In the weeks leading up to your whitening treatment, it’s a smart move to temporarily tweak your diet to give your teeth the best possible head start. The main goal here is to cut down on your exposure to acids, which are notorious for softening and eroding enamel.
Think about dialing back on these items for a couple of weeks:
- Acidic Drinks: Coffee, soda, wine, and citrus juices.
- Sugary Foods and Snacks: Sugar is what the acid-producing bacteria in your mouth love to feast on.
- Highly Acidic Foods: Tomatoes, citrus fruits, and anything with a vinegar-based dressing.
At the same time, switch to a soft-bristled toothbrush. Brushing too aggressively with hard bristles can lead to gum recession and enamel wear, both of which just make sensitivity worse. A gentle technique with a soft brush cleans perfectly well without causing unnecessary irritation to your teeth and gums. This isn't about giving up your favorite foods forever; it’s just a temporary strategy to create a solid, resilient foundation for a comfortable and successful whitening experience.
Choosing the Right At-Home Whitening Products
Standing in the dental care aisle can feel like a pop quiz you didn't study for, especially when you have sensitive teeth. Trying to find a whitening product that won’t leave you wincing is the main goal. It’s not about grabbing the strongest formula on the shelf; it's about making a smart choice for your teeth.
The secret is understanding the active ingredients. You'll almost always see two names pop up: carbamide peroxide and hydrogen peroxide. They both get the job done, but how they work makes all the difference for managing sensitivity.
Carbamide Peroxide vs. Hydrogen Peroxide
Hydrogen peroxide is the sprinter of the whitening world. It gets to work fast, releasing most of its whitening power within 30 to 60 minutes. This is why you see it in a lot of quick-fix strips and in-office treatments. But for sensitive teeth, that rapid-fire action can be way too intense, triggering those sharp "zings" of pain.
Carbamide peroxide, on the other hand, is more of a marathon runner. It's a much more stable compound that breaks down slowly, first into hydrogen peroxide and urea. It releases about 50% of its power in the first two hours and keeps working gently for up to six more hours. This slow-and-steady approach is way kinder to your teeth and is the go-to for anyone dealing with sensitivity.
To put it in perspective, a 10% carbamide peroxide gel is roughly as strong as a 3.5% hydrogen peroxide gel. That lower, slower release is often the key to whitening without the ouch.
Comparing Whitening Agents for Sensitive Teeth
To help you decode product labels, here's a quick comparison of the most common whitening agents, their ideal concentrations for sensitive users, and what they're best suited for.
| Whitening Agent | Recommended Concentration Range | How It Works | Best For |
|---|---|---|---|
| Carbamide Peroxide | 10% - 16% | Breaks down slowly over several hours, providing a gentle, sustained whitening action. | Users with moderate to high sensitivity; ideal for overnight or extended-wear trays. |
| Hydrogen Peroxide | 3% - 7.5% | Acts quickly, releasing its full whitening power within 30-60 minutes. | Quick, short-duration treatments; best for users with very mild or no sensitivity. |
| Phthalimidoperoxy-caproic Acid (PAP) | Varies by Brand | A non-peroxide agent that oxidizes stains without releasing free radicals, reducing sensitivity risk. | People looking for peroxide-free alternatives or those with extreme sensitivity. |
Choosing the right agent and concentration is the most critical step in ensuring your whitening journey is a comfortable one.
Why Concentration Matters Most
When you're looking at a product, that percentage on the box is your most important clue. For anyone with sensitive teeth, lower is always better. A higher concentration might sound like it’ll get you white teeth faster, but it also skyrockets your risk for sensitivity and gum irritation.
You have to resist the temptation to go for the highest percentage you can find. A lower concentration used consistently over a longer time will get you the exact same beautiful result, just without the painful side effects.
Think about it: it's far better to whiten gradually over two weeks with a gentle 10% to 16% carbamide peroxide gel than to force it in three days with a 35% gel that leaves you miserable. The destination is the same, but the journey will be a whole lot more pleasant. To get a full picture, it's worth exploring all the best teeth whitening options available, both professional and at-home.
Finding the Right Delivery System
The "how" is just as important as the "what." The way the whitening agent gets onto your teeth plays a huge part in keeping sensitivity at bay. You want to keep that gel on your tooth enamel and far away from your gums and any exposed root surfaces.
Here's a look at the most common methods:
- Custom-Fitted Trays: Honestly, these are the gold standard for at-home whitening, especially if you have sensitive teeth. Your dentist makes them from a mold of your mouth, so they fit perfectly. That snug fit means the gel stays exactly where it’s supposed to and doesn't ooze out onto your gums.
- Whitening Strips: Strips are super convenient, but they can be tricky. One-size-fits-all rarely fits anyone perfectly. This can lead to patchy results and allow the gel to seep onto sensitive gum tissue. If you go this route, look for strips made specifically for sensitive teeth—they usually have a lower peroxide level and a better no-slip grip.
- Whitening Pens and Brushes: These are fantastic for touch-ups or targeting a specific stained tooth. You have total control over where the gel goes, which is perfect for avoiding known sensitive spots.
For those with sensitivity, the best bet is often a professional at-home kit from a trusted dental brand like Opalescence or Zoom. There's a reason whitening gels hold a whopping 62% market share—they work. These systems use controlled levels of carbamide peroxide, like in PolaNight for overnight use, that whiten effectively without the overkill of many store-bought options.
By understanding the peroxide type, its concentration, and the application method, you can confidently pick a product that gets you the results you want without the pain. For a detailed breakdown of specific options, check out our guide to the best teeth whitening products.
The Smart Application Method for Minimal Sensitivity
You’ve picked a gentle product—fantastic. But the how is just as important as the what. Your application technique is your single best defense against sensitivity, ensuring the whitening gel works on your enamel without making your gums angry or overwhelming your teeth.
This is where you take full control of the process to put comfort first. By focusing on precision, timing, and recovery, you can head off sensitivity before it even starts. It’s all about working with your teeth, not against them.
This process flow maps out the key decisions for whitening sensitive teeth: choosing the right peroxide, picking the correct concentration, and using the best application method.
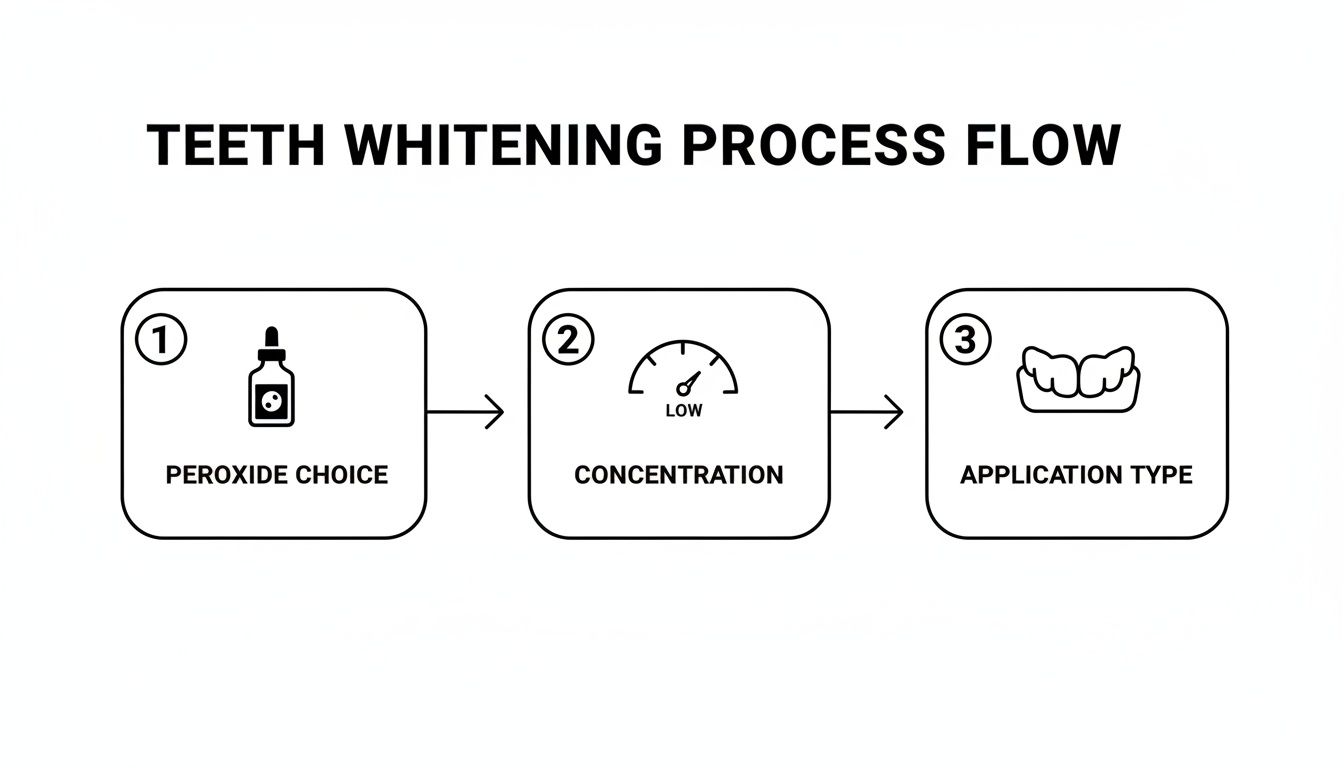
As you can see, a successful, low-sensitivity approach isn't about just one thing. It's about making smart choices at each step, from picking a gentle agent to using a controlled system like custom-fit trays.
Master the “Less Is More” Rule
One of the biggest mistakes I see people make is overloading their whitening trays. It’s a natural impulse—more gel must mean whiter teeth, faster, right? Wrong. For sensitive teeth, using too much gel is the quickest route to gum irritation and zingers.
The goal is to use just enough gel to coat the front surface of each tooth, without it oozing onto your gums. A tiny teardrop-sized dot of gel in the front part of each tooth impression is more than enough. Anything more will just get squeezed out onto your sensitive gum tissue.
Remember, the whitening gel only works when it's in direct contact with your enamel. Any excess that spills onto your gums does nothing to whiten your teeth but can cause significant chemical burns and discomfort.
This careful placement keeps the active ingredients exactly where you want them and away from the more vulnerable parts of your mouth.
Implement the Short Session Strategy
Another key to avoiding sensitivity is to ease your teeth into the whitening process. Instead of jumping straight to the maximum recommended wear time, start with much shorter sessions. This gives your teeth time to adapt to the peroxide.
For your first few applications, try wearing the trays for just 15–30 minutes. That's often enough to see how your teeth are going to react. If you get through a couple of short sessions with little to no sensitivity, you can slowly start increasing the duration.
Here’s a sample schedule you could follow:
- Sessions 1-2: Wear the trays for 15 minutes.
- Sessions 3-4: Increase to 30 minutes.
- Sessions 5-6: Try for 45 minutes.
- Subsequent Sessions: Gradually work your way up to the full time recommended by the product.
This slow ramp-up puts you in complete control. If you feel any twinges, you can just stick with the shorter time or even take an extra day off.
Give Your Teeth Time to Recover
Your teeth need breaks. Whitening every single day can be too much for sensitive teeth, as it doesn't give them enough time to rehydrate and remineralize between sessions. A much more comfortable—and just as effective—strategy is to whiten on alternating days.
By whitening every other day, you give your teeth a full 24-hour recovery period. On your off days, keep using your desensitizing toothpaste to calm the nerves and strengthen your enamel. This simple schedule change can make a world of difference in your comfort.
You'll still get brilliant results; it will just happen over a slightly longer timeframe. Your teeth will thank you for it.
Pro Tips for Maximum Comfort
Beyond those core strategies, a few extra tricks can further protect your mouth and even improve your results.
First, always make sure your teeth are completely dry before putting in the trays. Gently pat the front of your teeth with a clean tissue. A dry surface helps the gel adhere better and work more efficiently, stopping it from mixing with saliva and spreading where it shouldn't.
Next, try applying a thin layer of vitamin E oil or petroleum jelly to your gums with a Q-tip right before you pop in the trays. This creates a protective barrier, shielding your gums from any gel that might seep out and dramatically cutting down the risk of irritation.
The huge demand for whiter teeth has led to a flood of products, but smart choices are what separate a great experience from a painful one. Health-conscious consumers are learning to stick with vetted products that offer clear support and instructions. Following your treatment with a remineralizing product helps restore essential minerals that can get depleted during whitening. You can explore more about teeth whitening market trends in this detailed industry analysis from Grand View Research.
Maintaining Your Bright Smile After Whitening
You’ve done the work, followed the steps, and now your smile is noticeably brighter—congratulations! The focus now shifts to making those fantastic results last, all while keeping sensitivity from making an unwelcome return. Smart post-whitening care is really the key to maintaining your new shade comfortably.
The hours and days right after a whitening session are the most critical. Think of your tooth enamel as being slightly more porous right after treatment, which makes it extra susceptible to both sensitivity triggers and new stains. A gentle, protective approach during this window is what sets you up for long-term success.
Your Immediate Aftercare Plan
The moment you finish your whitening session, your maintenance routine begins. First things first: rinse your mouth thoroughly with lukewarm water. This gets rid of any residual gel that could continue to irritate your gums or teeth.
Next, it’s a great idea to apply a soothing agent to calm your teeth and help reinforce your enamel. A remineralizing gel or paste containing ingredients like calcium, phosphate, and fluoride is perfect for this. Applying a small amount and letting it sit on your teeth for a few minutes can seriously cut down on post-whitening discomfort and help your enamel recover faster.
This immediate soothing step is more than just for comfort. It actively helps replenish minerals that may have been temporarily depleted during the whitening process, making your teeth stronger and less prone to sensitivity down the line.
The 48-Hour “White Diet”
For the first 48 hours after whitening, your teeth are like sponges, ready to soak up any pigments from foods and drinks. To protect your investment and prevent new stains from setting in, it’s best to stick to a "white diet."
This just means avoiding foods and drinks that have strong, dark colors. It’s a temporary adjustment, but it can make a huge difference in how long your results last.
Foods and Drinks to Avoid:
- Coffee and black tea
- Red wine and dark sodas
- Berries, ketchup, and soy sauce
- Dark chocolate and tomato-based sauces
Instead, focus on light-colored options like plain chicken, rice, bananas, and yogurt. If you absolutely can't skip your coffee, drinking it through a straw can help minimize contact with your freshly whitened teeth.
Long-Term Maintenance Strategies
Once you’re past that initial 48-hour window, you can shift to a sustainable maintenance plan. This is all about weaving simple habits into your daily routine that keep your smile bright without needing to repeat the full whitening process too often.
One of the best strategies is to switch to a gentle whitening toothpaste for daily use. Look for one that also has desensitizing ingredients like potassium nitrate or stannous fluoride. This combo helps polish away new surface stains while actively protecting against sensitivity. If you're looking for guidance on what to do when sensitivity does flare up, our article on how to reduce tooth sensitivity after whitening offers more in-depth solutions.
Planning for Touch-Up Sessions
Even with perfect care, your teeth will naturally start to dull a bit over time. The good news is you won't need to do a full whitening course all over again. A quick touch-up session is usually all it takes to bring back that brightness.
Depending on your diet and habits, you might plan for a touch-up every 3 to 6 months. This usually just means one or two short whitening sessions—maybe wearing your trays for 30 minutes on back-to-back nights. These brief applications are far less likely to trigger sensitivity than a full, week-long treatment.
By finding this simple rhythm of daily care and occasional, brief touch-ups, you can easily maintain a bright, comfortable smile for the long haul. It turns whitening from a one-time event into a sustainable part of your oral health routine.
Common Questions About Whitening Sensitive Teeth
Even with a solid game plan, you're bound to have some questions. When you're trying to whiten sensitive teeth, the last thing you want is uncertainty. Let's walk through some of the most common concerns people have so you can feel confident you're whitening safely and effectively.
Can I Whiten My Teeth if I Have Receding Gums?
Yes, you can, but you have to be extra careful. When your gums recede, they expose the tooth roots. This part of your tooth is covered by a layer called cementum, which isn't nearly as tough as the enamel protecting the crown of your tooth. It's way more sensitive and simply not meant to be bleached.
The best approach here is to use a perfectly fitted custom whitening tray. This ensures the gel stays on your teeth and doesn't ooze onto the exposed root surfaces. As an extra precaution, you can apply a protective barrier, like a thin layer of vitamin E oil, right along the gumline before putting your trays in. Always start with very short sessions, and absolutely check with your dentist first. They can tell you how severe the recession is and give you the safest protocol.
How Long Should I Wait Between Whitening Sessions?
If you start feeling that familiar zing of sensitivity, that's your teeth telling you they need a break. Listen to them. The right move is to stop whitening for at least 24 to 48 hours. This pause gives your teeth time to rehydrate and for the nerves to settle down.
During that break, keep using your desensitizing toothpaste to help calm things down. When you're ready to start again, just cut your previous wear time in half. So, if you were whitening for 30 minutes, drop back to 15. Many people with sensitive teeth find an alternating-day schedule—whitening every other day—is the most comfortable way to go. You’ll get the same fantastic results, just on a timeline that works for you.
Taking a day or two off isn’t a setback; it’s a smart part of the process. Listening to your body is the most important rule when managing sensitivity during any cosmetic treatment.
Are Natural Whiteners Like Charcoal Safer?
Just because something is labeled "natural" doesn't automatically make it safer, especially for sensitive teeth. While options like activated charcoal and baking soda scrubs don't have peroxide, they have a different problem: they're highly abrasive. They work by physically scrubbing away surface stains, but that same scrubbing action can also wear down your precious enamel.
Over time, this gradual erosion thins the protective layer of your teeth, which can actually lead to more sensitivity down the road. A professionally formulated, low-concentration peroxide gel is generally a much safer and more effective way to lift stains from within the tooth without causing that kind of mechanical damage to the surface.
When Should I See a Dentist Before Whitening?
Think of a dental check-up as a non-negotiable first step, particularly if you have any existing dental issues. Whitening agents can cause some serious pain or even damage if they seep into an untreated cavity, a cracked filling, or an area with active gum disease.
You should absolutely schedule a visit if:
- You have severe sensitivity before you even start.
- You know you have cavities, cracked teeth, or leaky fillings.
- Your gums are bleeding, swollen, or tender to the touch.
Your dentist can figure out the root cause of your sensitivity and make sure your mouth is healthy enough for whitening. They can also provide a personalized, safe plan, which might involve in-office treatments or prescription-strength products designed to manage sensitivity from the very beginning.
At DentalHealth.com, we simplify access to professional-grade dental products recommended by dentists. Find gentle yet effective whitening gels, desensitizing toothpastes, and remineralizing pastes to support your journey to a brighter, more comfortable smile. Explore our curated selection at https://dentalhealth.com and get started today.