
Oral Care Whitening That Works Without the Risks
The moment usually feels small. A coffee mug sits by the sink, a phone photo catches your smile under harsh light, or a wedding invite lands on the calendar and suddenly the teeth that looked fine last month seem a little dull.
That reaction makes sense, but oral care whitening works best when it starts before any bleach touches the teeth. Daily brushing, flossing, and checkups shape how clean, even, and stain-free your smile can look, and they help you avoid whitening over decay, gum inflammation, or restorations that won't change color at all. The World Health Organization estimated that about 3.5 billion people, or roughly 45% of the world's population, were affected by oral diseases in its 2022 report, and untreated dental caries was the most common condition, affecting about 2.5 billion people WHO oral health report.
Why Whitening Starts With Everyday Oral Care
A smile can look dull for different reasons. Coffee, tea, red wine, and tobacco stain the surface, while plaque and tartar can leave teeth looking yellowed before whitening even enters the picture. Decay and gum disease can change the appearance of the whole mouth, so a healthy baseline matters before any bleaching product goes on the teeth.
The smile you see is built on the care you do every day
A patient may want a brighter smile for a big event, but the first issue is often buildup, not shade. Brushing clears fresh surface film, flossing removes plaque from the spaces between teeth, and a professional exam can catch problems that whitening will not fix. Daily care gives whitening a cleaner starting point.
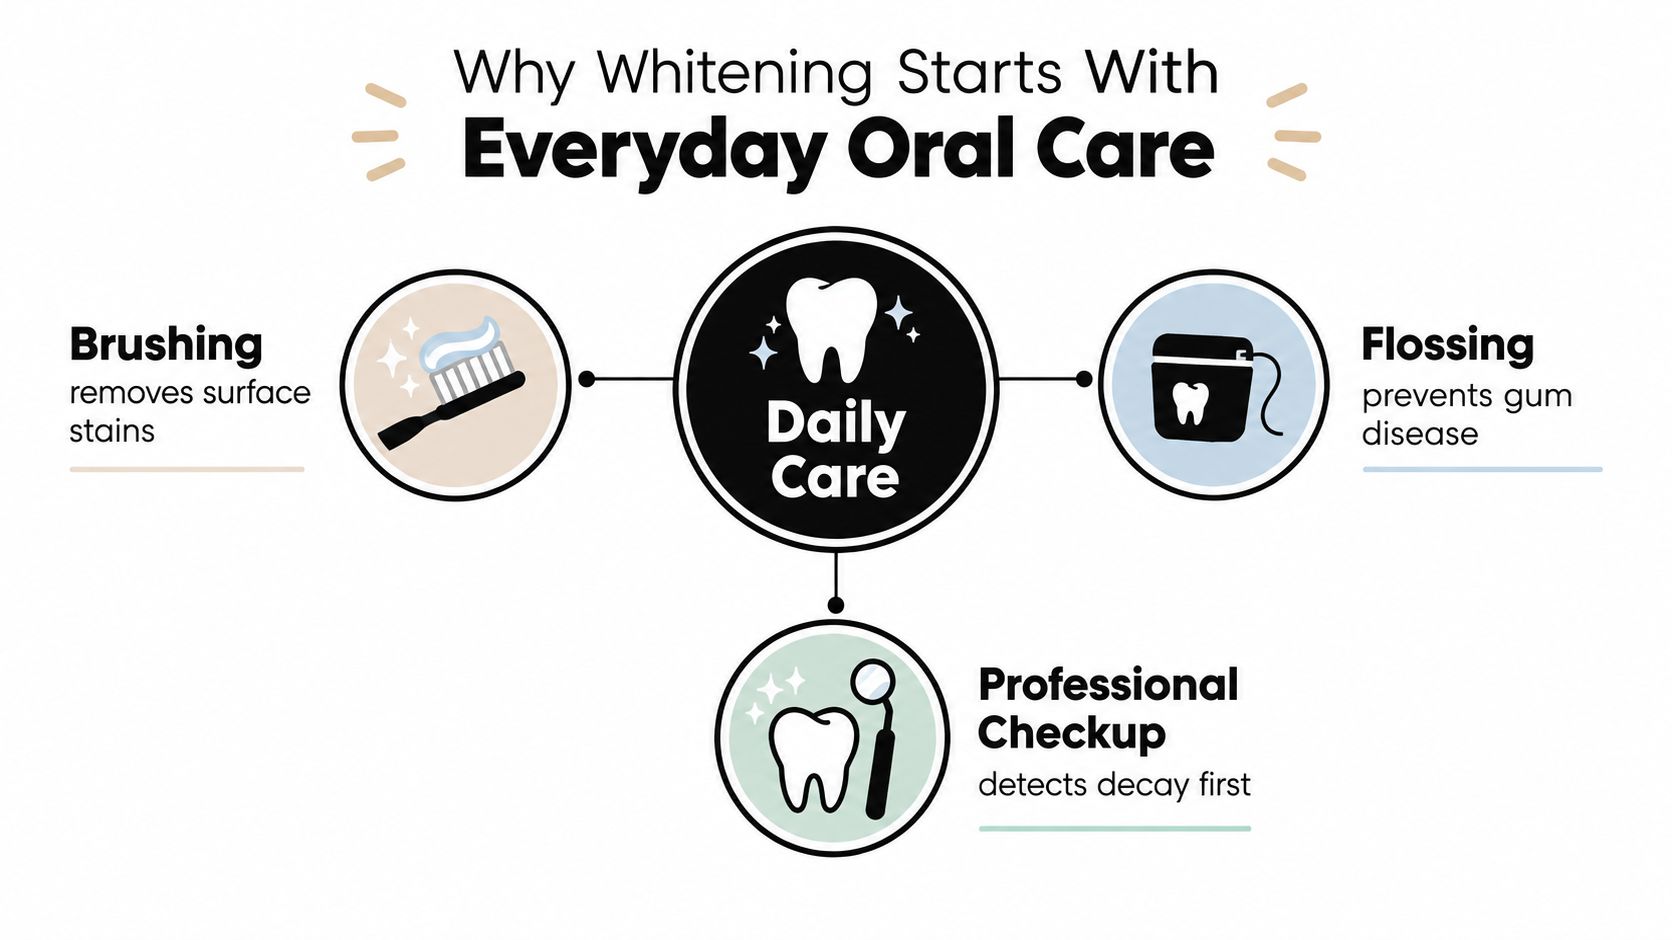
Whitening changes color, but it does not make plaque disappear, it does not treat active decay, and it does not make gum disease go away. It also sits inside a much bigger picture of preventive care, which is why a brighter smile starts with the condition of the teeth and gums, not the strength of the whitening product alone.
Restorations can turn whitening into a mismatch
Crowns, veneers, fillings, and similar restorations do not reliably bleach with natural tooth structure. A person can brighten the surrounding enamel and still end up with a visible color gap between natural teeth and dental work. That is why cosmetic whitening should be planned with the mouth as a whole in mind.
How to prevent tooth discoloration is a useful companion topic because stain prevention and whitening work together. Clean, healthy tooth surfaces make it easier to tell whether you are seeing stain removal, true bleaching, or a problem that needs a dentist first.
Practical rule: if your teeth look dull and your gums bleed when you floss, fix the oral health issue first. Whitening over inflammation only makes the result harder to judge.
How Whitening Changes Tooth Color
Whitening is chemistry, not surface cleaning. Most modern systems use hydrogen peroxide or carbamide peroxide, and both work by entering the tooth and changing the molecules that make stains look darker. The product does more than remove buildup, it changes color within the tooth itself.
Peroxide has to reach the stain to change it
Hydrogen peroxide is the direct bleaching agent. Carbamide peroxide breaks down into hydrogen peroxide and urea, so it releases the active ingredient more slowly and is often used in tray-based at-home systems. That slower release is one reason the label percentage alone can be misleading.
A practical example makes the point clearer. 10% carbamide peroxide is roughly equivalent to 3.3% hydrogen peroxide, because about one-third of the carbamide-peroxide concentration corresponds to hydrogen peroxide concentration split-mouth clinical trial. A lower label percentage can still do meaningful work if the wear time and repeated exposure are set up well.
Natural tooth color and dental materials are not the same target
Whitening changes natural tooth structure, not the shade of every material in the mouth. Crowns, veneers, fillings, and sealants can stay the same color while the surrounding teeth brighten, which is why planning matters before you start. If one tooth suddenly looks different after whitening, that often explains it.
A recent umbrella review found that in-office protocols using about 25% to 35% hydrogen peroxide can produce whitening outcomes comparable to higher concentrations while reducing tooth sensitivity umbrella review. That does not make every product equal, because exposure time, fit, enamel condition, and sensitivity all affect the result. It does show that stronger does not automatically mean better.
Whitening works through chemistry plus time. If the active ingredient cannot reach the tooth structure in a controlled way, the number on the box matters far less than the way the product is used.
At-Home Whitening vs Professional Whitening Options
Shoppers usually compare whitening by the wrong yardstick. They ask which option is strongest, when the better question is which one fits their sensitivity level, schedule, and tolerance for supervision. The right choice depends on how much control you want over contact time and whether you're dealing with sensitivity, restorations, or a deadline.
The line between at-home and professional care isn't just “cheap vs expensive.” It's also “more self-directed vs more monitored.” A dentist-supervised plan can help with tray fit, shade goals, and sensitivity management, while at-home products trade some oversight for convenience.
| Option | Active Peroxide | Typical Concentration | Time to Visible Results | Supervision | Relative Cost |
|---|---|---|---|---|---|
| OTC strips | Usually hydrogen peroxide | Lower than professional gels | Gradual | Minimal | Lower |
| Tray gels | Hydrogen peroxide or carbamide peroxide | Varies by brand and prescription status | Gradual to moderate | Can be self-directed or dentist-guided | Low to moderate |
| High-strength home gel | Carbamide peroxide | Higher professional-grade home formulas, such as PolaDay CP 35% | Often faster than low-strength home options | Usually dentist-directed | Moderate |
| In-office whitening | Hydrogen peroxide | Higher chairside protocols | Fastest initial change | Direct supervision | Higher |
The table is only a starting point. A high-concentration at-home gel can sit between ordinary strips and in-office care, and that middle ground is useful for people who want stronger bleaching without chairside treatment. DentalHealth.com offers at-home whitening products, including PolaDay CP 35% carbamide-peroxide syringes, plus tray-based options such as boil-and-bite whitening trays and guided-light systems, so the category itself already spans several comfort levels and supervision styles.
What matters more than the label
A strong product can still be the wrong product if your teeth are already sensitive or if your restorations will not whiten. A slower, well-fitting tray system may be the better option for someone who values control, while a chairside appointment may suit a person who wants a dentist to manage exposure and monitor comfort. If you want a broader product comparison, at-home teeth whitening vs professional gives a useful retail-facing overview.
The point isn't to pick the most aggressive option. The point is to choose the smallest effective dose, then give it enough time and consistency to work.
A Safe Step-by-Step Whitening Routine at Home
Home whitening goes wrong when people improvise. They wear trays too long, load too much gel, or start bleaching over a tooth that already hurts. A safer routine is slower, more deliberate, and much less dramatic than marketing copy makes it sound.
Start with the mouth, not the package
Before you open a whitening syringe or strip, check for the things whitening can aggravate: active sensitivity, a broken filling, a rough crown edge, bleeding gums, gum recession, or a tooth that reacts to cold. If any of that is present, it's better to sort out the issue first. Whitening over a problem tooth usually creates more discomfort than color change.
Then match the product to the format. A tray gel needs a tray that fits snugly. A strip needs full contact with the tooth surface. If the material pools against the gums, you've just traded a cleaner looking smile for irritated tissue.
Keep the wear time honest
Use the labeled wear time and stop there. Longer sessions don't reliably produce a better endpoint, and they often bring more sensitivity instead. Track shade under the same lighting each time, because bathroom mirrors and mobile phone flash can make you think you're seeing progress or failure when the difference is just light.
When sensitivity starts, don't “push through” by wearing the tray longer the next night. Shorter exposure, fewer sessions, or a lower-strength product usually makes more sense than trying to force the result.
A visual guide can help if you're comparing products or learning to fit a tray, and the routine below pairs well with that kind of demonstration.
If the gums sting, the tray may fit poorly. If the teeth ache afterward, the exposure may be too long. Either way, more time isn't the fix.
For people who like structure, a simple sequence helps:
- Check first: make sure there's no untreated decay, active gum trouble, or unexplained pain.
- Fit carefully: seat the tray so the gel stays on the tooth, not the gum.
- Use the label: follow the exact wear time, not a guess.
- Record changes: compare shade in the same light, at the same time of day.
- Pause if needed: sharp or lingering pain means stop and reassess.
Strength vs Comfort in Whitening Concentration
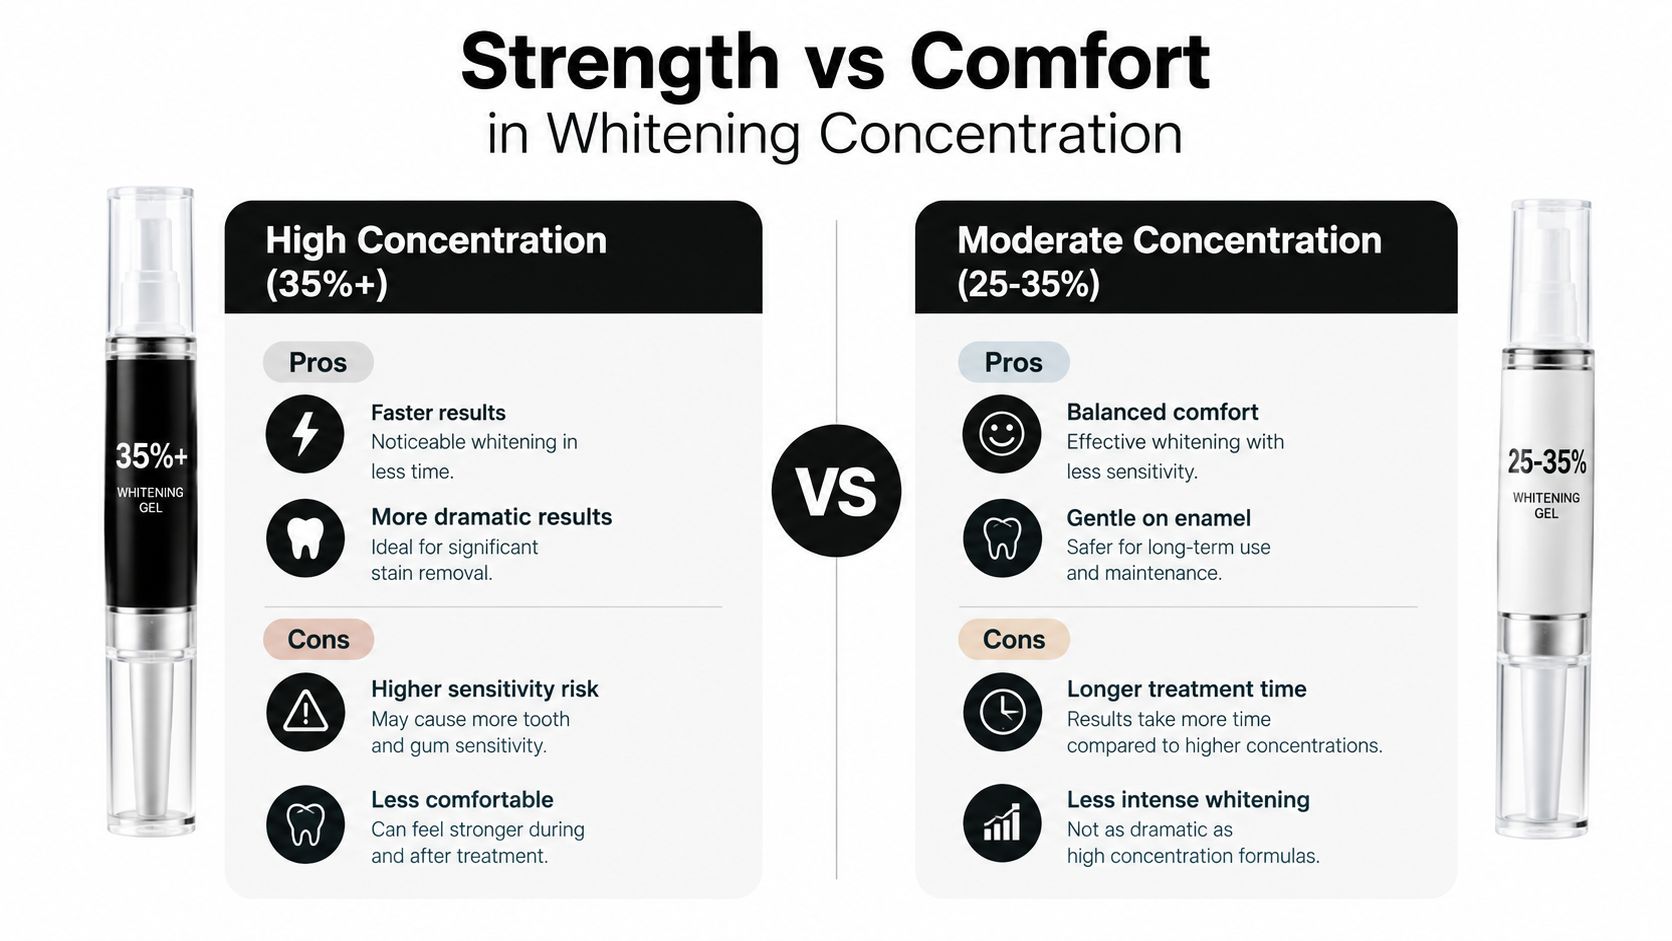
A lot of whitening advice treats a higher concentration as the automatic winner. In practice, the actual choice is between a stronger-feeling routine and a more comfortable one that still reaches the shade you want.
Moderate protocols can hold their own
As noted earlier, the umbrella review found that 25% to 35% hydrogen peroxide in-office protocols can produce results comparable to higher concentrations while causing less sensitivity. A randomized split-mouth trial also found that 10% carbamide peroxide tray bleaching matched 35% hydrogen peroxide in-office treatment, with or without light activation.
That does not make every lower-strength product equal to every stronger one. Contact time, repeated exposure, and tray fit can make a moderate protocol work well, so the “strongest” label is not a reliable shortcut when you are choosing between options.
Light claims deserve skepticism
Consumer kits often suggest that LED, halogen, or laser activation will improve the result. The evidence does not support treating light as a universal upgrade, and for some people it adds more irritation without a clear payoff. The better question is simple, does the activation method change the final shade in a meaningful way, or does it only make the routine more complicated?
The ADA reports that sensitivity and gingival inflammation are the most common adverse effects of whitening, with sensitivity affecting up to two-thirds of users early in bleaching and usually resolving by the fourth day ADA whitening guidance. That keeps the focus where it belongs, on choosing a concentration and wear pattern that balance whitening results with enamel comfort and gum health.
Managing and Preventing Whitening Sensitivity
A whitening routine can start to feel uncomfortable long before the shade changes much. A mild twinge is a signal to slow the protocol, not a reason to push through harder. Whitening works better when you treat comfort as part of the plan from the start.
Build the comfort plan before you start
If your teeth already react to cold air or cold drinks, start with a fluoride toothpaste that contains potassium nitrate before you begin whitening. It can help calm sensitive teeth over time. MI Paste Plus is another option some people use to support remineralization during whitening, especially when enamel feels taxed. Use a soft brush, keep pressure light, and avoid very acidic drinks while the whitening cycle is active.
Shorter sessions and lower-concentration products usually make more sense than trying to outlast soreness. A desensitizing gel can also help. The main rule is simple, if the pain is sharp or it lingers, stop and reset the routine.
Practical rule: mild, short-lived sensitivity can happen. Pain that changes how you chew, sleep, or drink needs a pause, not more wear time.
That supports a conservative response. If your comfort drops, adjust the protocol rather than trying to outlast the reaction.
How to reduce teeth sensitivity after whitening is a practical next read if you want product-level ideas for making the routine easier to tolerate.
What to do when sensitivity appears anyway
- Shorten the wear time: less contact can reduce irritation while still letting the whitening continue.
- Switch formulas: moving to a lower concentration may keep progress steady with less discomfort.
- Use desensitizing products: potassium nitrate and fluoride are common comfort supports.
- Pause when needed: sharp pain is a reason to stop, not a sign of better whitening.
A Pre-Whitening Checklist for Safer Bleaching
A lot of whitening disappointment starts with one missed detail. A filling edge, a hidden cavity, or a recessed gum line can make the whole process feel uneven or uncomfortable. A pre-whitening checklist keeps the cosmetic goal tied to the health of the teeth underneath it.
What to confirm before you bleach
Make sure untreated decay, active gum disease, gum recession, cracked enamel, and leaking restorations have been checked. Note any crowns, veneers, fillings, or sealants, because peroxide won't reliably change their color. If you're pregnant, nursing, or considering whitening for an adolescent, professional guidance matters more than brand choice.
That also means separating stain removal from true bleaching. Daily brushing, flossing, and professional cleanings help keep new stains from building up, while bleaching is the step that changes the tooth's internal color. Fluoride and remineralization support belong in the routine too, because enamel health affects how comfortable whitening feels and how stable the result looks over time.
| Check before whitening | Why it matters |
|---|---|
| Untreated decay | Whitening can irritate a damaged tooth |
| Gum recession | Exposed areas may be more sensitive |
| Restorations | They may not change color |
| Active sensitivity | It can worsen during bleaching |
| Pregnancy, lactation, adolescence | These situations call for professional input |
When to Bring a Dentist Into Your Whitening Plan
The smartest whitening step is often the least exciting one, a dental visit. A dentist can tell you whether the discoloration is surface stain, deep internal color change, or something whitening won't touch at all. That saves you from chasing a cosmetic fix that can't solve the underlying issue.
This matters even more if you already have sensitivity, visible restorations, gum recession, recent dental work, cracked teeth, or a history of acid erosion. It also matters if you're comparing a home tray, a stronger gel, or an in-office option, because professional input can help set a realistic shade target and a safer exposure plan. For people dealing with airway devices or nighttime oral appliances, a find a dental sleep medicine provider resource can also be useful when whitening plans overlap with bite guards, mouth guards, or other dental appliances that affect fit.
A dentist visit isn't an upsell. It's a planning session that can keep a whitening purchase from becoming a repair appointment later.
If you want product guidance that respects both shade goals and sensitivity, DentalHealth.com carries professional-grade at-home whitening options, sensitivity toothpaste, remineralizing support, and tray-based systems that fit different comfort levels. Visit DentalHealth.com to compare whitening gels and oral-care products with a more practical eye toward enamel care, restorations, and safer use.