
How to Use Teeth Whitening Gel for Blue Light
A brighter mouthpiece is the wrong place to start. Blue light can change how teeth look right after a session, but it does not prove the shade will hold better than peroxide gel alone, and clinical comparisons have seen early light advantages fade once the color settles.
When you choose teeth whitening gel for blue light, read the syringe before the lamp: peroxide type and strength, minutes per session, and whether the tray keeps gel on enamel instead of gums. Blue LED, violet LED, and heat-lamp kits are different setups, so match the gel directions to the device you own.
A lamp can be part of the system. It cannot rescue a weak gel, a loose tray, or a schedule built for a different light.
What Blue Light Does to Whitening Gel
Judge the settled shade, not just the first look. Blue light doesn't bleach stains by itself, and a dramatic immediate result doesn't establish a lasting advantage over the same peroxide gel without a lamp.
The randomized clinical trial published in 2010 divided 40 adults into four groups of 10, all treated with 35% hydrogen peroxide; the blue BriteSmile group had the strongest immediate color change, but no significant difference remained among treatments after one month. Immediate sensitivity was lowest with peroxide alone and highest with BriteSmile, although it was mild and temporary.
That distinction matters when a product page shows a photograph taken immediately after treatment. The photograph may show a genuine change, but it doesn't tell you whether adding light improved the durable result.
Trial results that separate the lamp from the gel
The protocols below aren't interchangeable home-use instructions. They compare particular gels and devices under study conditions, including professional-strength peroxide.
| Protocol | Light | Result |
|---|---|---|
| 35% hydrogen peroxide, 10 of 40 adults | No light | No shade difference among treatments at one month; lowest immediate sensitivity |
| 35% hydrogen peroxide | Blue BriteSmile | Strongest immediate color change; advantage gone at one month; highest immediate sensitivity, mild and temporary |
| 35% hydrogen peroxide | QuickSmile LED | No lasting lead over peroxide alone at one month |
| 35% hydrogen peroxide | Zoom2 metal-halide | No lasting lead over peroxide alone at one month |
| 6% hydrogen peroxide | Blue LED | Less whitening than the 35% control; lower sensitivity |
| 6% hydrogen peroxide | Violet LED | Whitening comparable to the 35% control; lower sensitivity |
| 6% hydrogen peroxide with nitrogen-doped titanium dioxide | Blue LED, three 16-minute cycles | Less whitening than 35% peroxide; less sensitivity, not proof of less gum irritation |
An umbrella review of light-activated bleaching found no consistent final-whitening advantage from light or laser activation, and its clinical evidence distinguishes 6% hydrogen peroxide with blue LED, which was less effective than the 35% control, from the comparable result obtained with violet LED. The specialized nanoparticle protocol in the final row also needs its own interpretation, rather than being treated as a recipe for an ordinary refill syringe.
Different lights deserve different expectations
Blue LED, violet LED, and metal-halide lamps are different technologies. A favorable outcome with one wavelength and formula doesn't establish that another mouthpiece will perform the same way.
For context on a professional whitening appointment, The Dental Retreat Zoom whitening guide is a useful companion when comparing office treatment with a home kit. Don't assume a home device reproduces a professional protocol because both use a light.
Sensitivity also needs a balanced reading. A 2021 systematic review in Operative Dentistry found no evidence that light activation changed the risk or intensity of sensitivity in the in-office studies it assessed, so the discomfort pattern from an individual trial shouldn't become a universal claim about every LED.
Buying rule: Pay for a clearly described gel-and-device protocol, not an assumption that blue light must make any gel work better.
Checks Before You Pair Gel With a Blue Light
| Check | Pass standard | Fail or caution |
|---|---|---|
| Peroxide named | Hydrogen peroxide or carbamide peroxide with a printed percentage | Blue-light claim and no percentage |
| Wavelength | Blue wavelength disclosed, with violet identified separately | Generic LED description with no wavelength |
| Cycle length | Minutes per cycle and maximum cycles stated | Instructions to continue until the shade looks right |
| Formula match | Gel explicitly compatible with the device, including any photocatalyst | Ordinary tray gel forced into an LED mouthpiece |
| Fit and spill | Gel contacts enamel without reaching the gums | Gel leaks onto gums or pools around one tooth |
| Dental status | Teeth and gums assessed as suitable for whitening | Pain, inflamed gums, untreated decay, cracks, leaking fillings, or exposed roots requiring assessment |
Read the syringe before the device description
The active ingredient should be easy to identify. Hydrogen peroxide and carbamide peroxide aren't interchangeable percentage labels, so don't compare syringes by the printed number alone.
If the packaging lists flavors, lights, and accessories but hides the bleaching ingredient or concentration, pause the purchase. Our guide to whitening gel ingredients can help you distinguish the active bleach from ingredients used for texture, stability, or comfort.
The device instructions should be equally specific. Look for the wavelength, exposure setting, and compatible gel, not just a photograph of a blue glow.
A timer helps only when it corresponds to the intended formula. A device that switches off automatically doesn't make an unrelated gel appropriate for that exposure.
Treat a specialized formula as a complete recipe
In the clinical study of a nanoparticle-containing whitening gel, 6% hydrogen peroxide with nitrogen-doped titanium dioxide was used in three consecutive 16-minute cycles, and blue LED produced less whitening than the 35% hydrogen-peroxide control, while the lower-concentration groups were less likely to cause sensitivity. Those details describe a studied combination, not a general home-whitening schedule.
Photocatalytic ingredients are included to interact with a particular light protocol. Their presence doesn't give you permission to substitute another lamp, add cycles, or use professional concentrations at home.
Check compatibility in both directions:
- Gel instructions: Confirm that the formula is intended for your device, rather than merely described as whitening gel.
- Device instructions: Confirm which gels and application methods the mouthpiece accepts.
- Refill information: Match the replacement syringe to the original system instead of choosing by appearance or syringe size.
A label saying suitable for LED use is less informative than explicit compatibility with the mouthpiece you own. If the instructions conflict, don't improvise.
Fit is the final practical test. Seat the empty mouthpiece first and check whether you can hold it comfortably without biting hard or pushing it into the gumline.
A kit is ready only when its ingredient, device specifications, cycle limits, formula compatibility, fit, and your dental condition all check out. A missing answer is a reason to delay, not a reason to estimate.
How Peroxide Oxidizes Stains With or Without Light
Say your teeth have gradually darkened while coffee and tea remain part of your routine. Brushing removes plaque and some surface staining, but bleaching targets colored molecules within natural tooth structure.
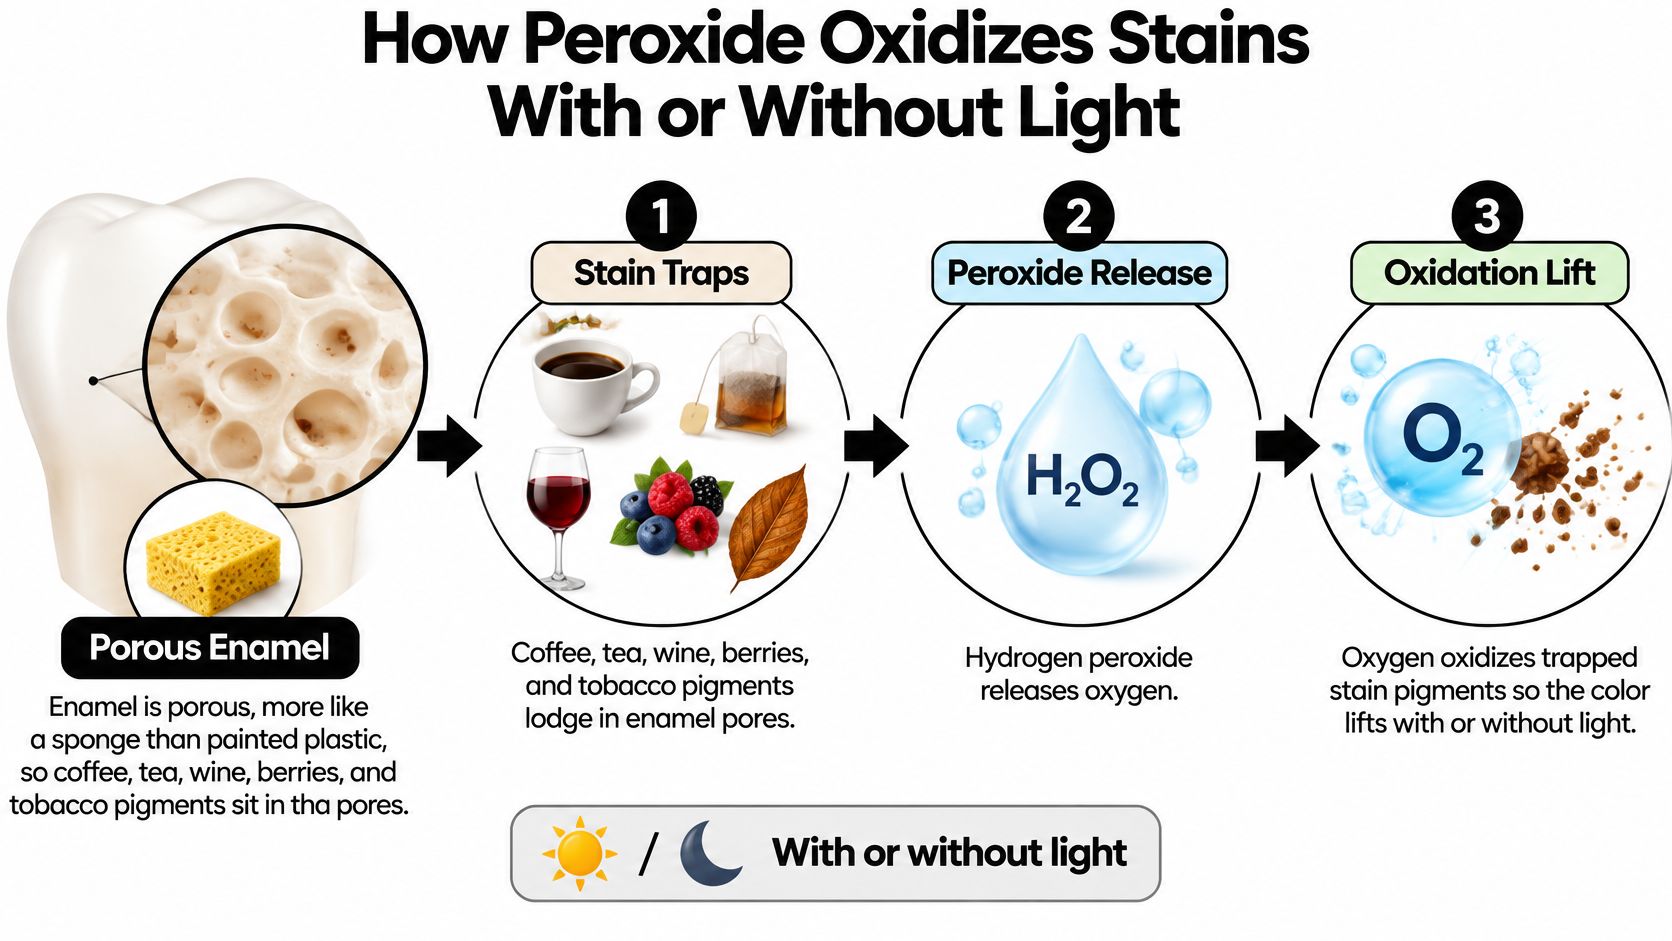
Think of enamel as more like a mineral sponge than painted plastic. That's an analogy for its microscopic permeability, not a claim that teeth contain large open holes or that whitening mechanically opens and closes them.
The illustration follows the route from stain pigments to chemical bleaching.
The gel changes the stain molecules
Hydrogen peroxide is the bleaching agent. Its reactive breakdown products oxidize colored molecules, changing the chemical structures responsible for their visible color.
The useful idea is chemical change, not scrubbing. Adding more gel doesn't polish more stain away, and a stronger glow doesn't substitute for bleaching chemistry.
Carbamide peroxide releases hydrogen peroxide more gradually. It can suit a longer tray-wear protocol, but it isn't a blue-light ingredient and shouldn't be assigned an LED schedule by guesswork.
For a closer look at the active ingredient, our explanation of teeth whitening gel with hydrogen peroxide helps connect the label to the bleaching process.
What illumination can change
The clinical evidence on peroxide and LED activation concerns systems using visible blue light near 480–520 nanometers, but the gel remains the primary bleaching agent. Illumination may accelerate peroxide decomposition or warm the gel and tooth, depending on the system.
Faster chemical activity isn't automatically a better clinical result. A formula also needs suitable contact with the tooth and an exposure schedule that balances bleaching with comfort.
The lamp may hurry parts of the chemistry, but it can't replace the peroxide or justify an improvised exposure time.
In the coffee-drinker example, the practical goal isn't the strongest reaction you can create. It's controlled stain oxidation using a formulation and schedule intended to work together.
Nor should you interpret a mild sensation as evidence that the gel is working. Pain isn't a measure of bleaching effectiveness, and no discomfort is required for a useful result.
How to Run a Blue Light Whitening Session
Set out the gel, compatible mouthpiece, timer, tissues, and instructions before you begin. You shouldn't need to search for the stop button while gel is touching your teeth.
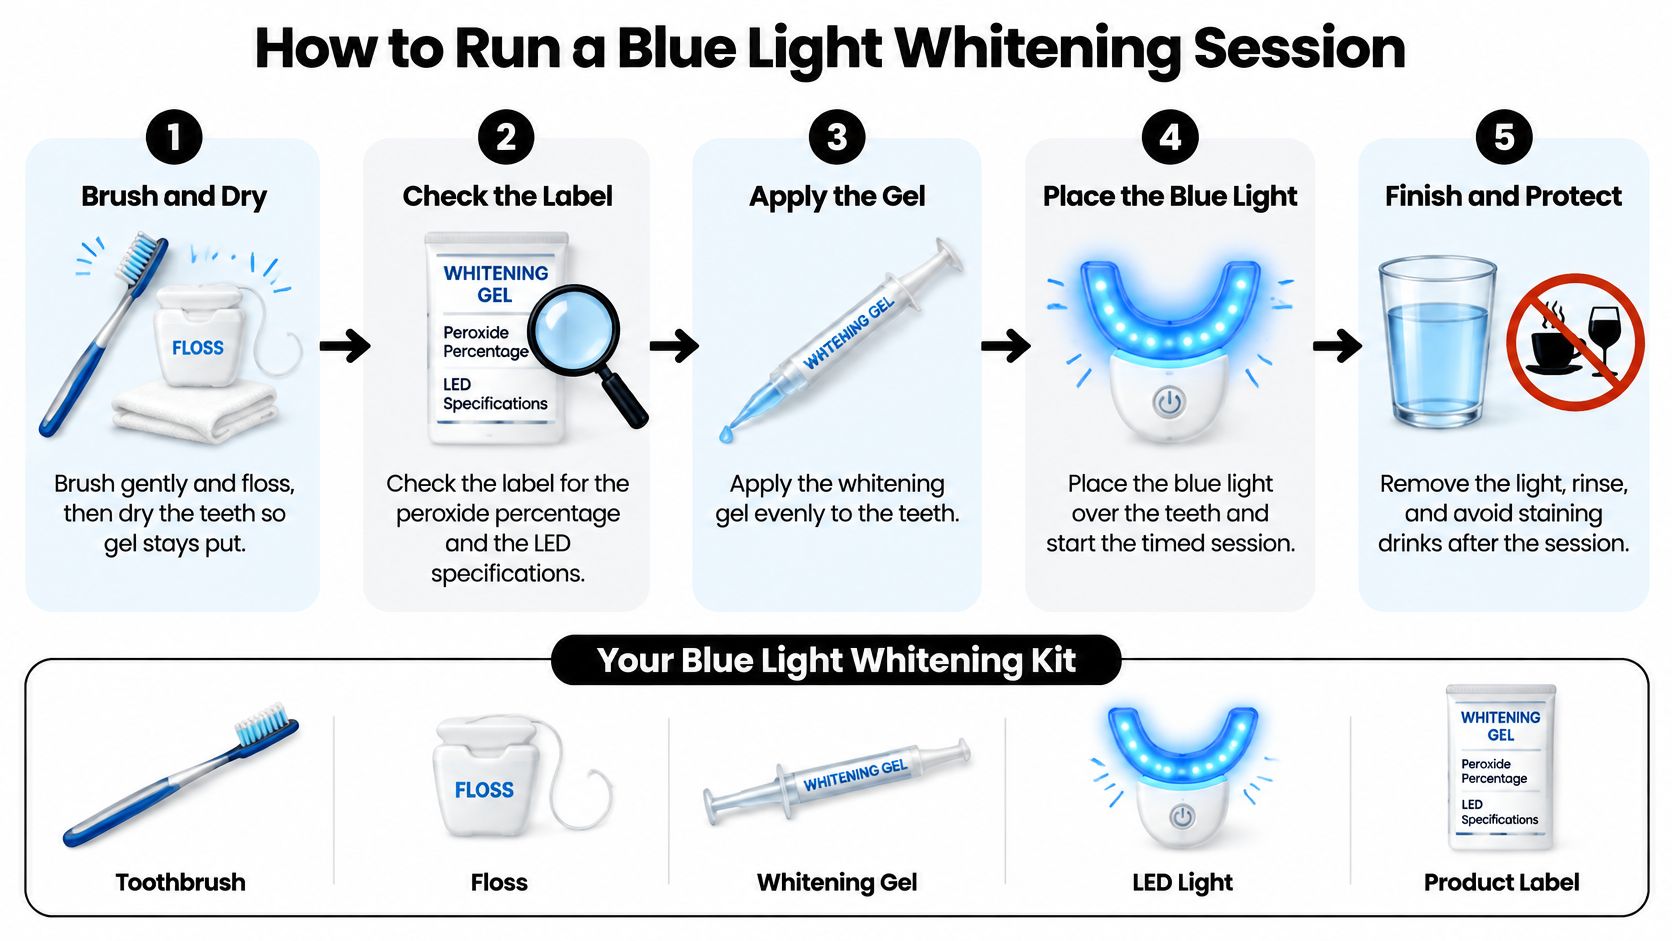
The visual below shows the overall sequence; the written steps add the handling details that help prevent spills and unnecessary exposure.
Prepare and apply without overfilling
- Clean gently, then prepare the tooth surfaces. Brush and floss without scrubbing the gums, following any kit-specific guidance about when to brush. If the system calls for dry teeth, blot away excess saliva with a clean tissue rather than trying to dehydrate your mouth.
- Set the permitted exposure before opening the gel. Find the session duration and cycle limit for that exact kit, then set the timer or select the matching device program. Don't plan an extra cycle because you're hoping for a faster result.
- Apply the specified small amount. For a compartmented tray, place a small drop in the intended tooth wells; for a simple tray, use a thin line only where the instructions direct. Don't pack the tray or push gel firmly into the teeth, because excess gel is more likely to escape onto soft tissue.
- Seat the mouthpiece gently and remove spills. Check the gumline before switching on the light, wiping away visible excess with a clean tissue or cotton swab. If the tray repeatedly squeezes gel out, remove it and correct the amount or fit rather than accepting ongoing leakage.
A wet surface can make some gels harder to position, but that doesn't justify using more product. Likewise, pressure isn't a placement tool: biting harder can move gel toward the gums instead of improving contact.
Time, remove, and recover
- Run only the intended session. Keep the mouthpiece positioned as directed, and don't eat, drink, or fall asleep during treatment. Stop early if you develop pain, burning, or uncomfortable heat rather than waiting for the timer.
- Remove the device and clear away the gel. Spit out residual product and rinse as directed; don't deliberately swallow whitening gel. Clean the mouthpiece using its care instructions, keeping powered components out of water unless the manufacturer permits washing them.
- Record the session and wait for the next permitted treatment. Note any sensitivity alongside the treatment in your calendar. Follow the kit's food, drink, and retreatment instructions, but don't assume whitening leaves enamel pores open for a fixed period or that every kit needs the same recovery interval.
This video offers another visual reference for the treatment process, but your own kit's instructions determine the actual settings and handling.
A tolerable session may involve no sensation at all. Sharp pain, gum burning, and persistent discomfort aren't normal targets to work through, even if the shade hasn't changed as much as you hoped.
When Sensitive Teeth or Restorations Should Pause
Don't start with untreated decay, a suspected crack, inflamed gums, or severe existing sensitivity. Those conditions need dental assessment before you put peroxide against the area, whether or not a lamp is involved.
A tooth that already hurts with cold drinks deserves particular attention. Whitening shouldn't become a home test to find out whether that pain is harmless.
Decide whether to shorten or stop
Sensitivity depends on the formula, exposure, leakage, and the tooth's existing condition. It can't be judged from the presence of an LED alone.
The clinical work on light-activated whitening and sensitivity illustrates why protocol-specific advice matters: specialized formulations and violet-light treatments aren't reliable guides to how an ordinary blue-light refill will feel. A comfort claim attached to a particular formula shouldn't be transferred to a different peroxide gel.
Use symptoms to guide a cautious response:
- Brief sensitivity that settles: Pause treatment until comfortable. Before restarting, consider a sensitivity toothpaste containing potassium nitrate and use only a shorter exposure option explicitly allowed by the kit.
- Repeated zingers: Don't whiten again the same evening or stack another whitening product on top. Ask a dentist whether the concentration, schedule, or tooth condition needs attention.
- Sharp or localized tooth pain: Stop and arrange a dental assessment, especially if one tooth reacts more than the others.
- Burning or white patches on gums: Remove the gel and rinse thoroughly. Don't reapply to the irritated area; seek dental advice if the tissue is painful, damaged, or doesn't settle.
Severe pain, swelling, or worsening symptoms warrant prompt care. Don't wait for a planned touch-up date to address them.
Pause rule: Whitening is elective. Sore tissue or a painful tooth takes priority over finishing a treatment course.
Restorations create a separate shade problem
Fillings, crowns, and veneers don't bleach like natural teeth. Even a comfortable, correctly performed treatment can leave a visible mismatch if the surrounding enamel lightens and the restoration stays its original shade.
Say a front tooth contains tooth-colored bonding that currently blends well. Whitening adjacent enamel may make that bonding look darker, even though nothing has stained or damaged the restoration.
Our guide to teeth whitening with fillings explains why restoration placement matters when planning a target shade. Discuss visible dental work before buying a course rather than trying to correct a mismatch with longer exposure.
Receded gums also change where gel can safely sit. Don't try to bleach exposed roots into matching the enamel; have the fit and application area assessed first.
Choose Gel Strength Instead of a Brighter Lamp
Choose an appropriate, disclosed strength, not automatically the highest strength. A worthwhile purchase gives you enough information to understand the treatment and enough control to stop if it becomes uncomfortable.
If you already own a blue-light mouthpiece, choose its intended refill system. An inexpensive syringe isn't good value if you can't establish compatibility, and a light-only gadget doesn't supply the bleaching ingredient.
Match the format to the routine you'll follow
An LED system makes sense when you can use its matched gel and timed sessions consistently. A tray-based approach may suit you better if you prefer a prescribed wear period without a light.
Our non-light example is Lumibrite 22% Teeth Whitening Gel, which contains 22% carbamide peroxide and is used with custom or boil-and-bite trays. Its treatment directions specify 1–2 hours of tray wear, with use up to twice daily for 14 days.
That's a product-specific tray schedule, not a duration to borrow for an LED mouthpiece. Don't transfer it to another formula, and don't place the gel in a light device unless the instructions explicitly support that combination.
Choose the application method you can follow accurately, not the accessory that looks most impressive.
Before purchasing, be able to answer a straightforward question: What exactly will touch my teeth, in what tray, and for how long? If the packaging can't answer it, keep looking.
If sensitivity already limits brushing or eating, address that first. A comfortable mouth and a realistic shade goal are better starting points than an urgent deadline.
DentalHealth.com offers professional-grade at-home whitening gels and kits, along with sensitivity-care products to help you plan a manageable routine. Visit DentalHealth.com to compare ingredients and product directions, then choose a gel-and-tray or matched LED system you can use as instructed.