
Teeth Whitening Kit USA: How to Choose a Safe One
Buy the strongest gel you can find. That's the most popular advice for a teeth whitening kit USA shoppers see online, and it's often the wrong advice. A higher percentage can shorten wear time, but it can't whiten a crown, fix a cavity, or make receded gums tolerate peroxide better. It can also leave natural teeth lighter than the fillings and veneers right beside them.
Start with your mouth, then the label, then the brand. The American Dental Association reported in ADA News reporting on cosmetic whitening popularity that as many as 19% of Americans had whitened their teeth. With that many people buying kits, the useful question isn't which box promises the fastest shade change. It's whether your teeth, restorations, and gums are ready for peroxide at all, and which strength you can wear exactly as directed.
Dental Checks That Decide Whether a Kit Fits You
The strongest kit is not automatically the best buy. Bleaching lightens natural tooth structure, but it generally doesn't change the color of ceramic or resin restorations, so a front filling, crown, veneer, bonding, or sealant can end up looking darker than the newly whitened teeth around it. In ADA News coverage of experts weighing in on teeth whitening, the ADA notes that aggressive bleaching may contribute to tooth erosion or microstructural changes, and whitening chemicals can react with restorations.
That mismatch is the problem most buyers miss. If you whiten first and discover the mismatch later, stronger gel won't fix it. Your dentist may need to replace a restoration after your natural shade settles, which is a restorative cost, not a whitening problem. Read what to expect when whitening teeth with fillings before you assume every visible surface will move together.
Run This Self-Screen Before You Order
Stand in bright, neutral light and answer carefully. Any yes means book a dentist visit before buying.
- Front restorations: Can you see fillings, crowns, veneers, or bonding on teeth that show when you smile?
- Cold pain: Do any teeth ache or zing with cold drinks or air?
- Gum warning signs: Do your gums bleed when you floss, look puffy, or appear pulled back from the teeth?
- Damage or decay: Do you have a crack, a rough edge, a known cavity, or a tooth that hurts when you bite?
- Worn enamel: Do biting edges look thin, translucent, notched, or cupped?
| Dental condition | Whiten now? | What to do first |
|---|---|---|
| Healthy teeth with no restorations | Usually yes | Dental cleaning and a quick exam |
| Cavities or active infection | No | Treat decay and infection first |
| Gum recession or exposed roots | Only after dental clearance | Dentist assesses root exposure and sensitivity risk |
| Enamel erosion or cracked enamel | Ask a dentist first | Dentist evaluates the tooth before peroxide |
| Fillings, crowns, veneers or bonding | Will not change them | Plan any shade match with the dentist after whitening |
| Sealants | Will not whiten them | Dentist confirms they are intact before treatment |
A cleaning and exam are the first purchase, not the kit. Cleaning removes surface film that can block even contact, and the exam catches decay, leaking margins, inflamed gums, or exposed roots that peroxide can irritate. If a restoration sits in your smile zone, ask directly whether replacement after whitening is likely and what that would involve.
No kit can promise even color across natural and restored teeth. Sometimes the right fix is restorative replacement, not a stronger gel.
Strength Limits on US Kits and What the Label Shows
The strongest kit on the shelf is often the wrong purchase. One box shows 22%, another shows 14%, and the bigger number can still be the weaker active ingredient. According to NewMouth's compilation of teeth whitening statistics, the number of U.S. consumers using tooth whiteners was estimated at 35.22 million in 2024. At that scale, shelves carry strips, pens, syringes, trays, lights, and refill gels that share similar language for very different strengths.
Place any product in the table before comparing prices. Find its row, and you know the likely wear time and whether a dentist should weigh in first. For a broader label walkthrough, see this guide to choosing teeth whitening gel in the USA.
| Product type | Active ingredient and strength | Where it is sold | Typical wear time |
|---|---|---|---|
| Over-the-counter strips and gels | Hydrogen peroxide up to 14% | Pharmacies and online retailers | Usually about 30 minutes per session |
| Over-the-counter gels | Carbamide peroxide up to 22% | Pharmacies and online retailers | 45 minutes to 2 hours, once daily |
| Dentist-dispensed tray gel, standard | Carbamide peroxide 10%-16% | Dental office or dentist-supplied kit | 4 hours daily at 10%, or 90 minutes daily at 16% |
| Dentist-dispensed tray gel, higher strength | Carbamide peroxide 20%-22% | Dentist-supplied kit | One 45-minute session daily |
| In-office professional bleaching | Hydrogen peroxide roughly 25%-40% | Dental office only | One or more supervised chair sessions |
Why the Two Percentages Don't Compare Directly
Carbamide peroxide breaks down into hydrogen peroxide, so a 22% carbamide peroxide gel delivers roughly a third of that strength as active peroxide. A 22% carbamide gel and a 14% hydrogen peroxide strip can sit in the same shopping cart and still not be comparable products. The ingredient name matters as much as the number.
Over-the-counter products reach you without a dentist dispensing them, so their ceilings sit below supervised in-office strengths. Take Lumibrite 22% Teeth Whitening Gel, an at-home system made by Den-Mat: its 22% carbamide peroxide sits near the top of what you can buy without a dental visit, right about where dentist-dispensed tray gels begin. No chairside check comes with a pharmacy shelf or an online cart. The printed ingredient, percentage, and directions are the checks you can verify before money changes hands.
The Four-Part Label Check
- Active ingredient by name: It should say carbamide peroxide or hydrogen peroxide, not just whitening agent.
- Percentage: It should give a specific number you can match to the table.
- Wear time: It should state session length, frequency, and total course length.
- Tray directions: Tray gels should explain filling amount, seating, excess removal, and cleaning.
A label that gives no percentage, or only says professional strength, hasn't given you enough to buy safely. Ask a dentist before you guess.
Don't let an LED light distract you from those four items. A light housing, case, and shade guide don't tell you what's touching your enamel. The gel does. If the percentage is buried, missing, or different on the box and syringe, treat that as a stop sign, not a minor packaging flaw.
How Concentration Changes Results and Wear Time
A clinical result surprises most buyers who shop by percentage alone. In a randomized, blind trial published in the Journal of Esthetic and Restorative Dentistry, 40 patients used 10% carbamide peroxide for 4 hours per day and 40 used 37% carbamide peroxide for 30 minutes per day, with both groups treating for 3 weeks. The 37% group whitened faster during weeks 1 through 3.
One month after treatment ended, the two groups produced equivalent bleaching, and the difference was not statistically significant at p = 0.06. Tooth sensitivity and gingival irritation also showed no statistically significant difference between the concentrations at p > 0.05. A separate long-term clinical study in that report found that 16% carbamide peroxide used for 90 minutes daily over 4 weeks produced whitening that remained stable through 42 months of follow-up.
The Decision Rule Behind the Numbers
A stronger gel mainly buys you shorter daily wear. A milder gel asks for patience and consistency. That's a schedule trade-off, not proof that the higher number reaches a better final shade for every user. If you won't wear trays for hours, a lower strength you abandon after three days won't help. If you can wear trays while you work from home, read, or wind down at night, the slower route may fit just fine.
Choose the lowest strength whose wear time you'll actually complete every planned day.
Three Buyer Situations
Say you're sensitive to cold drinks but can wear trays daily. Start lower, follow the longer schedule, and don't jump up because day two looks unchanged. Early shade movement is a poor reason to change strength mid-course.
Say you have a short timeline, healthy gums, no front restorations, and no sensitivity history. A higher strength with shorter sessions can be reasonable if the label gives clear limits and your dentist has cleared you. Shorter doesn't mean casual. You still measure the gel, protect your gums, and stop at the stated time.
Say you start and want faster progress. Escalate carefully by talking with your dentist about schedule or strength. Don't improvise by wearing a mild gel far beyond its directed time. Tray fit, written directions, existing sensitivity, and dental health matter as much as the number on the box, because a leaking tray puts gel on tissue instead of keeping it on teeth.
I would pick schedule fit over bragging rights every time. The best protocol is the one you can finish without skipping, doubling up, or extending sessions.
Buying Checklist for Labels, Shipping and Support
Work through this check before you pay. It takes five minutes and prevents the most common wrong purchase, which is a usable product in the wrong strength for your mouth or schedule.
First, confirm the exact product. Match the product name, active ingredient, percentage, syringe or strip count, and written wear-time and tray instructions across the listing and package photos. Brands sell multiple strengths under similar names, so a familiar logo doesn't confirm what's inside. I'd read the label before trusting any product name, including familiar lines such as Opalescence, Philips Zoom, or PolaNight and PolaDay.
Second, check tray compatibility. A gel syringe alone isn't a complete system unless you already own well-fitting trays. Confirm whether trays are included, whether they're boil-and-bite or custom style, and whether the directions match the trays you plan to use. A loose universal tray can waste gel and push it onto your gums.
Third, ask about heat and storage. Peroxide gels lose strength when stored hot, so summer shipping and warehouse conditions matter. We store every item in a temperature-controlled environment. Ask any retailer how products are stored and how promptly orders ship, especially if a package will sit on a hot porch.
Fourth, read returns before ordering. Check the return window and whether opened gel is eligible, since that decides what happens if you order the wrong strength and break the seal. Screenshot or save the product page percentage and directions in case the received box doesn't match.
Fifth, use a human check when you're unsure. You can contact us by phone at +1-888-508-3375 to confirm that a product matches the strength you chose before ordering. Give the exact product name and percentage you're seeing, not just the brand family.
Don't buy two strengths to test them against each other. Stacking gels, alternating syringes without a plan, or combining a gel with strips multiplies exposure and makes symptoms hard to trace. One product, one schedule, one set of notes gives you a clean answer.
Running the Routine and Handling Symptoms
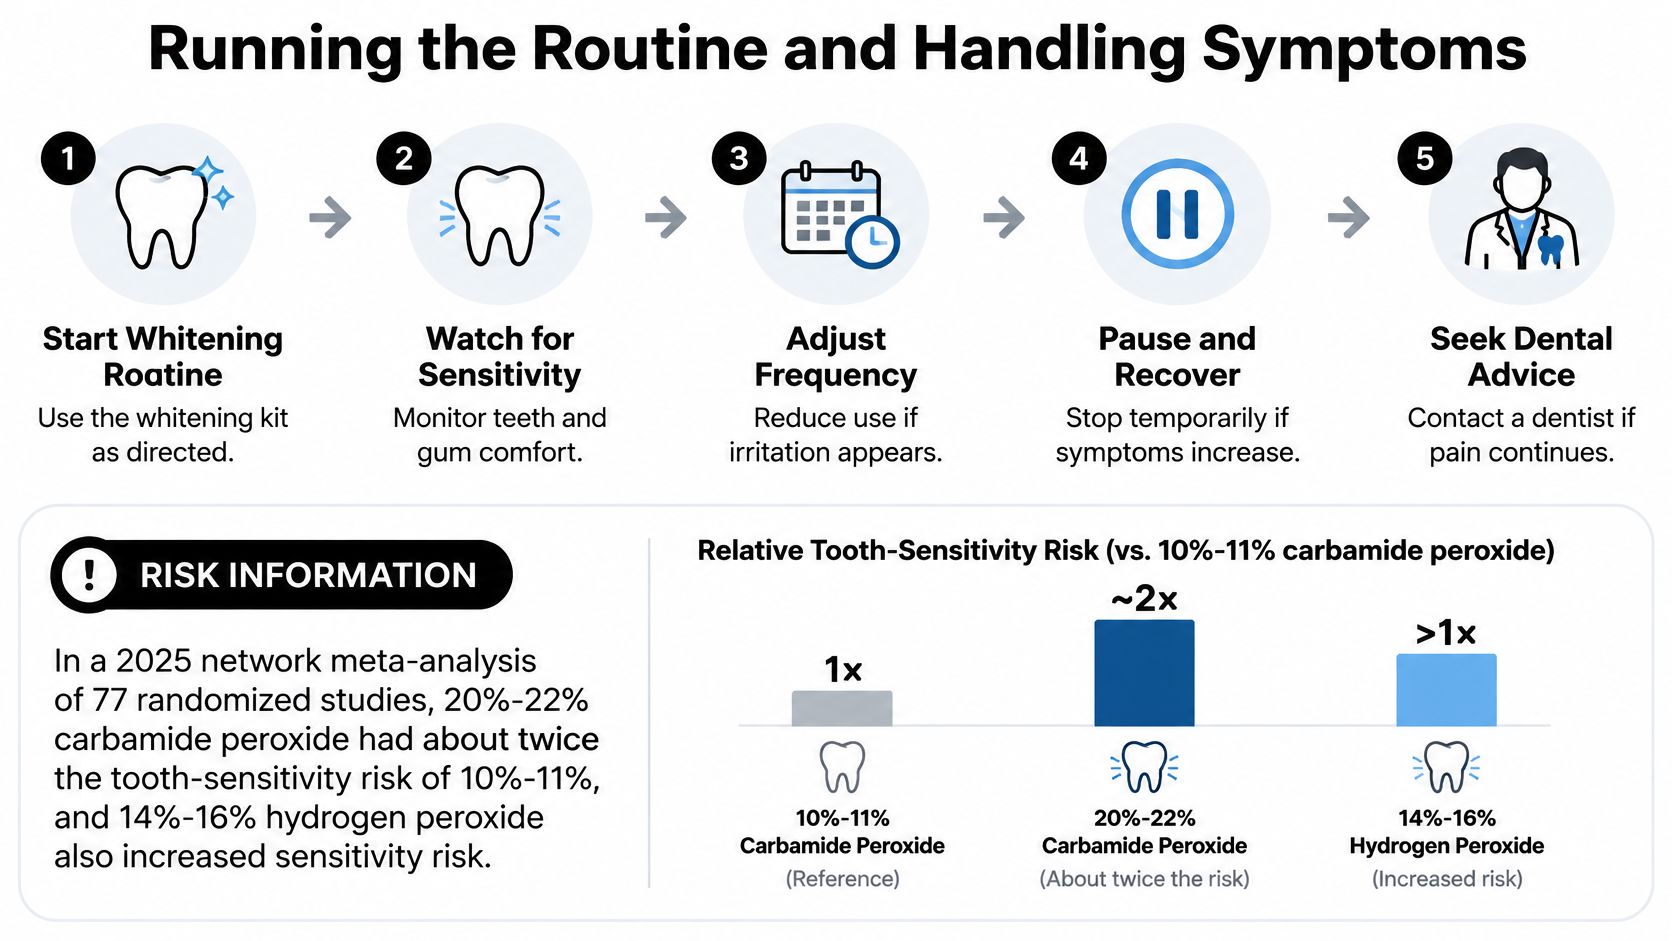
Higher strength changes your symptom risk, even when sensitivity stays mild for many users. A 2025 network meta-analysis in Operative Dentistry of 77 randomized clinical studies found that 20%-22% carbamide peroxide produced approximately twice the tooth-sensitivity risk of 10%-11% carbamide peroxide, with a relative risk of 2.0. It also found hydrogen peroxide at 14%-16% had about 2.8 times the sensitivity risk of 2%-4% hydrogen peroxide, while evidence quality was rated low and protocols varied.
That same source reports a 2025 systematic review found no significant difference in overall whitening efficacy between at-home and in-office bleaching, while sensitivity intensity was significantly lower for at-home treatment. The practical lesson is measured exposure. You don't need prolonged or aggressive sessions to justify a home kit.
The visual below maps the routine from first session through symptom checks and when to pause.
Set Up Cleanly Before the First Tray
Begin after your dental check, not before it. The ADA oral health topic page on whitening supports a dental examination to identify untreated caries, periodontal inflammation, exposed roots, cracked enamel, and restorations before peroxide use. It also notes that temporary sensitivity can affect up to two-thirds of users across vital-tooth bleaching, and sensitivity may appear after two to three days and generally resolves by about the fourth day after treatment ends.
Brush and floss the day before your first session, then clean and dry your teeth right before loading the tray. Dry teeth help you see where gel goes and reduce dilution at the tray edge. Don't eat, drink, or smoke while trays are in.
For tray fitting and gel placement basics, watch the demonstration below before your first session.
Run Each Session the Same Way
- Load sparingly: Put only the manufacturer-specified amount inside each tray compartment, toward the front surface that contacts the visible tooth.
- Seat gently: Press the tray into place without forcing gel onto the gingiva.
- Remove excess: Wipe visible gel from gums with a clean finger, cotton swab, or soft dry brush.
- Time it: Wear the tray for the prescribed time only. Set a timer instead of estimating.
- Rinse and clean: Remove trays, rinse your mouth, brush off residual gel gently, and rinse trays with cold water.
- Record the shade: Check weekly in the same light, at the same time of day, before colored drinks.
- Respect rest days: If you're sensitive, use desensitizing toothpaste as directed and keep the label's rest days.
More gel doesn't mean more whitening. Excess mostly escapes at the gumline, where it can burn, blanch tissue white, or create soreness that makes you quit. A fitted tray matters because it limits gum contact and keeps a thin, even film on enamel.
Read how to handle teeth whitening gel side effects if symptoms start, and use the table before your next session rather than guessing.
| Symptom | Likely cause | Change to make |
|---|---|---|
| Sharp pain on cold drinks | Temporary sensitivity from peroxide reaching the tooth | Drop to a lower strength or alternate days, and use desensitizing toothpaste |
| Gums burning or turning white | Gel on gum tissue from an overfilled tray | Trim excess, reseat the tray, and skip a day |
| Sensitivity that lasts beyond about four days | Pronounced sensitivity or an untreated problem | Stop and book a dentist visit |
| Gum ulceration or swelling | Tissue irritation | Stop whitening and get a dental evaluation |
| Sensitivity with a 20%-22% carbamide peroxide gel | Higher concentration carries about twice the risk | Switch to a 10%-11% gel or an alternate-day schedule |
Adjust the Schedule Before You Add Exposure
Change frequency before you add minutes. If cold sensitivity appears, move to alternate days, reduce gel dots slightly within label directions, and check tray fit. If gums burn, look for overfilling first. White spots or redness at the margin usually point to contact, not a need for more product.
Stop and get dental advice for severe pain, ulceration, swelling, or symptoms that persist beyond several days. Don't push through pain to finish a syringe. You can pause a cosmetic routine. You can't negotiate with an irritated nerve or damaged tissue.
Never stack gels or combine a high-strength gel with whitening strips. That turns one controlled exposure into two overlapping ones, and you lose track of which product caused a reaction. A calm, repeatable routine beats an aggressive week followed by a forced month off.
Choose Your Kit After a Dental Check
Make the decision in order. First, book the cleaning and exam and ask whether whitening suits your restorations, roots, and gums. Second, if you're cleared, pick the lowest strength whose wear time you'll consistently keep. Third, verify the label for ingredient, percentage, written directions, and tray fit.
Fourth, check buying terms before you pay. We offer free shipping on all USA orders, and we have a 30-day return policy, so you have 30 days after receiving an item to request a return. Still confirm whether opened gel is eligible before you break a seal, because return windows and opened-product rules are not the same thing.
Fifth, treat session one as a test. Load carefully, time it, wipe excess, inspect your gums afterward, and note your starting shade in consistent light. Sixth, reassess after the planned course. If progress stalls, your restorations now stand out, or sensitivity persists, stop and call your dentist instead of ordering a stronger syringe.
The right kit fits your mouth, not the highest number.
Book the dental check before you buy. That one appointment can save you from whitening around a crown, irritating exposed roots, or spending on a strength your schedule won't support.
Once your dentist clears you and you've chosen a strength you can wear as directed, visit DentalHealth.com to compare professional-grade tray gels, whitening kits, and sensitivity products by ingredient and percentage. Check the label details on each product page, confirm tray compatibility before ordering, and call if you need help matching a listed strength to the plan your dentist approved.