
Zoom Teeth Whitening Gel Refills: How to Use Them Safely
You've found your whitening trays, but the syringe is nearly empty. The replacement box looks familiar, except the percentage is different, and the half-used refill in your drawer still has time left before its expiry date. It's tempting to order by the Zoom name and carry on.
With Zoom teeth whitening gel refills, the details that matter are the peroxide type, strength, prescribed wear time, tray condition, and storage history. A familiar box doesn't guarantee the same treatment. And a future expiry date doesn't tell you whether an opened syringe, or one delivered in summer heat, will still perform as expected.
Matching Zoom Refills to Your Tray, Strength and Reorder Check
The wrong-order mistake usually starts with the product name. You recognize Zoom, choose a refill, and only notice the different percentage when it arrives. Match the peroxide chemistry and strength first, then confirm that the product belongs in your take-home tray system.
Strength doesn't determine whether a tray physically fits your teeth. It determines which gel and exposure schedule your dentist intended you to use. Don't treat a higher percentage as a straightforward upgrade, or assume equal percentages of different peroxide types describe equivalent treatments.
Compare the label, not just the branding
Philips identifies its take-home Zoom NiteWhite refill formulation as 10% carbamide peroxide. Other Zoom formulations require their own label and prescribing checks.
Zoom refill strengths and what to check before ordering
| Refill | Peroxide strength | Check before ordering |
|---|---|---|
| Zoom NiteWhite 10% CP refill | 10% carbamide peroxide | Confirm the label reads 10% CP and matches your dentist's prescribed strength |
| Zoom NiteWhite 16% CP refill | 16% carbamide peroxide | Confirm it's intended for your maintenance plan, rather than assuming an unrestricted daily routine |
| Zoom DayWhite refill | Read the peroxide type and percentage on the specific box | Read the strength on the box before ordering |
The distinction between maintenance treatment and a general whitening course matters. A Philips Zoom clinical study enrolled 82 subjects, with 77 completing a protocol combining in-office 6% hydrogen peroxide, with or without LED acceleration, followed by three applications of NiteWhite 16% carbamide peroxide. At day 14, the combined regimen produced a mean shade-guide-unit reduction of 6.9 units with LED and 6.2 units without LED.
Those were results from the combined regimen, not the refill gel acting alone. They support a planned take-home maintenance phase after professional whitening, not adding applications whenever you want a brighter result.
The packaging and tray should be checked together before you load any gel.
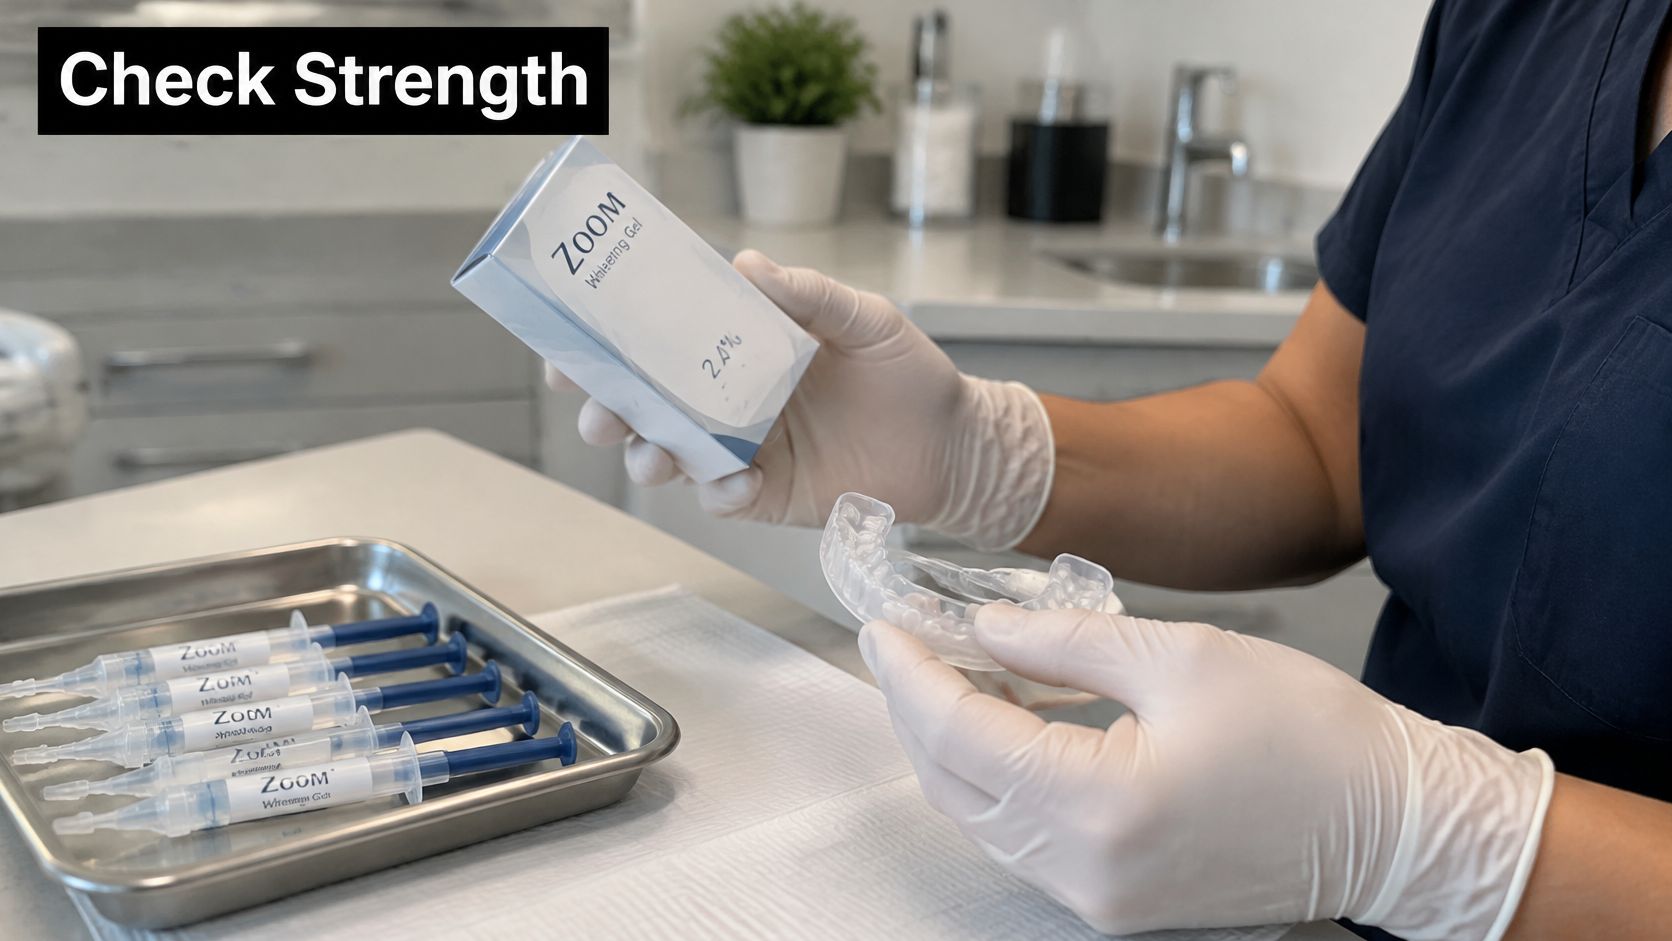
Run this check before reordering
- Read the full label. Record the product name, peroxide type, and percentage. A photo is more useful than remembering the box color.
- Compare it with your dentist's note. If the proposed refill is stronger, or your teeth have become sensitive, resolve that mismatch before buying.
- Confirm the tray system. Use a take-home whitening tray approved for the refill. A retainer or aligner isn't automatically an equivalent substitute.
- Make room for an opening date. Mark each syringe when you first open it rather than relying on the carton's expiry alone.
If the listing or box doesn't show a clear percentage, don't guess. Have the product identified before placing the order. Our guide to Zoom at-home trays can help you understand the tray side of the purchase.
DentalHealth.com carries the Zoom line within our teeth-whitening range. Confirm the exact formulation with your dentist, then match that description to the store product, rather than choosing a substitute because the name looks close.
Dosing and Wear Time for Each Refill Strength
A useful dosing example comes from the 2025 Philips randomized, single-blind clinical trial, which included Zoom NiteWhite 10% carbamide peroxide used once daily for 4 hours over 14 days. The trial enrolled 309 participants, 293 received treatment, and 279 completed it; assessments occurred after 3, 9, and 14 days, with follow-up one week after the final application.
The trial reported statistically significant whitening improvements for all tested products at each assessment point and described little to no sensitivity. That's a result under a defined protocol, not a guarantee that every user or every Zoom formulation will feel the same.
Use a schedule, not a tolerance test
Wear time and schedule by refill strength
| Refill strength | Wear per session | Schedule | Source |
|---|---|---|---|
| Zoom NiteWhite 10% CP | 4 hours | Once daily for 14 days in the trial | Philips randomized trial described above |
| Zoom NiteWhite 16% CP | Confirm with the prescribing dentist or product instructions | Three applications in a dentist-supervised phase | Philips clinical study discussed under refill matching |
| Zoom DayWhite | Use the time printed for the exact formulation | Confirm frequency and course length on the label | Product-specific instructions |
Missing wear-time information isn't permission to borrow another product's schedule. If your syringe is loose, the carton is gone, and you can't identify the instructions, set it aside until you can confirm them.
The schedule includes more than the timer setting. It also includes how often you apply the gel, whether you have rest days, and when you finish the course. Changing those variables changes the exposure, even if the percentage stays the same.
Practical rule: A session that feels mild isn't a reason to keep the tray in longer.
Before starting, put the syringe, instructions, and timer together. Decide when the tray comes out before it goes in, especially if you're whitening while working or watching television.
Keep a brief treatment record: formulation, application date, prescribed wear time, and any discomfort. That gives your dentist something concrete to adjust if the course isn't comfortable or the result stalls. Follow the exact label or your dentist's written schedule, not the longest wear time you can tolerate.
How to Refill Your Tray Without Overfilling
Loading a tray is a placement task, not a filling task. You want gel against the front surfaces of the teeth being treated, not a tray packed to its edges.
The American Dental Association's home-bleaching guidance supports a dental examination before treatment, controlled exposure, and attention to sensitivity and gum irritation. Before your first application, record your starting shade and any existing sensitivity, then use consistent lighting for later comparisons.
This visual shows the core loading sequence and the light pressure needed when seating the tray.
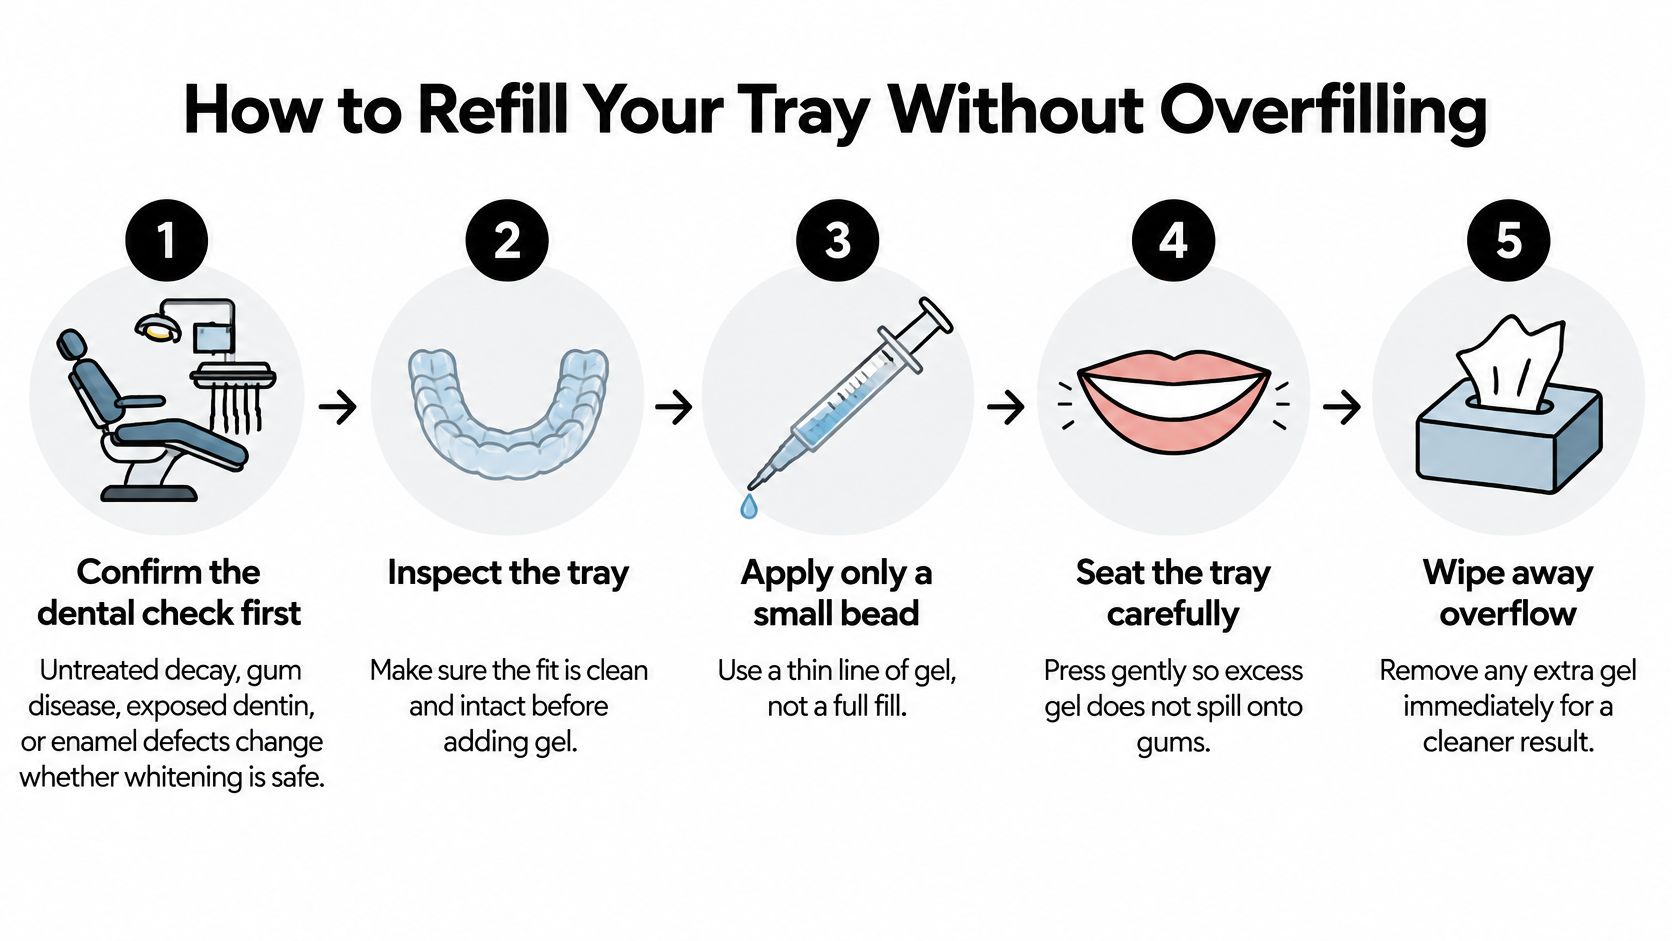
Load and seat the tray carefully
- Confirm the dental check first. Untreated decay, gum disease, exposed dentin, and enamel defects can change whether whitening is appropriate. A refill purchase shouldn't bypass an unresolved dental problem.
- Inspect the empty tray. Look for cracks, distorted edges, or margins that lift away from the teeth. Seat it without gel first if you're unsure about its condition.
- Clean and dry it. Remove residue from the previous application, rinse the tray, and dry it before loading. This lets you see where the fresh gel goes rather than dispensing over leftover material.
- Apply a small bead in the facial-side reservoir. That means the space facing the front of each tooth, not the biting surface. With compartmented trays, use a small drop in each prescribed tooth compartment; with simpler trays, use a thin continuous line along the treatment area. Don't fill the compartments to the top or assume you must empty a syringe.
- Seat with light pressure. Guide the tray into place and tap or press gently so the gel contacts the teeth. Firm pressing isn't necessary and can push gel toward the gums.
- Remove overflow immediately. Use a clean tissue or cotton swab to wipe gel from the gumline. If you repeatedly get overflow, reduce the amount at the next application and have the fit checked if leakage continues.
- Use the prescribed timer setting. Don't add gel during wear or extend the session to compensate for a missed application. Remove the tray if you develop concerning discomfort.
- Clean up gently. Rinse your mouth with tepid water and brush gently with a mild toothpaste. Rinse the trays and let them dry thoroughly before storing them.
Set realistic expectations before loading
Crowns, veneers, fillings, implants, and sealants won't whiten like natural teeth. Some intrinsic discoloration may also remain, so an unchanged area isn't automatically a sign that you missed it with the gel.
Don't try to solve that mismatch by packing extra gel around the tooth. Ask your dentist whether the visible difference comes from a restoration, an underlying stain, or something that needs treatment.
Use the video as a handling reference alongside your own product instructions.
The right amount looks modest before seating. Visible overflow is a reason to reduce the load, not proof that you've achieved better coverage.
Storing Refills and Knowing When to Toss Them
Putting peroxide gel in the fridge sounds sensible, but it isn't the instruction for these formulations. Philips' storage instructions specify 15–25°C (59–77°F), protection from light and heat, and no refrigeration or freezing; temperatures above 25°C reduce shelf life.
The same product information lists approximately 18 months for DayWhite and 24 months for NiteWhite, while stating that effectiveness is reduced one month after opening. Those unopened shelf-life figures don't cancel out opening history or poor storage.
Treat expiry and opening date as different checks
The printed expiry tells you when the product expires under its specified conditions. It doesn't certify that a syringe stayed within those conditions during shipping, sat safely in your drawer, or remained unopened.
Write the opening date directly on the syringe or on a label attached to it. Keep the carton and instructions, but don't make the carton your only record, since syringes and boxes are easily separated.
Storage situations and what to do
| Situation | Risk | What to do |
|---|---|---|
| Summer delivery that sat in heat | Temperatures above the specified storage range shorten shelf life | Confirm suitability with the seller, dentist, or manufacturer before use if exposure is uncertain |
| Refill left in a mailbox or car | Uncontrolled heat and light | Inspect gel and packaging; contact the manufacturer if unsure |
| Travel with syringes | Temperature swings | Maintain the specified room-temperature range and avoid leaving them in a parked car |
| Syringe opened more than a month ago | Reduced effectiveness | Check the opening record and seek advice about replacement rather than extending treatment |
| Refrigerated or frozen refill | Storage contrary to Philips' instructions | Don't assume cold preserved it; check with the manufacturer |
Heat exposure isn't fixed by immediate use
A hot delivery doesn't become reliable just because you use it that evening. Retrieve deliveries promptly, move them into suitable storage, and keep the packaging if you need to raise a concern about shipping conditions.
Inspect for leakage, damaged caps, or abnormal gel appearance, but remember that normal appearance can't establish the product's full temperature history. When that history is unknown, don't compensate with extra gel or longer wear.
Choose an indoor storage spot away from direct sunlight, heaters, and humidity. A bathroom or car is a poor default because the conditions can fluctuate, while travelers should keep syringes protected from heat rather than packing them against ice.
Our guide to teeth-whitening gel expiration dates explains how to distinguish expiry concerns from other reasons to replace a refill. Discard expired product, and set aside damaged or questionably stored syringes until you've confirmed whether they're suitable to use.
Troubleshooting Sensitivity, Gum Irritation and Uneven Results
Sensitivity is the complaint most likely to interrupt a home-whitening course. A review of at-home whitening protocols reports sensitivity in roughly 37–90% of users across at-home studies, usually temporary and milder than in-office sensitivity, and notes that adverse effects become more prevalent at higher concentrations.
That wide range isn't a prediction of your personal risk. It reflects different products, protocols, and study populations, which is why comfort should be assessed during your own prescribed course rather than assumed from the brand.
Pause before changing the treatment
If sensitivity appears, pause applications and allow rest days rather than pushing through the schedule. Discuss a shorter wear time or other adjustment with your dentist before restarting, and don't increase concentration or exposure to make up for the pause.
Record whether discomfort affects the whole treated area or a particular tooth. Localized, persistent pain needs assessment rather than being dismissed as routine whitening sensitivity.
Refill problems, likely causes and fixes
| Symptom | Likely cause | Fix |
|---|---|---|
| Sensitivity during or after wear | Peroxide exposure, especially if concentration or wear exceeds the prescribed schedule | Pause for rest days; discuss shorter wear and consult a dentist before escalating |
| Gum stinging or whitish irritation | Gel pushed onto gums | Remove the tray, rinse, and let irritation settle; reduce loading before any advised restart |
| Uneven shade across teeth | Poor tray fit or restorations that don't whiten | Have the fit and tooth surfaces assessed; don't spot-load with extra gel |
| Gel leaking from the tray | Loose or cracked tray margins | Stop using the damaged tray and arrange assessment or replacement through your dentist |
| Oral sores or marked sensitivity | Irritation or excessive exposure, with other dental causes possible | Stop use and contact a dentist |
Separate a loading problem from a dental problem
Gum discomfort that follows the tray edge suggests you should inspect where the gel is escaping. Repeated leakage despite careful loading warrants a fit check, not another attempt with the same damaged tray.
For accidental soft-tissue contact, our guide to teeth-whitening gel on gums provides practical guidance on recognizing and responding to irritation. Don't resume while tissue is sore just because the next application is due.
Stop and contact a dentist for oral sores or marked sensitivity, consistent with ADA guidance. Don't use a desensitizing product to mask symptoms so you can continue an uncomfortable course.
A refill that produces an uneven result needs a fit and expectation check before it needs more gel.
Compare your progress under consistent conditions, and take the tray and product label to your appointment if the result remains patchy. Your dentist can distinguish a delivery problem from a tooth or restoration that won't respond as expected.
DentalHealth.com offers Zoom whitening products alongside sensitivity-care options such as Fluoridex and MI Paste. Visit DentalHealth.com to compare product descriptions with your dentist's prescribed formulation, then check your tray condition and storage plan before ordering your next refill.