

Your Guide to the Best At Home Teeth Whitening
When you're looking for the best at-home teeth whitening, you want something that actually delivers professional-grade results. The top contenders use active ingredients like carbamide or hydrogen peroxide, delivered through custom-fit trays, easy-to-use strips, or modern LED kits. For a truly comprehensive, even whitening that tackles those deep, stubborn stains, you really can't beat professional-grade gels used with custom trays. Brands like Opalescence or PolaDay are often seen as the gold standard for a reason.
Achieving a Brighter Smile with At Home Teeth Whitening

Welcome to your complete guide for getting that radiant smile right from the comfort of your own home. We're going to move past simple product reviews and really dig into the science, giving you the knowledge to whiten your teeth safely and effectively. Consider this your roadmap to a professional-level smile, guiding you toward products you can trust.
The desire for a brighter smile is more popular than ever, with millions turning to at-home solutions for their sheer convenience and impressive results. The global market definitely reflects this shift. In fact, at-home whitening products now account for over 68% of consumer spending in the entire whitening category. As you can see from this industry report on teeth whitening, people clearly value the privacy and flexibility that home treatments offer over a trip to the dentist.
Why At Home Whitening Works
To pick the best at-home teeth whitening method for you, it really helps to understand the basics of how teeth get stained in the first place—and how the whitening agents reverse it.
Think of your tooth enamel as a porous surface, a lot like a ceramic mug. Over time, it naturally absorbs pigments from things we consume every day:
- Coffee and tea
- Red wine
- Dark berries and sauces
- Tobacco products
Whitening agents, which typically contain carbamide peroxide or hydrogen peroxide, are designed to penetrate that porous enamel. Once there, these compounds release oxygen molecules that break apart the chemical bonds holding the stain molecules together. It's a bit like a deep clean that lifts discoloration from the inside out.
A Quick Comparison of Popular Methods
Navigating all the whitening options can feel a bit overwhelming, but they generally fall into a few key categories. Each method strikes a different balance between effectiveness, convenience, and how much time you need to commit, so you can find a perfect match for your lifestyle and whitening goals.
To help you get started, the table below gives a quick, high-level look at the most common methods out there. It's designed to give you a clear picture of what each type of product is best for and what kind of results you can expect.
At Home Teeth Whitening Methods at a Glance
| Method | Best For | Typical Treatment Time | Effectiveness Level |
|---|---|---|---|
| Whitening Gels & Trays | Comprehensive, even whitening of deep-set stains. | 30-60 minutes daily for 1-2 weeks. | High |
| Whitening Strips | Minor to moderate surface stains and touch-ups. | 30 minutes daily for 2-3 weeks. | Moderate |
| LED Whitening Kits | Accelerating the gel's whitening action for faster results. | 10-30 minutes daily for 7-10 days. | Moderate to High |
| Whitening Pens | Targeting specific spots or individual teeth. | A few minutes per application, as needed. | Low to Moderate |
As you can see, the method you choose really depends on your starting point and your ultimate goal. Whether you're fighting years of coffee stains or just looking for a quick touch-up, there's an option that will work for you.
Understanding How Teeth Whitening Actually Works
To really feel confident about picking the right at-home whitening product, it helps to pull back the curtain and see what’s actually happening to your teeth. The science is surprisingly simple: it’s all about a specific chemical reaction designed to lift stains from the inside out.
Think of your tooth enamel like a favorite white coffee mug. When it's new, it’s brilliant. But after years of morning coffee, tea, or the occasional glass of red wine, it starts to look a little dingy. You can scrub the surface all you want, but the discoloration has seeped deep into the ceramic itself.
Your teeth are pretty much the same. While enamel is the hardest substance in your body, it's also porous. Over time, those tiny pores collect pigmented molecules from the things we eat and drink. These molecules, called chromogens, are the culprits behind those deep, intrinsic stains that regular brushing just can't touch.
The Role of Peroxide in Whitening
This is where the magic of professional whitening gels comes in. The two main players you’ll see are carbamide peroxide and hydrogen peroxide. When you apply a whitening product, these ingredients kick off a powerful oxidizing process.
Imagine them as tiny "oxygen scrubbers" that are small enough to travel deep into the enamel's pores and find those pesky stain molecules. Once they get there, a chemical reaction begins.
Peroxide releases highly reactive oxygen molecules that break the chemical bonds holding the stain molecules together. This oxidation process doesn't scrub or harm your enamel; it just dismantles the stains, neutralizing their color. The result? Your teeth look brighter because the discoloration has been erased from within.
It’s not about abrasion or scraping away the surface. The gel simply changes the chemical makeup of the stains, making them colorless. This is exactly why a good quality gel can reverse years of staining.
Why Concentration Percentages Matter
As you browse for the best at-home teeth whitening kits, you’ll notice percentages like 16% carbamide peroxide or 35% carbamide peroxide. Pay close attention to this number—it tells you how potent the gel is.
A higher percentage means there's more active whitening agent packed into the gel. This has a direct effect on two things:
- How Fast It Works: A stronger gel, like a 35% concentration, gets the job done much quicker. You can often see incredible results with shorter wear times, sometimes as little as 30 minutes a day.
- Potential for Sensitivity: A lower concentration, maybe 16% or 22%, works its magic more slowly. This gentle, gradual approach is a much better fit for people who already have sensitive teeth, as it helps keep discomfort to a minimum.
For instance, a product like PolaDay CP 35%, which you can find on sites like DentalHealth.com, is built for speed. On the flip side, someone with just minor stains or sensitive gums might find a lower percentage to be a far more comfortable (and still effective) experience.
Choosing the right percentage is all about finding that sweet spot between your whitening goals and your personal comfort. If you have deep, stubborn stains, a higher strength might be the way to go. But if your teeth are just a little dull and prone to sensitivity, a gentler formula will get you there without the zing. Understanding this one detail is the key to picking a product that’s not just powerful, but perfect for you.
Now that you have a handle on how the whitening magic actually happens, let’s look at the different tools you can use to get the job done right. The world of at-home teeth whitening isn't a one-size-fits-all situation; each method brings its own mix of power, convenience, and application style to the table.
Think of it like picking the right tool for a weekend project. You wouldn't use a tiny artist's brush to paint a whole wall, but you also wouldn't grab a giant roller for the delicate trim work. It's the same with whitening—the best product for you really comes down to your goals, the kinds of stains you’re dealing with, and what fits into your daily life.
Professional Whitening Gels With Trays
For those looking for dramatic, long-lasting, and truly comprehensive results at home, this is the gold standard. This method pairs a professional-strength peroxide gel with custom-fit or thermoforming trays that you wear over your teeth.
The real power here is in the trays. They create a seal that ensures the potent whitening gel makes full, uniform contact with every single tooth surface. We're talking about the curved edges and the tiny spaces between teeth that strips often miss. This complete coverage is what prevents a splotchy or uneven finish and allows the gel to tackle deep, set-in stains from years of coffee or red wine. It takes a bit more effort, but the professional-level results are undeniable.
- Best For: Anyone wanting the most powerful and even whitening possible for moderate to severe discoloration.
- Pros: Gives you the most uniform, all-over whitening; highly effective on stubborn stains; delivers results that rival a dental office treatment.
- Cons: Application can be a little messier than strips, requires a longer time commitment each day, and overfilling the trays can lead to temporary gum irritation.
Convenient Whitening Strips
Whitening strips are easily the most popular and accessible option out there, and for good reason. They are simply thin, flexible plastic strips coated with a layer of whitening gel. You just peel them off, stick them onto the front of your top and bottom teeth, and go about your day.
Their biggest selling point is sheer convenience. Strips are incredibly easy to apply with almost no prep time and are usually worn for about 30 minutes a day. They are a fantastic choice for people with minor surface staining or for those just looking to touch up an already bright smile. The one drawback? Because you're applying a flat strip to a curved tooth, they sometimes have trouble getting into all the nooks and crannies, potentially leaving the rounded edges and in-between spaces a little behind.
Key Insight: Strips are champions for maintenance and erasing light surface stains. But if you have significant discoloration or you're aiming for perfectly even results across every single tooth, a tray-based system will almost certainly give you a better outcome.
Targeted Brush-On Whitening Pens
Think of a whitening pen as a precision tool. It’s a small, portable applicator with a brush tip that lets you literally "paint" whitening gel directly onto a specific tooth. This makes them absolutely perfect for spot-treating a single discolored tooth or touching up those hard-to-reach areas.
Pens aren't meant for whitening your entire mouth at once. Instead, they’re a brilliant supplemental tool. Got one tooth that's a shade darker than its neighbors? A whitening pen allows you to give it some extra attention without treating your whole smile. Their grab-and-go design also makes them great for quick touch-ups before a big event. You can find more tips on how to use them in our guide to the best teeth whitening products available today.
Advanced LED Light Devices
You’ve probably seen those at-home kits that come with a gel and a blue LED light mouthpiece. The idea is that the light acts as an accelerator for the peroxide gel's chemical reaction. By activating the gel, it’s meant to speed up the stain-lifting process, potentially giving you brighter results in less time.
Many people do report seeing faster results when they pair a good gel with an LED accelerator. It's important to remember the light itself isn't doing the whitening—it's helping the active ingredients in the gel work harder and faster. These kits are a great fit for anyone who loves a more modern, tech-forward approach and wants to shorten their total treatment time.
Ultimately, picking the right product is all about matching its strengths to your own whitening needs and what you can realistically stick with in your daily routine.
How to Choose the Right Whitening Product for Your Needs
Stepping into the world of at-home teeth whitening can feel overwhelming. With so many products promising brilliant results, the key is to find the one that's a perfect match for your smile, not just anyone's. The best at-home solution is always a personal choice, and it really comes down to a few key things about you and your lifestyle.
The desire for a brighter smile is more popular than ever. In fact, whitening is the most requested dental procedure in the United States, with a staggering 67% of American adults having tried some form of it. It’s so popular that it accounts for 32% of all in-office dental practice revenue, which shows just how much we value a radiant smile. You can dive deeper into these market insights on tooth whitening trends to get the full picture.
To cut through the noise, let’s simplify the decision. Your ideal product sits at the intersection of four things: the type of stains you have, your tooth sensitivity, your budget, and how much time you can realistically commit.
Assess Your Starting Point and Goals
First, take a good, honest look at your teeth. Are you dealing with years of deep-set coffee or red wine stains, or are you just looking to brighten up an already decent smile by a few shades? Your answer here will point you toward the right product strength.
Let's imagine two different scenarios:
- The Coffee Lover: This person has noticeable, yellowish stains that have built up over years. They need a powerful, comprehensive solution like professional-grade whitening gels with custom-fit trays. The trays are crucial because they ensure the potent gel makes full, even contact with every tooth surface to lift those stubborn, intrinsic stains.
- The Casual Whitener: This individual has a relatively white smile but wants a quick boost for an upcoming event. For them, convenient whitening strips or a brush-on pen for minor touch-ups would be an excellent, low-commitment choice to erase light surface discoloration.
This flowchart can help you visualize which path is right for your whitening goals.
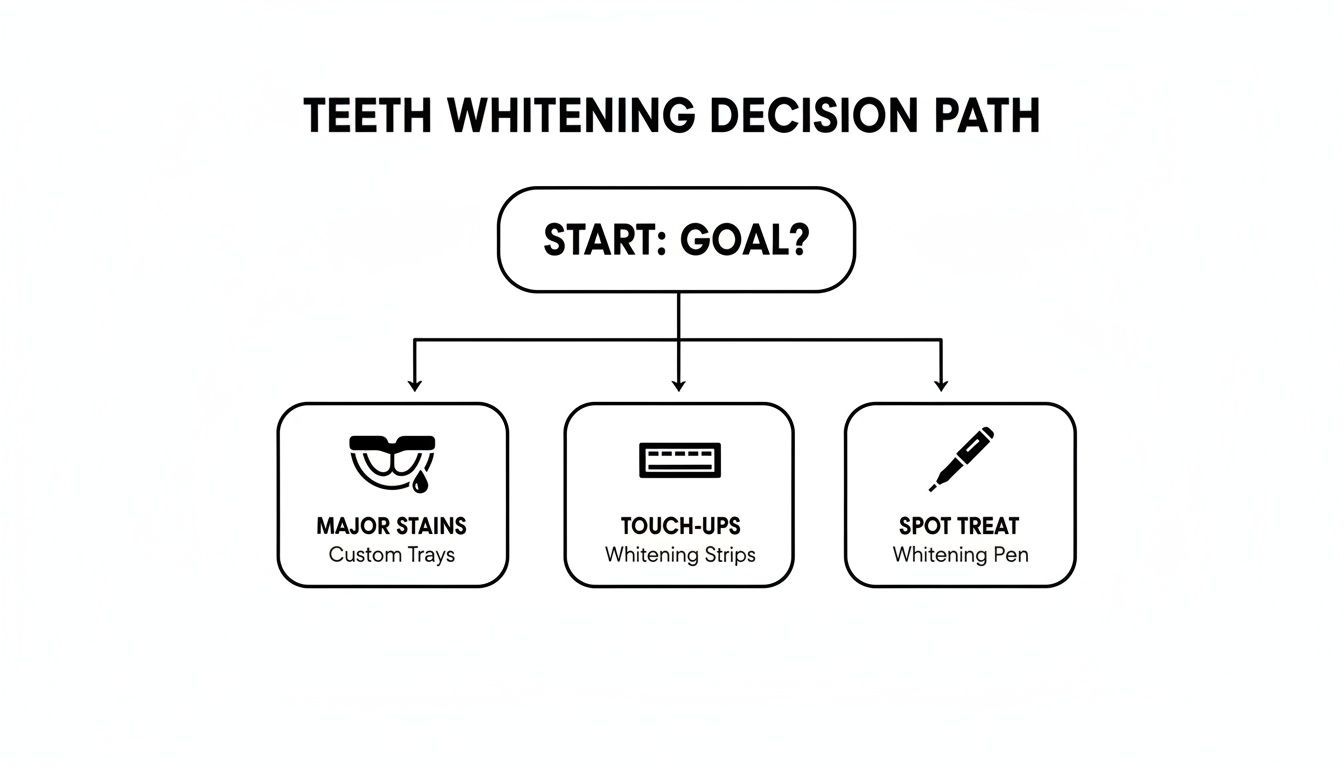
As the chart shows, for a major transformation, tray-based systems are the way to go. For maintenance and smaller adjustments, strips and pens are a perfect fit.
Consider Your Tooth Sensitivity
Tooth sensitivity is a huge factor. If you’ve ever felt that sharp "zing" from a cold drink or even a gust of cold air, you'll want to approach whitening with a bit more care. This doesn't mean you can't whiten; you just need the right kind of formula.
For the Sensitivity-Prone User: Look for products with a lower concentration of carbamide peroxide—think 16% or 22% instead of a high-octane 35%. Also, check the ingredient list for soothing additives like potassium nitrate or fluoride, which are specifically included to help calm nerve endings and reduce discomfort during whitening.
Choosing a gentler formula and whitening less frequently (say, every other day) can still deliver fantastic results without the uncomfortable side effects. It’s a marathon, not a sprint.
Matching Products to Your Lifestyle
Finally, think about your daily routine. How much time can you actually dedicate to whitening each day? Be realistic, because consistency is what gets you results.
- The Busy Professional: If you only have 30 minutes to spare while getting ready in the morning, whitening strips are an easy, no-fuss fit.
- The Dedicated Whitener: If you can set aside 30-60 minutes in the evening while watching TV, a more powerful gel and tray system will give you those dramatic, professional-level results you're aiming for.
A higher-strength gel like PolaDay CP 35% can deliver stunning results in just 30 minutes per day, making it a great option for those who want maximum impact in minimum time.
Ultimately, the best at-home teeth whitening product is the one you’ll actually use correctly and consistently. By aligning your choice with your stains, sensitivity, and schedule, you set yourself up for a comfortable and successful whitening journey.
Your Step-By-Step Guide to Flawless Whitening Results
Even the absolute best whitening product can let you down if the technique isn't right. To get that brilliant, even smile you're after, the secret is a consistent and careful application process. Think of this as your roadmap for using professional at-home whitening gels and trays—the gold standard for achieving a truly dramatic transformation.
Following these steps will ensure you get the most out of every single application. It’s the key to avoiding common pitfalls like wasting gel, getting patchy results, or causing needless gum irritation. Let's get you that flawless smile, safely and efficiently.
Preparing Your Teeth for Treatment
Before you even uncap the whitening gel, a little prep work makes a huge difference. The goal here is simple: create a perfectly clean surface for the gel to work its magic, maximizing its contact with your enamel.
-
Brush and Floss Thoroughly: Start by giving your teeth a gentle brushing with a non-fluoride toothpaste, and then floss to clear out any hidden plaque or food debris. Plaque is like a shield that can block the whitening agent from fully penetrating your enamel.
-
Dry Your Teeth Completely: Grab a clean, soft cloth or a tissue and pat your teeth dry right before you pop in the trays. A dry surface helps the gel stick better, giving you more consistent and uniform whitening from the moment you start.
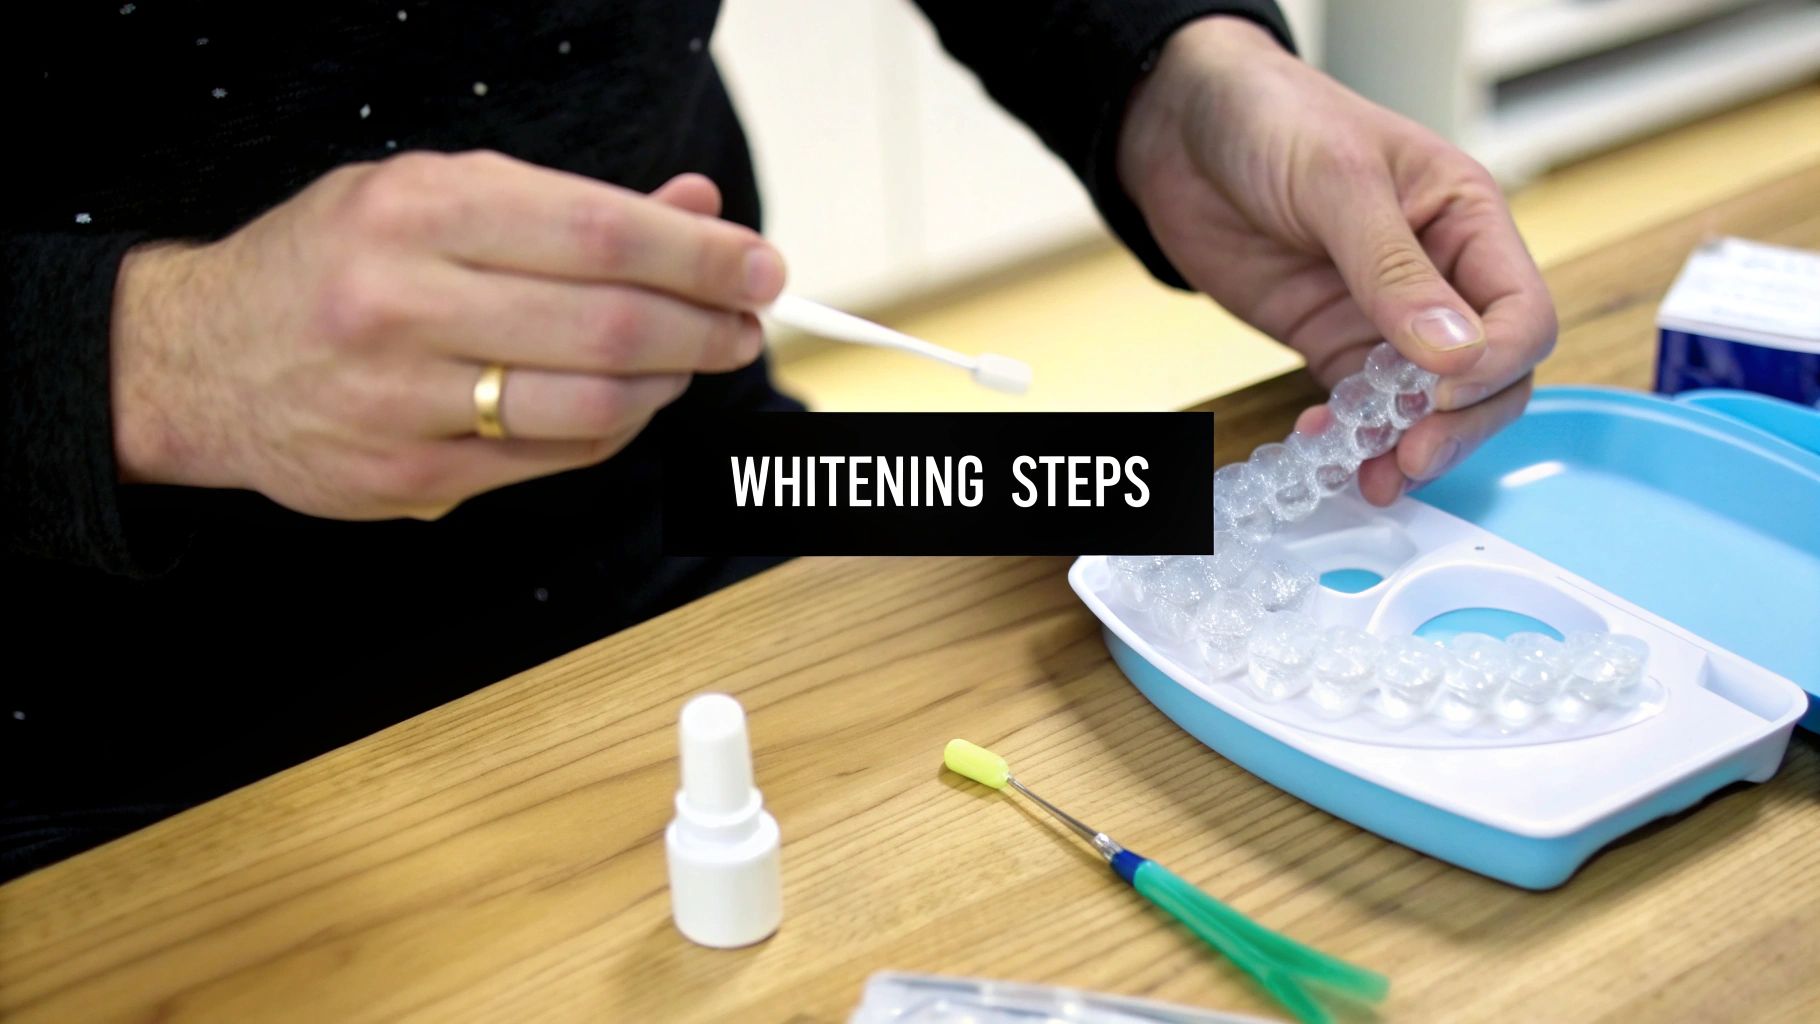
Loading and Applying the Whitening Trays
This is where a little precision goes a long way. The single most common mistake is overloading the trays. Not only does this waste your expensive gel, but it's also the number one cause of gum irritation. Remember: less is more.
Pro Tip: Squeeze a very small, continuous line of gel along the front-facing part of the tray. Another good method is to place tiny individual dots in the bottom of each tooth's indentation. You only need enough to cover the visible surface of your teeth—usually about one-third to one-half of a single syringe for both the upper and lower trays combined.
Once you’ve loaded the trays, gently but firmly place them over your teeth. The gel should spread out evenly across your teeth without spilling over the top edge of the tray. This careful approach is crucial for getting the best at home teeth whitening results without the discomfort. If you're just looking to zap a single stubborn spot, learning how to use a teeth whitening pen can also be a fantastic skill to have in your back pocket.
During and After Your Whitening Session
With the trays securely in place, the hard part is over. Now, it's just a matter of following the recommended wear time for your specific gel strength and keeping a few simple things in mind.
- Wipe Away Excess Gel: If a bit of gel does ooze out onto your gums, don't worry. Just use a cotton swab or a soft toothbrush to gently wipe it away. This one quick step is the best defense against temporary gum sensitivity.
- Follow the Clock: Stick to the recommended application time like glue. Leaving trays in longer won't magically speed up the process, but it can increase your chances of feeling sensitivity.
- Post-Treatment Care: Once your time is up, take out the trays and give your mouth a good rinse with plain water. To clean your trays, use cool water and a toothbrush (no toothpaste!), then let them air dry completely before putting them away.
- Avoid Staining Foods and Drinks: For at least an hour after you whiten, your enamel is a little more porous and can easily soak up stains. Steer clear of coffee, tea, red wine, or dark sauces to protect your bright new smile.
By making this simple routine a habit, you'll ensure every treatment is effective, comfortable, and gets you one step closer to your ideal shade of white.
How to Manage Sensitivity and Protect Your Enamel
Let's talk about the elephant in the room: tooth sensitivity. It’s a super common concern when it comes to at-home teeth whitening, but it absolutely shouldn't be a dealbreaker. For the vast majority of people, any sensitivity you feel during whitening is both temporary and entirely manageable.
So, why does it happen? The active ingredient, peroxide, is great at lifting stains, but it can also temporarily dehydrate your teeth. This process slightly opens up the microscopic tubules in your dentin (that's the layer right under your enamel), which makes the nerve a little more reactive to hot and cold. Think of it as a predictable side effect, not a sign of damage.
The good news is you have a whole toolkit of simple, practical strategies to keep sensitivity at bay. A proactive approach means you can whiten your teeth safely, comfortably, and with total confidence.
Strategies for a Comfortable Whitening Experience
Managing sensitivity is all about preparation and listening to your body. Instead of just trying to "push through" any discomfort, you can use these proven techniques to make your journey to a brighter smile a smooth one. A little planning really does go a long way.
Here are four key strategies to keep in your back pocket:
-
Pre-Treat with Desensitizing Toothpaste: About one to two weeks before you plan to start whitening, make the switch to a toothpaste designed for sensitive teeth. You'll want to look for one with active ingredients like potassium nitrate or stannous fluoride, which work by calming the nerves inside your teeth.
-
Use a Post-Whitening Remineralizing Gel: This is a game-changer. After each whitening session, applying a remineralizing or desensitizing gel can make a world of difference. These gels help soothe your teeth and replenish essential minerals. You can learn more in our guide on teeth desensitizing gel.
-
Choose the Right Formula: If you already know your teeth are on the sensitive side, just opt for a gentler whitening gel. A 16% carbamide peroxide formula, for example, will still deliver fantastic results, just a bit more gradually and with a much lower risk of discomfort compared to a high-strength version.
-
Adjust Your Whitening Schedule: Remember, you are in complete control. If you feel a little zinger, don't whiten every day. Try switching to every other day. Giving your teeth a 24-hour break allows them to rehydrate and recover, which can significantly reduce sensitivity.
When you see sensitivity as a controllable side effect rather than a permanent problem, you can approach at-home whitening with confidence. The key to a successful, pain-free experience is simply listening to your body and adjusting your routine as needed.
It's also crucial to understand which ingredients and methods to avoid so you don't cause long-term issues. It's worth reading up on the potential harm of DIY teeth whitening. By following these straightforward tips, you can effectively manage sensitivity and protect your enamel while achieving the brilliant smile you're after.
Your Top At-Home Whitening Questions, Answered
Starting a whitening journey usually sparks a few questions. Getting clear, simple answers can make the whole process feel easier and give you the confidence you’re doing it right. We've put together a quick rundown of the most common things people ask about at-home teeth whitening.
Think of this as your go-to guide. We’ve collected the essential info you need to whiten your teeth the right way, keep them bright, and protect your dental health from start to finish.
How Long Do Whitening Results Actually Last?
This is the big one, and the honest answer is: it really depends on your lifestyle. When you take care of them, the brilliant results from a full whitening treatment can last anywhere from several months to a year, and sometimes even longer.
But your daily habits are the main event here. Things like coffee, tea, red wine, or tobacco will bring stains back much faster.
The secret to keeping that brightness long-term is all about maintenance. A quick touch-up session with your gel and trays every few months is usually all it takes to lift new surface stains and keep your smile looking fantastic.
Does Teeth Whitening Damage Your Enamel?
When you use them the right way, professional at-home whitening products are considered perfectly safe and won't harm your tooth enamel. The active ingredients—either carbamide peroxide or hydrogen peroxide—work by getting inside the tooth's porous structure to lift stains out. They don't strip or erode the surface.
The key is simply to follow the directions. Overdoing it by whitening too often or leaving the product on longer than recommended is what can cause some temporary sensitivity or gum irritation. Just stick to the plan, and you’ll have a safe, effective treatment.
Can I Whiten Crowns, Veneers, or Fillings?
This is a crucial point to get straight: whitening agents do not change the color of dental work. That includes:
- Crowns
- Veneers
- Fillings
- Dental bonding
These restorations are typically made of porcelain or composite resin, materials that aren't porous and don't react to peroxide whiteners the way natural teeth do. If you whiten the natural teeth around them, you could end up with a very obvious color difference.
If you have any dental work on your front teeth, it’s always smart to have a chat with your dentist first. They can help you map out a strategy to make sure your final smile is even and looks natural. Sometimes, this might mean replacing older restorations so they match the new, brighter shade of your teeth.
Ready to unlock a brighter, more confident smile? The experts at DentalHealth.com have hand-picked a selection of the very best at-home teeth whitening kits and professional-grade gels from trusted brands. Shop professional teeth whitening solutions at DentalHealth.com and find the perfect fit for your smile today.