
Gel Tray Whitening How to Get Even Results Safely
You're probably standing in front of the mirror with a whitening tray in one hand and a syringe of gel in the other, wondering two things. How much gel goes in this tray, and how do you get a brighter result without making your teeth zing or your gums burn?
That's the part most whitening guides rush past. With gel tray whitening, the difference usually comes from tray fit and gel dosing, not from chasing the strongest percentage on the label. A snug tray keeps gel where it belongs. A small, controlled amount helps the enamel get even contact while the gums stay out of the line of fire.
Used well, tray whitening has strong long-term support. In a retrospective clinical follow-up of 95 patients, 16% carbamide peroxide used in individualized trays for 90 minutes per day over 4 weeks produced whitening that remained stable for 42 months, with statistically significant changes in multiple color measurements and end-of-treatment color differences of ΔE00 = 4.6 ± 1.2 and ΔE = 7.8 ± 1.8 (long-term clinical follow-up on tray whitening). That matters because it tells you this method isn't just a quick cosmetic trick when it's done properly.
What Gel Tray Whitening Is and Who It Suits Best
You notice it in bathroom light first. The front teeth look a little duller than they used to, the canines read darker at the corners of your smile, and strips have only brightened the flat middle surfaces. Tray whitening suits that situation because it carries gel across more of the tooth surface and keeps contact more consistent.
Gel tray whitening uses a peroxide gel placed inside a fitted tray, then worn over the teeth for a set period. The goal is controlled contact. In practice, the people who get the most even result are not always the ones using the strongest gel. They are the ones using a tray that seats properly and a small enough amount of gel that it stays on the enamel instead of squeezing onto the gums.
Who usually does well with trays
Tray whitening tends to work well for people who want fuller coverage across the visible smile line, especially when discoloration reaches the tooth edges or varies from tooth to tooth. It also suits careful routine-followers. If you can wear the trays as directed, clean them properly, and resist overloading them with gel, you are usually a good candidate.
I often recommend trays over strips for people with mild crowding, uneven tooth contours, or a history of patchy whitening. A tray can adapt around those shapes better than a flat strip can. Results still depend on the fit. A loose tray and excess gel often create the two complaints I hear most: blotchy color and irritated gums.
Peroxide percentage matters, but less than many people expect. With a well-fitted tray and sensible dosing, lower or mid-strength options are often easier to stay consistent with, and consistency is what usually gets the better cosmetic result at home.
Trays can whiten natural tooth structure evenly, but they will not change the color of a filling, crown, veneer, or bonded edge.
When to pause first
Some mouths need a check before whitening starts. Hold off if you have untreated decay, sore or bleeding gums, exposed root surfaces, cracked teeth, or one tooth that has turned darker than the rest without an obvious reason. Those cases need an exam, not a stronger gel.
Sensitivity also does not mean you have to give up on trays completely. It means the plan needs adjusting. In my experience, many people can continue by shortening wear time, spacing out sessions, and using less gel rather than stopping outright. That approach works far better than pushing through pain and hoping it settles.
Set expectations carefully. Whitening can improve the overall brightness of natural enamel and make the smile look cleaner. It does not make every tooth identical, and it does not erase every deep stain at the same speed.
Choosing the Right Tray for Even Whitening
If your whitening has ever looked patchy, the tray is usually the first thing I'd question. A tray that shifts, lifts, or floods the gums won't give you a clean result no matter what gel you buy.
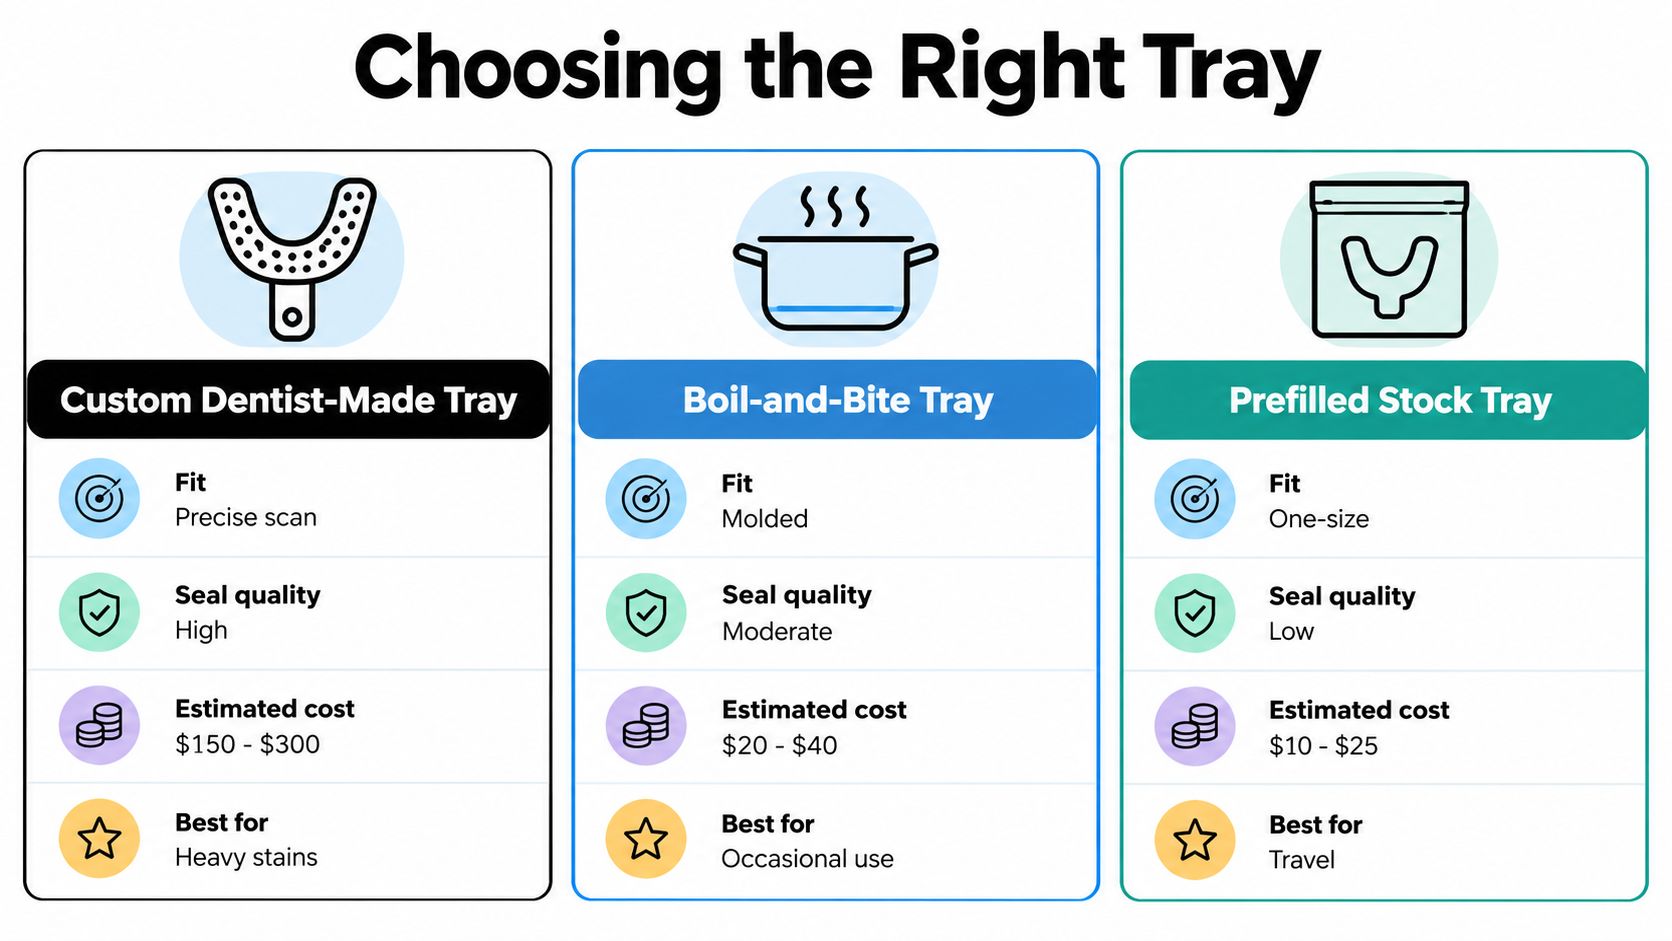
How the main tray types compare
| Tray type | What it does well | Where it falls short | Best fit for |
|---|---|---|---|
| Custom dentist-made tray | Closest fit, better seal, more precise gel placement | Higher cost, requires impressions or scans | People who want the most control or have a sensitivity history |
| Boil-and-bite tray | More adaptable than stock trays, accessible for home use | Can distort, often bulky at the gumline | People who want a middle ground |
| Prefilled stock tray | Convenient, fast, simple for occasional use | Least precise fit, more room for uneven contact | People who value convenience over customization |
For readers comparing formats in more detail, this guide to teeth whitening trays is a useful overview of how tray styles differ in daily use.
What even whitening actually depends on
A tray needs to do two jobs. It should seat fully over the teeth you want to whiten, and it should keep the gel from drifting onto the gums or pooling in one area.
A head-to-head clinical trial found that a custom tray system with 5% carbamide peroxide produced significantly greater color improvement than an 18% carbamide peroxide paint-on gel and a 1% hydrogen peroxide dentifrice, with adjusted mean changes of Δb = -1.83 and ΔL = 1.45 at day 15**. The authors concluded that barrier-based tray delivery outperformed barrier-free systems on multiple color metrics (clinical comparison of tray delivery versus non-tray formats). That's a strong reminder that delivery method matters as much as concentration.
Practical rule: If the tray is loose enough to rock when you smile or talk, it's loose enough to create uneven whitening.
Quick mirror fit check
Before you ever add gel, place the empty tray in your mouth and check these points:
- Stable seating: It should sit down over the teeth without springing up at one side.
- Clean edge: The tray edge shouldn't dig sharply into the gums or roll outward.
- No obvious gaps: If you can see open space over the front teeth, gel will drift.
- Comfort at the molars: If the back teeth don't seat, the front often won't seal correctly either.
A tray that passes those checks gives you a much better shot at even whitening with less cleanup.
Preparing Teeth and Loading Gel the Right Way
Many people sabotage a good tray. They use too much gel, seat the tray hard, and then assume the burning means it's working. It usually means the gel is on the gums.
Prep that makes the gel behave
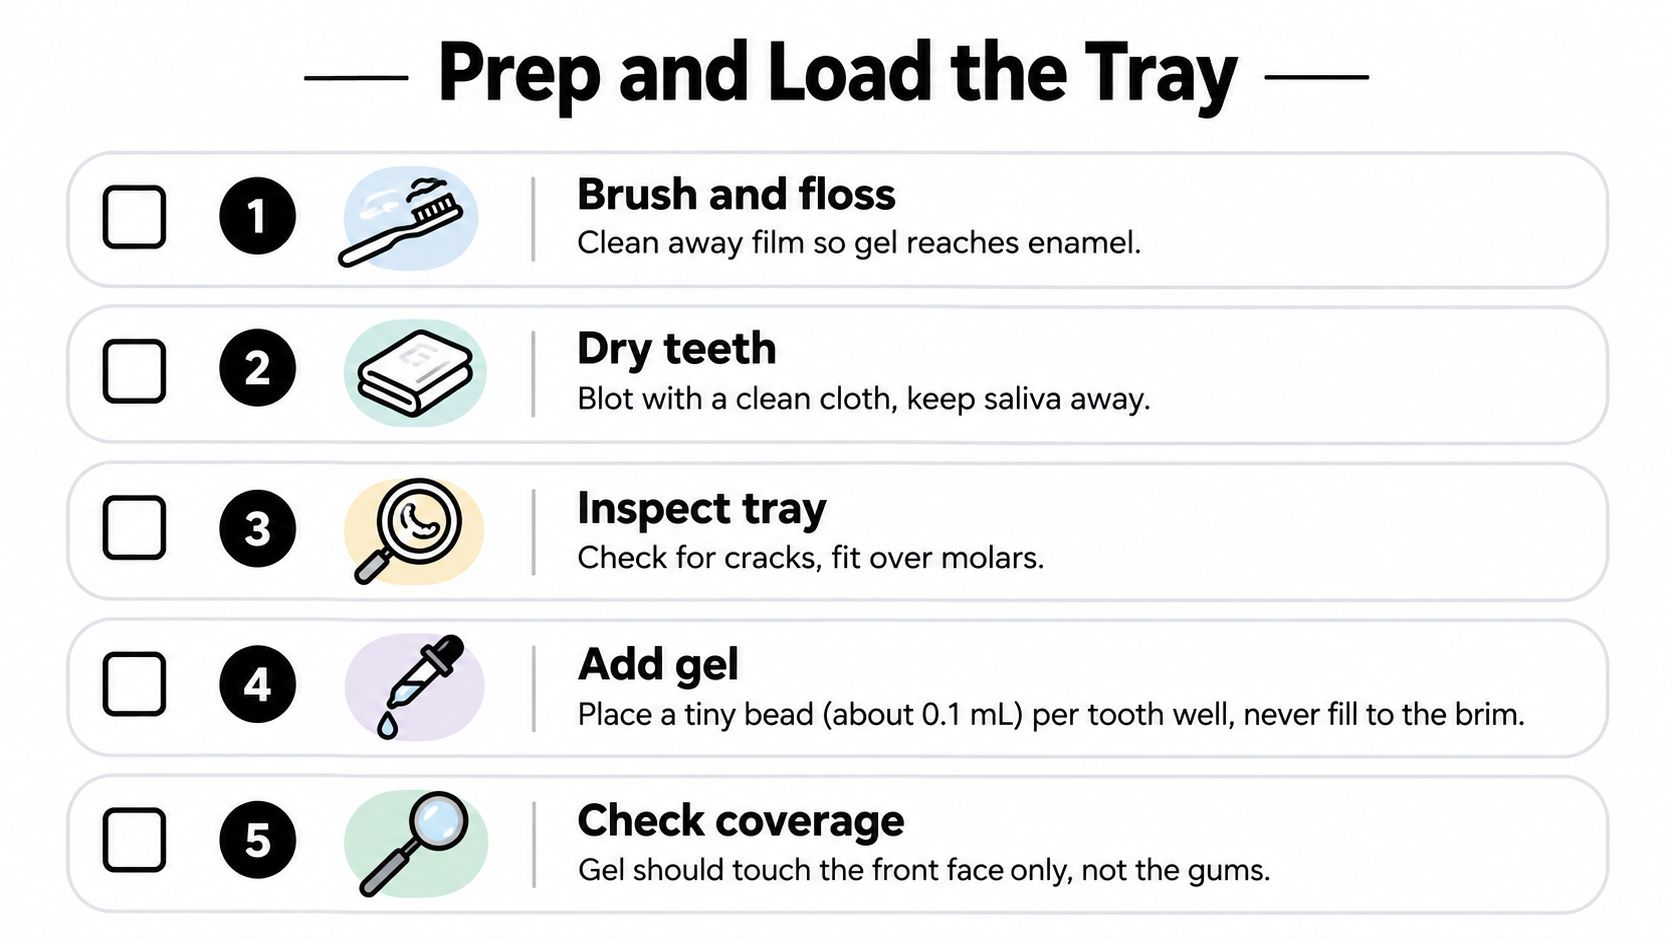
Start with clean teeth. Brush and floss so the gel touches enamel instead of plaque film, then dry the front surfaces gently with clean gauze, tissue, or a soft cloth. You don't need a perfectly moisture-free mouth, but a drier surface helps the gel stay where you place it.
Inspect the tray before loading it. Look for small splits, warped edges, or residue left from the last use. If old gel has dried into the tray, rinse it away and let the tray dry before you refill it.
For a practical walkthrough of tray loading, DentalHealth.com has a helpful guide on how to use teeth whitening gel.
The less-is-more loading rule
You need far less gel than you think. Place a small bead in the facial portion of each tooth space you plan to whiten. You want contact on the front face of the tooth, not a tray full of extra material sloshing toward the gumline.
Use enough gel to coat the tooth surface once the tray seats. Don't fill the well, and don't chase overflow as proof you used the right amount.
Common loading mistakes include:
- Overfilling every tooth well: This causes gum irritation faster than it improves whitening.
- Putting gel edge to edge: Gel near the tray borders is the part most likely to leak.
- Loading teeth you won't show when you smile: That wastes gel and increases the mess.
- Ignoring one crowded tooth: Crowded areas often need the smallest amount because the tray has less room there.
Before the tray goes in
Seat the loaded tray gently, then look in the mirror. If gel expresses onto the gums, wipe it away right away with a cotton swab or clean fingertip. Don't leave it there assuming a little extra contact will help. It won't help the gum tissue, and it won't make that tooth whiten more evenly.
If you're seeing overflow on nearly every tooth, the issue is almost always dose or fit, not weak gel.
Fitting Trays and Managing Wear Time Safely
You seat the tray, look in the mirror, and one canine still looks dry while gel is already creeping onto the gums near another tooth. That pattern matters. Uneven contact is usually what causes patchy whitening, and excess gel at the edges is one of the fastest ways to create soreness you could have avoided.
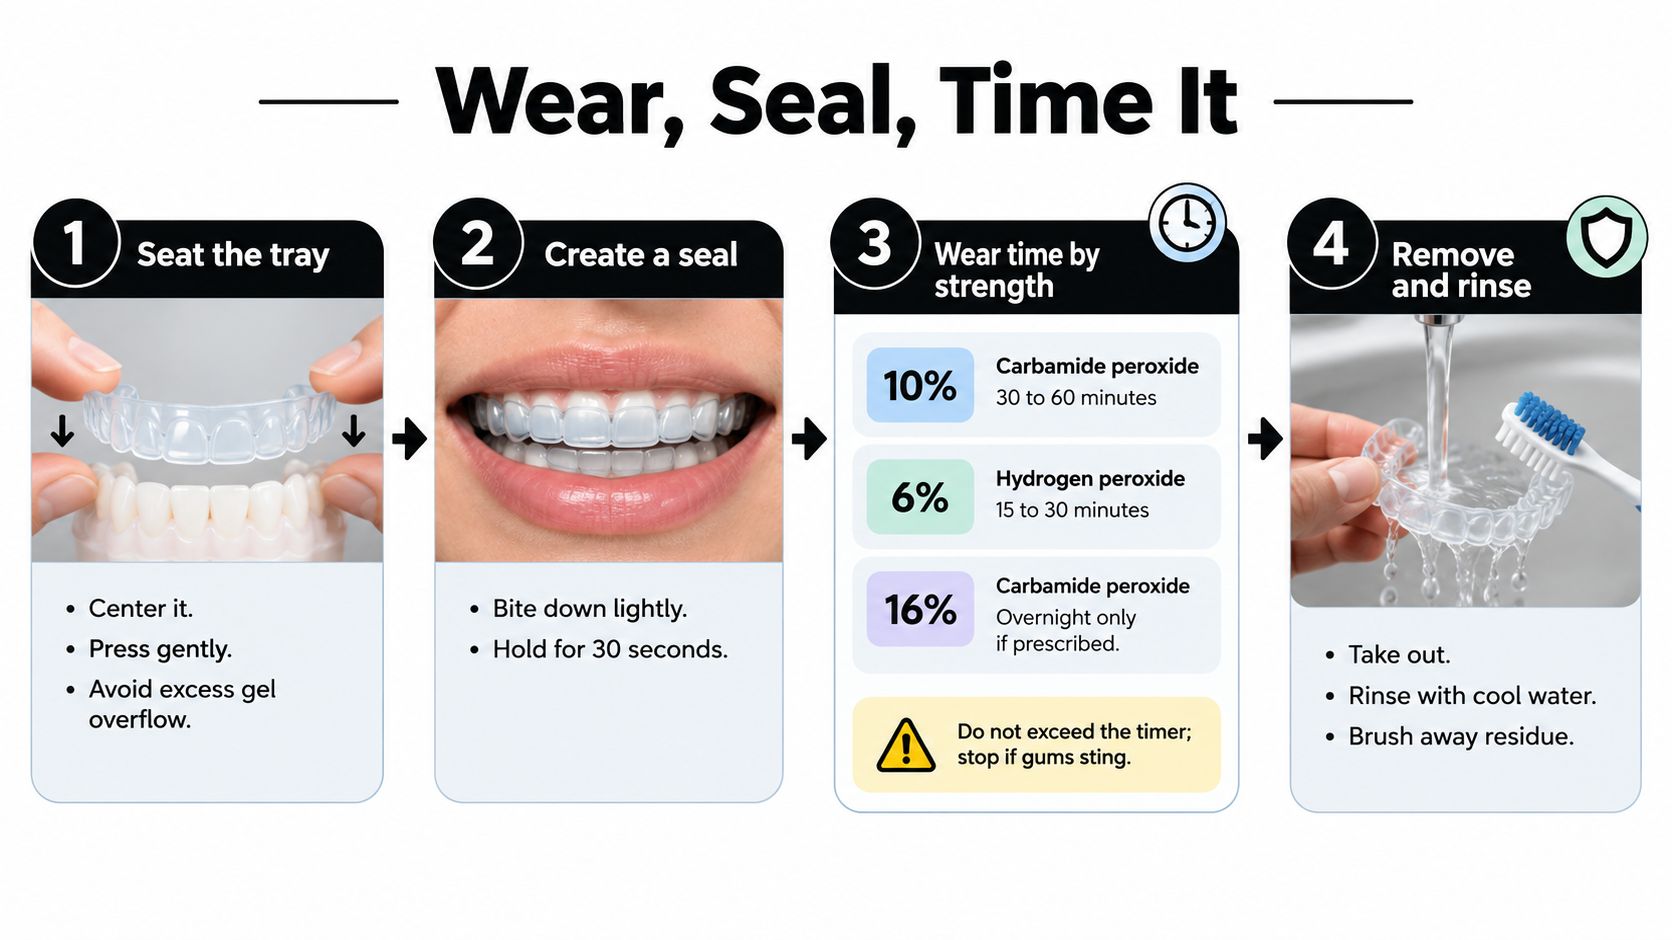
Start by aligning the tray over the front teeth, then guide it back over the rest of the arch. Use light fingertip pressure to seat it. Hard biting does not improve adaptation. It usually pushes gel toward the gumline and leaves less where you want it, on the front surface of the tooth.
A tray should feel snug and stable. It should not pinch, rock, or spring up on one side. If it does, take it out and correct the problem before the session starts. In practice, I see more uneven results from a poorly seated tray than from choosing between two reasonable peroxide strengths.
Wear time matters more than pushing the concentration
Tray whitening works best when the contact is even and the schedule is boringly consistent. As noted earlier, home tray systems can produce meaningful shade change over a planned treatment period. The mistake is trying to speed that up by wearing the tray longer than directed, doubling up after a missed day, or assuming stronger gel cancels out poor fit.
I usually tell patients to judge the session by three things: the tray stays seated, the gums stay clean, and the timer ends the session. If one of those breaks down, the answer is to adjust fit or wear time, not to push through.
A safe wear routine
Use the instructions for your specific gel or the schedule your dentist gave you. Those directions should always outrank general advice. These guardrails keep home use safer and more predictable:
- Set a timer every session: People who guess almost always drift longer than they think.
- Keep your jaw relaxed: Clenching tends to squeeze gel out and can make the tray feel worse.
- Check the tray once, then leave it alone: Repeatedly pulling the lip back to inspect the gel can disturb the seal.
- End the session on time: Longer wear does not guarantee a whiter result, but it does raise the odds of irritation.
- Stop and remove the tray if you feel sharp gum burning: Mild pressure from the tray can be normal. Stinging tissue is not.
Here's a visual demonstration of seating and wear technique:
If the tray never feels right, adjust early
A tray that lifts at the molars, digs into the frenum, or leaves one side of the front teeth looking dry is not just annoying. It changes where the gel sits and how long it stays there. That is why two people using the same peroxide percentage can have very different results.
Home whitening research and review data support tray systems as an effective option, but irritation risk goes up when tray use is sloppy or exposure runs too long. A Cochrane review found tray-based carbamide peroxide systems outperformed placebo in short home-treatment comparisons, while gingival irritation remained a known trade-off in tray use versus some strip comparators (Cochrane review of home-based whitening).
The practical takeaway is simple. Better tray fit and smaller, controlled gel placement usually do more for even whitening and comfort than chasing a stronger formula or stretching session time. If sensitivity starts to build, shorten the next session or take a rest day before you reach the point where you have to stop altogether.
Handling Sensitivity and Troubleshooting Common Issues
Sensitivity is where people either settle into a good routine or quit too early. The first few days are the usual trouble spot. The ADA notes that tooth sensitivity can occur in up to two-thirds of bleaching users early in treatment, usually starts within two to three days, and typically resolves by day four after treatment. The same guidance also points to clinical evidence that a 5% potassium nitrate-fluoride gel applied in the tray reduced sensitivity for 11 of 12 patients who used it, allowing most to finish bleaching (ADA guidance on whitening and sensitivity).
A keep-going sensitivity plan
If your teeth feel zippy but the pain is brief and generalized, you usually don't need to abandon the whole process. Try this:
- Shorten the next wear session: Back off before sensitivity escalates.
- Take a rest day if needed: One skipped session is better than pushing until you can't tolerate any more.
- Use a desensitizing product between whitening sessions: Potassium nitrate and fluoride are the ingredients I look for most often.
- Check the tray edges and gel amount again: Sensitivity and gum irritation often trace back to excess gel.
For additional home care ideas, this article on how to reduce teeth sensitivity after whitening covers practical options you can add between sessions.
When the problem isn't sensitivity
Not every whitening complaint comes from the teeth themselves.
- White gum spots or blanching: This usually means gel contacted the tissue. Remove the tray, rinse, and reduce the amount next time.
- One tooth looks patchy: That often happens early. Continue only if the tray seats evenly and the gumline is calm.
- Pooling saliva: Swallow normally and avoid tongue-checking the tray every minute. Fidgeting breaks the seal.
- A sharp, localized pain on one tooth: Pause and get that tooth checked.
Some people ask about numbing products when they're struggling to get through a session. If you're comparing options for topical comfort products in general, a page showing lidocaine gel pricing can help you understand what those products are, but I'd be careful not to self-medicate around whitening pain without checking the cause first. Numbing a problem tooth can hide the warning sign you need to pay attention to.
If sensitivity improves when you shorten wear time, that's a dosing problem. If one tooth keeps flaring no matter what, that's a dental exam problem.
Aftercare Habits That Keep Your Smile Bright
The first couple of days after a whitening session matter more than people think. Freshly whitened teeth tend to reward good habits and punish sloppy ones. If you go straight from whitening into coffee, red sauce, tobacco, or dark berries without rinsing and cleaning well, the smile can lose momentum fast.
What helps results last
A few habits make a visible difference:
- Rinse the trays well after use: Cool water is enough. Let them dry before storage.
- Store gel correctly: Keep the syringes sealed and follow the package guidance so the product stays usable.
- Keep staining foods and drinks in check right after sessions: If you do have coffee or tea, rinse with water soon after.
- Stay current with brushing and flossing: Whitening looks better on clean enamel.
Touch-ups work best when they're conservative. Don't keep whitening because you still notice tiny natural variations between teeth. Chasing perfect uniformity often creates the exact sensitivity and gum irritation that interrupts treatment.
The best long-term mindset is maintenance, not overcorrection. If your tray fits well, your gel amount stays controlled, and you respect recovery when your teeth ask for it, gel tray whitening usually stays predictable.
DentalHealth.com carries professional-grade at-home whitening products, including tray-compatible gels, prefilled tray options, and sensitivity support items that fit the kind of routine described here. If you want to compare products, read practical whitening guidance, or build a safer at-home setup, visit DentalHealth.com.