

Teeth whitening trays: How they work and safe, brighter at-home results
Teeth whitening trays are one of the most effective ways to get professional-level results right from your own home. Think of them as a custom delivery system—a device that looks a bit like a mouthguard and holds whitening gel directly and evenly against your teeth. This direct contact is key to unlocking the gel's full power for a truly brilliant smile.
Your Guide to a Brighter At-Home Smile
Welcome to your complete guide for achieving a more confident smile, without ever leaving the house. While you've probably seen options like whitening strips and pens on store shelves, teeth whitening trays often deliver more consistent and dramatic results.
Their smart design ensures every surface of every tooth gets uniform coverage. This prevents the powerful whitening gel from getting washed away or diluted by your saliva, which is a common problem with less precise methods.
This approach is a big reason why the at-home dental care market is booming. The global demand for brighter smiles without constant dental visits is surging, with the teeth whitening market projected to hit USD 8.69 billion by 2026. More specifically, the teeth whitening tray segment is expected to grow by USD 34.7 million between 2023 and 2028. That shows just how many people are trusting this method to reach their smile goals.
What You Will Learn
This guide will walk you through everything you need for a successful whitening journey. We’ll break down all the essential topics to make sure you get the best possible outcome.
Here’s a sneak peek at what we'll cover:
- Choosing the Right Tray: We'll compare custom-fit, boil-and-bite, and prefilled trays to help you find your perfect match.
- Understanding the Science: We'll dive into how professional-grade gels like Opalescence and PolaDay work to safely lift away stains.
- Safe and Effective Use: You'll get our step-by-step instructions for a flawless application, every single time.
A truly radiant smile involves more than just tooth color. While teeth whitening focuses on brightness, other aesthetic treatments can address aspects like gum display, contributing to an overall harmonious appearance and achieving a picture-perfect smile.
Our goal here is simple: to give you the knowledge you need to whiten your teeth safely, manage any potential sensitivity, and keep your stunning results looking great for years to come.
Comparing Custom-Fit, Boil-and-Bite, and Prefilled Trays
Not all teeth whitening trays are created equal, and figuring out the differences is the first real step toward finding your perfect match. Think of it like picking the right tool for a job—each type of tray is designed with a specific person in mind, balancing precision, convenience, and cost. Let's break down the three main players in the world of at-home whitening trays.
You’ve basically got three choices: custom-fit trays made by a dental professional, moldable boil-and-bite trays you fit yourself, and single-use prefilled trays. Each one offers a unique path to a brighter smile, with its own set of pros and cons.
The Gold Standard: Custom-Fit Trays
Custom-fit trays are the real deal, crafted by a dental lab using a precise impression of your teeth. The process creates a tray that hugs every nook and cranny of your smile perfectly, almost like a custom-tailored suit.
Because of this exact fit, the whitening gel is held securely right against the tooth surface. This ensures maximum contact and minimal leakage onto your gums, which is a big deal for both effectiveness and comfort. You get less wasted gel and a much lower risk of gum irritation. While they do have a higher upfront cost, their durability and incredible effectiveness make them a worthwhile investment for anyone serious about whitening. You can dive deeper into this personalized approach by exploring our guide to custom-fit teeth bleaching trays.
The DIY Option: Boil-and-Bite Trays
Boil-and-bite trays offer a more affordable and accessible at-home alternative. They're made from a special thermoplastic material that you soften in hot water. Then, you simply bite down into the softened plastic to create a semi-custom mold of your teeth.
While they're not as precise as the professionally made trays, they provide a much better fit than any generic, one-size-fits-all option. This makes them a popular middle ground, offering a great balance between cost and effectiveness for a lot of people. The only catch is that they can sometimes feel a bit bulky, and getting that perfect mold can take a little practice.
The Ultimate Convenience: Prefilled Trays
For anyone who puts ease and simplicity above all else, prefilled trays are the answer. These are disposable, single-use trays that come pre-loaded with whitening gel, completely eliminating any need for measuring or filling syringes.
You just wear them for the recommended time and then toss them. This grab-and-go approach is perfect for travel, hectic schedules, or anyone new to whitening who just wants a no-fuss introduction. The trade-off is usually a less customized fit and a higher cost per treatment when compared to using a reusable tray with your own gel.
To make the choice a little easier, here’s a quick rundown of how the three types of whitening trays stack up against each other.
Teeth Whitening Trays: A Quick Comparison
| Tray Type | How It's Made | Best For | Average Cost | Pros | Cons |
|---|---|---|---|---|---|
| Custom-Fit | From a dental impression taken by a professional | Maximum effectiveness and long-term use | $150 - $500 | Perfect fit, even whitening, minimal gum irritation, durable | Highest initial cost, requires a dental visit or impression kit |
| Boil-and-Bite | Molded at home by boiling in water and biting down | Budget-conscious users seeking a better-than-generic fit | $15 - $50 | Affordable, better fit than prefilled, widely available | Can be bulky, fit isn't perfect, may cause uneven results |
| Prefilled | One-size-fits-most, pre-loaded with gel | Convenience, travel, and first-time users | $20 - $80 per kit | Extremely easy to use, no mess, great for on-the-go | Higher cost per treatment, less effective fit, potential for gum sensitivity |
Ultimately, the best tray for you comes down to what you value most. Are you after the absolute best results, the most convenient option, or the best bang for your buck?
This flowchart can help you visualize the decision-making process based on your priorities.
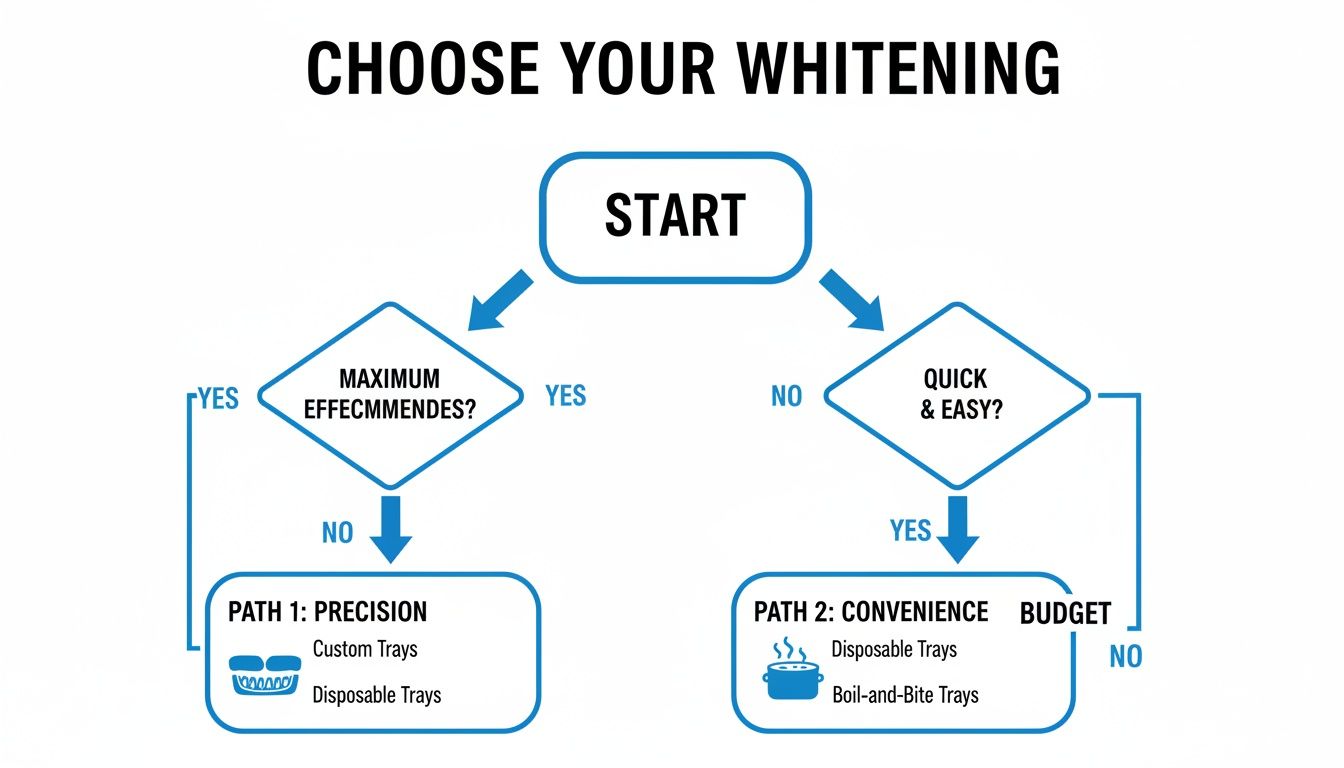
As the guide shows, aligning your goals—whether that's precision, budget, or pure convenience—with the right type of whitening tray is the key to getting the results you want. Each path leads to a brighter smile, but the journey there is just a little bit different.
How Whitening Gels and Trays Work Together
To get a grip on how whitening trays work, think of the tray as the perfect delivery system and the whitening gel as its powerful cargo. The tray's main job is simple but crucial: it holds the gel right up against your teeth, creating the ideal environment for the active ingredients to do what they do best.
The real magic, of course, is in the gel itself. Most professional-grade whitening gels use an active ingredient like carbamide peroxide or hydrogen peroxide. Once these compounds touch your teeth, a pretty amazing chemical reaction kicks off.
They release tiny oxygen molecules that are small enough to get into the microscopic pores of your tooth enamel. Once inside, they hunt down and break apart the stubborn, stained carbon bonds that cause yellowing from things like coffee, tea, and red wine.
The Science of the Snug Fit
This is exactly why the fit of your whitening trays is so important. A tray that fits snugly acts as a barrier, keeping saliva from sneaking in and diluting the gel. Saliva can quickly neutralize peroxide, basically stopping the whitening process cold.
A good, tight fit means the gel stays potent and active for the entire treatment. This gives those oxygen molecules maximum time to work, leading to more consistent, even, and impressive results across your whole smile.
A secure fit doesn't just improve results; it makes the whole process more efficient. Custom molding ensures 20-30% better peroxide retention than whitening strips, which cuts down on gel waste and can even lower gum sensitivity.
This kind of efficiency is a big deal as more people turn to at-home dental care. In fact, online sales for these products are projected to blow past USD 1.4 billion by 2026, largely because people are looking for effective solutions they can get shipped quickly. The superior performance of tray-based systems is a key reason for this growth, especially in North America where they're still a top choice. You can find more details in this U.S. tooth whitening market trends report.
Matching Gel Strength to Your Goals
Whitening gels aren't one-size-fits-all; they come in different concentrations. Picking the right one really depends on how sensitive your teeth are and what kind of results you're after. That percentage you see on a product, like PolaDay CP 35%, tells you the strength of the active ingredient.
Here’s a quick guide to what that means for you:
- Higher Concentrations (e.g., 35% Carbamide Peroxide): These gels get the job done fast, often requiring wear times of only 15-30 minutes a day. They're perfect if you're looking for quick results and don't typically struggle with tooth sensitivity.
- Lower Concentrations (e.g., 10-16% Carbamide Peroxide): These are gentler options made for longer wear times—sometimes even overnight. They are the go-to choice for people with sensitive teeth, delivering gradual but very effective whitening.
At the end of the day, the tray and the gel are a team. The tray creates the perfect application environment, and the gel brings the chemical power needed to lift away years of stains. You can dive deeper into the specifics by reading our guide on hydrogen peroxide whitening gels.
Your Step-by-Step Guide to Using Whitening Trays
Ready to get started? Knowing the right way to use your whitening trays is the key to getting those bright, even results you're after without any of the guesswork.
When you use your teeth whitening trays correctly, you're not just making them more effective; you're also dodging common issues like gum irritation. Just think of this as your practical roadmap for a safe and successful whitening session.
This process is simple and easy to follow. Let’s walk through it from start to finish to make sure you get the most out of every single treatment.
Prepare for Your Whitening Session
Before you even think about opening the whitening gel, a little bit of prep work goes a very long way. The idea here is to start with a perfectly clean canvas, giving the gel direct contact with your enamel.
- Brush Your Teeth Thoroughly: Grab a soft-bristled toothbrush and gently brush your teeth with just water. It's best to skip the fluoride toothpaste right before whitening, as it can sometimes create a thin barrier that gets in the way of the gel's absorption.
- Floss Between Each Tooth: Don't skip this part! Flossing is essential for clearing out plaque and food particles from those tight spaces between teeth. This ensures those in-between areas get just as white as the front surfaces.
- Rinse and Dry: Give your mouth a good rinse with water, then gently pat your teeth dry with a clean tissue or cloth. A drier surface helps the whitening gel stick where it's supposed to.
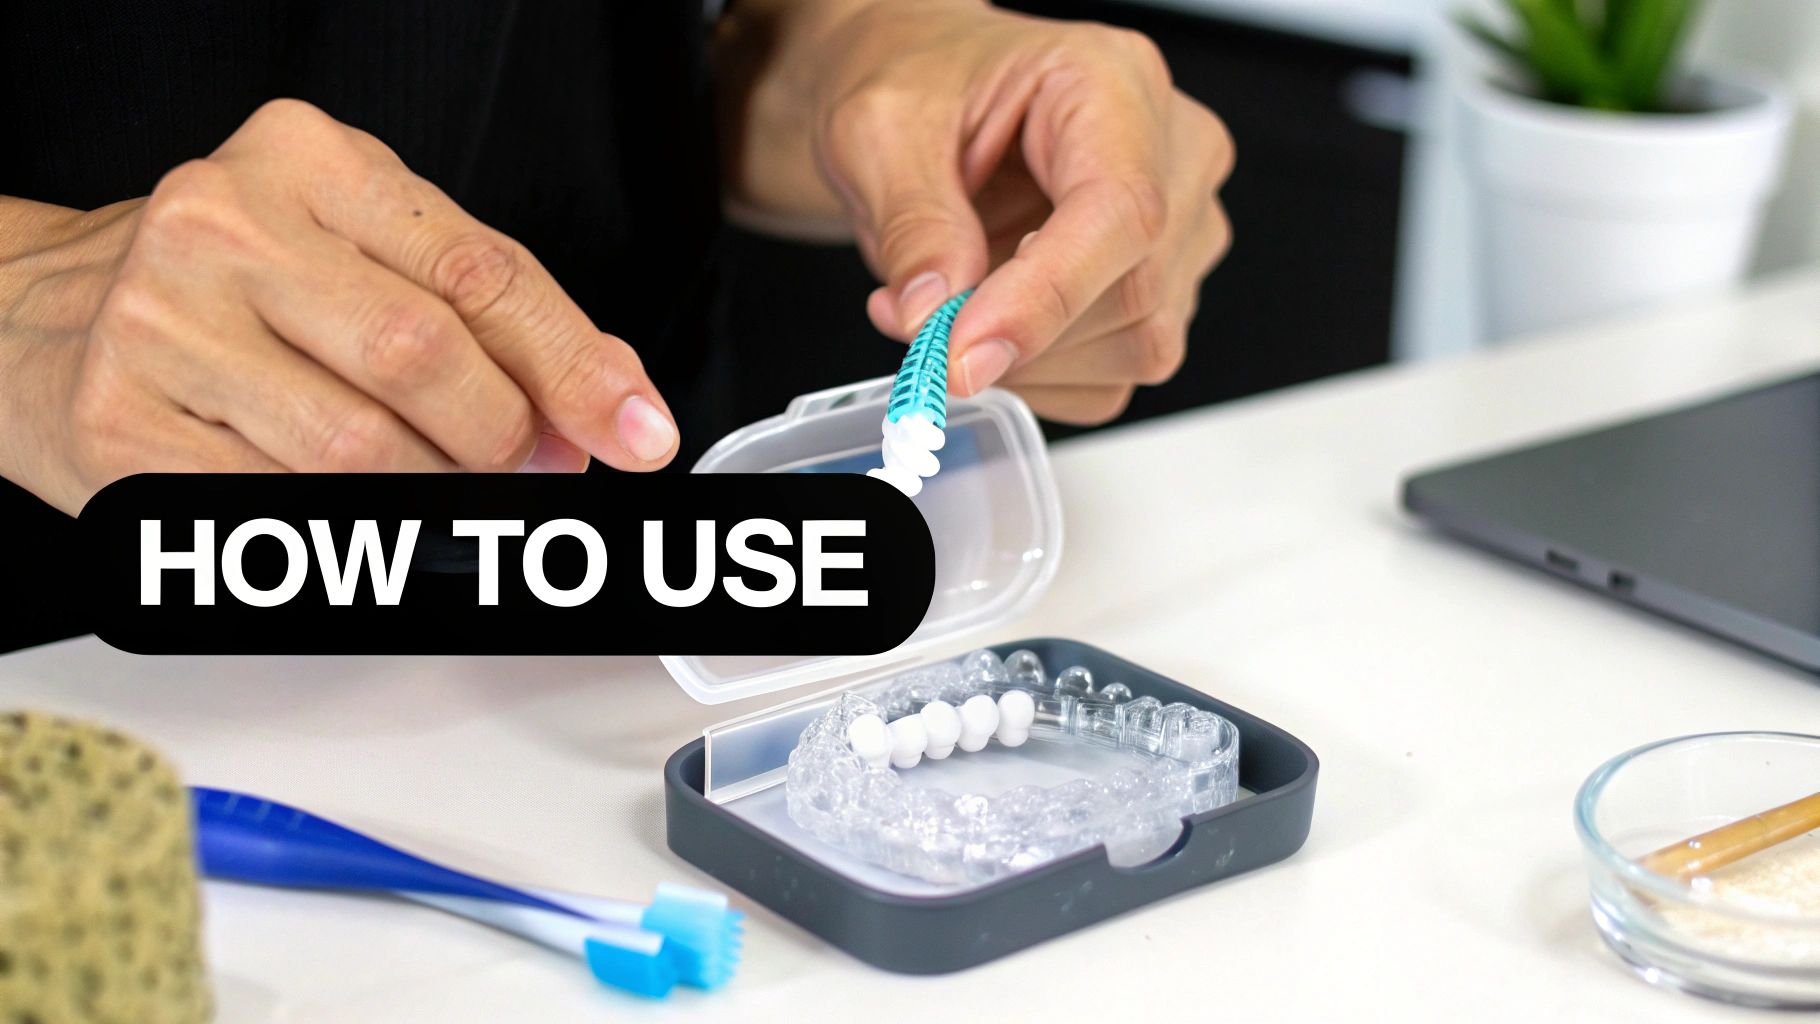
Apply the Gel and Position the Trays
Now for the main event—getting the gel into the trays. Precision is what you're aiming for here. Using too much gel is probably the most common mistake people make, and it's the number one cause of gum irritation. Less is definitely more.
Start by squeezing a tiny bead of whitening gel into the inner front portion of each tooth impression inside the tray. You only need gel where the tray will cover the visible, "smile" part of your teeth.
Once you’ve got the gel in, gently but firmly seat the tray over your teeth. You're looking for a snug fit. If you see any extra gel squishing out onto your gums, wipe it away immediately with a cotton swab or a soft cloth.
Pro Tip: Avoid the temptation to overfill your trays. A small drop is all you need for each tooth. The pressure from putting the tray on will spread that little bead of gel evenly across the entire tooth surface.
Post-Treatment and Tray Care
Once your session is over—whether it was 30 minutes or an overnight treatment—it’s time for cleanup. Taking care of your trays properly will keep them in great shape for next time and help protect your smile.
- Rinse Your Mouth: Take the trays out and rinse your mouth thoroughly with lukewarm water. This will wash away any leftover gel. You'll want to avoid brushing your teeth right away, as your enamel might be a little more porous for a short time.
- Clean Your Trays: Use a soft toothbrush and cool water to gently scrub the inside and outside of your teeth whitening trays. Steer clear of hot water, as it could warp the plastic.
- Store Them Safely: Let the trays air dry completely before popping them back into their protective case. This simple step prevents bacteria from growing and keeps them from getting damaged.
One last thing: to protect your newly brightened smile, try to avoid stain-causing foods and drinks—think coffee, red wine, or dark berries—for at least a few hours after each session. It’s a small step that makes a big difference in how long your results last.
How to Manage and Prevent Teeth Sensitivity
Let's talk about the number one concern most people have with teeth whitening trays: sensitivity. That little "zing" you might feel can be alarming, but it's usually temporary. It happens because the whitening process can briefly dehydrate your teeth, making the nerves a bit more responsive. The good news? It's completely manageable—and often preventable—if you know what you're doing.
The real key to a comfortable experience is to be proactive. Instead of waiting for sensitivity to show up, a few simple steps before you even start can make a world of difference.
Proactive Strategies for a Comfortable Whitening Journey
Think of this as prepping for success. A little groundwork can ensure your path to a brighter smile is smooth and pain-free.
Here are a few highly effective ways to get ahead of sensitivity:
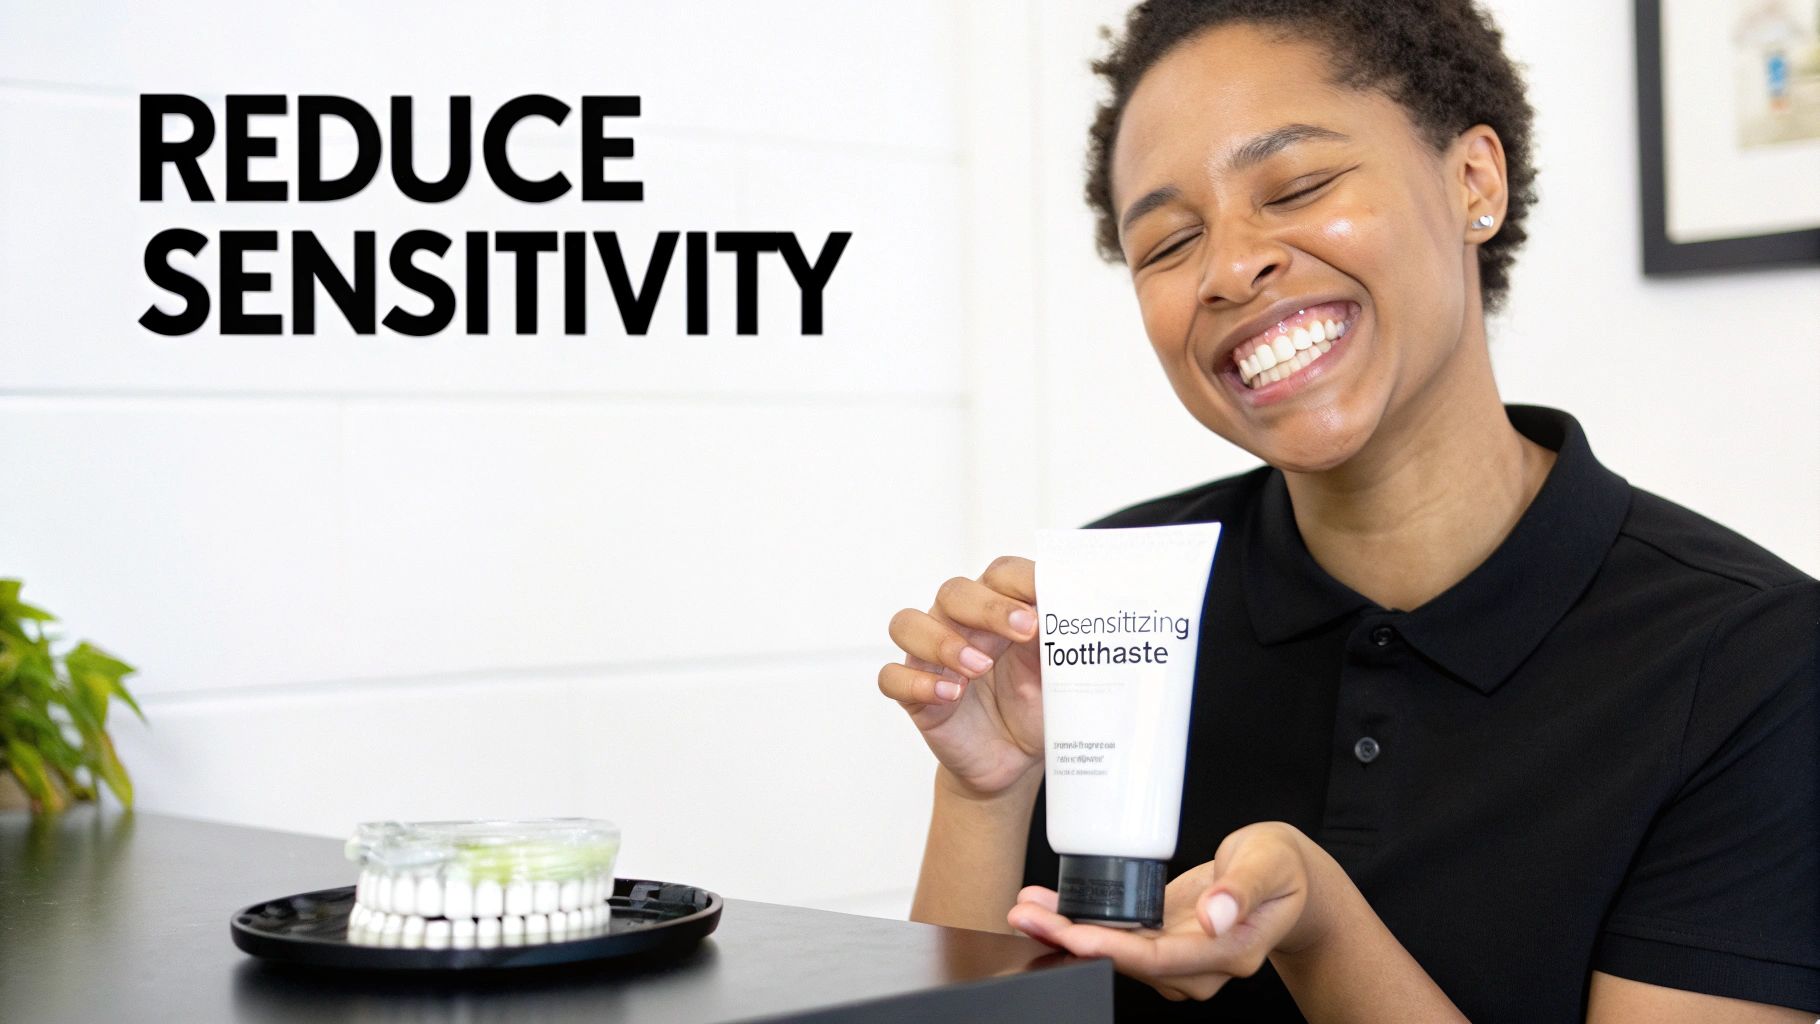
- Prep with Desensitizing Toothpaste: About a week before your first treatment, switch your daily toothpaste to a sensitivity-focused one like Fluoridex. This helps build up a protective barrier over the more sensitive parts of your teeth.
- Choose a Lower Concentration Gel: You don't always need the strongest formula. A whitening gel with a lower percentage of carbamide peroxide works just as effectively over time but is much gentler on your teeth.
- Reduce Your Wear Time: If the instructions say 30 minutes, try starting with just 15 or 20. You can always work your way up as your teeth get used to the process.
This proactive mindset is crucial, especially since 67% of U.S. consumers now use at-home whitening products. This huge demand has pushed brands like Opalescence and PolaNight to create solutions that are both powerful and comfortable. With online sales for these products topping USD 1.4 billion, tackling sensitivity is a top priority for everyone involved.
Reactive Solutions if Sensitivity Strikes
So, what happens if you do everything right and still feel a twinge? Don't panic. There are simple, immediate steps you can take to find relief and get back on track.
The most important rule here is to listen to your teeth. Pushing through discomfort won't get you whiter teeth any faster and could make things worse. A short break is almost always the best answer.
If sensitivity does pop up, try these fixes:
- Take a Day Off: Give your teeth a break for 24-48 hours between sessions. This little rest period allows them to rehydrate and recover naturally.
- Use a Remineralizing Product: After a whitening session, applying a product like MI Paste Plus can work wonders. It helps put essential minerals back into your enamel, which calms down nerve sensitivity.
- Check Your Gel Amount: Nine times out of ten, gum irritation comes from using too much gel. Make sure you're only placing a tiny bead in the tray for each tooth—this prevents it from oozing out onto your gums.
By following these simple tips, you can use your teeth whitening trays with confidence and get that brilliant, pain-free smile you're looking for. For an even deeper dive, check out our complete guide on how to reduce tooth sensitivity after whitening.
Got Questions About Teeth Whitening Trays?
As you get ready to kick off your whitening journey, it's totally normal for a few questions to pop up. This final section is all about giving you clear, straightforward answers to the most common things we hear about using teeth whitening trays. Let's clear up those last few details so you can feel confident about getting—and keeping—your brightest smile.
We'll cover everything from how long you can expect your new, whiter smile to stick around to the nitty-gritty on keeping your trays clean. Let's dive in.
How Long Will My Whitening Results Last?
This is usually the first thing on everyone's mind, and the honest answer is: it largely depends on you. Generally, the brilliant results you get from teeth whitening trays can last anywhere from six months to a couple of years.
Your daily habits are the biggest player here. Think of your freshly whitened teeth like a clean white shirt—it's much easier to avoid spills than it is to get a new stain out later.
To keep your smile brighter for longer, keep these things in mind:
- Your Diet: Sipping on coffee, red wine, tea, or enjoying dark berries will definitely shorten the lifespan of your results. Using a straw can be a game-changer by minimizing contact with your front teeth.
- Lifestyle Habits: Smoking or using tobacco is one of the fastest ways to bring back that yellowing and discoloration.
- Maintenance Routine: Occasional touch-up treatments are your best friend for long-term brightness. A quick whitening session every few months is perfect for knocking out new surface stains before they set in.
Will Whitening Trays Work on Crowns or Fillings?
This is a critical point to understand before you start. Whitening gels, whether they use hydrogen peroxide or carbamide peroxide, are designed to work on one thing only: your natural tooth enamel.
That means they won't change the color of any dental work you have. Crowns, veneers, fillings, and bonding are all made from materials like porcelain or composite resin, which simply don't react to bleaching agents.
The job of a whitening agent is to lift organic stains from the tiny pores in your natural enamel. It can't alter the fixed, inorganic color of dental restorations.
If you whiten your teeth, your natural enamel will get brighter, but your dental work will stay the same shade it's always been. This can sometimes create a noticeable mismatch in color. It's always a smart move to chat with your dentist first if you have crowns or fillings and are thinking about whitening.
Carbamide Peroxide vs. Hydrogen Peroxide
When you browse whitening gels, you'll see two main active ingredients: carbamide peroxide and hydrogen peroxide. Both get you to the same brilliant result—breaking down stains—but they get there a little differently.
Hydrogen peroxide is the sprinter. It gets to work fast, releasing most of its whitening power within the first 30-60 minutes. This makes it a great choice for shorter, daytime whitening sessions.
Carbamide peroxide, on the other hand, is the marathon runner. It's a more stable compound that breaks down slowly, releasing about 50% of its whitening power in the first two hours and continuing to work for up to six more hours. This slow-and-steady release is what makes it perfect for gentler, overnight whitening treatments.
How Should I Clean and Store My Trays?
Taking good care of your teeth whitening trays is key to keeping them hygienic, effective, and ready for your next touch-up. The good news is, it's super simple and only takes a minute after each use.
Once you take your trays out, just use a soft-bristled toothbrush and cool water to gently scrub away any leftover gel. Make sure you get the inside and outside surfaces. A word of caution: never use hot water! It can warp the delicate plastic and completely ruin the custom fit of your trays.
After they're clean, let them air dry completely before popping them back in their protective case. This stops bacteria from growing and keeps them safe from getting bent or broken. For a deeper clean now and then, you can use a specialized cleaner like Retainer Brite to keep them crystal clear and fresh.
Ready to start your journey to a brighter, more confident smile? DentalHealth.com offers a curated selection of professional-grade teeth whitening trays, gels, and sensitivity-prevention products from brands trusted by dentists. Explore our full range of at-home whitening solutions today and enjoy free, fast shipping on all USA orders.