

How to Clean Your Retainer and Keep It Like New
The best way to clean your retainer starts with a simple, immediate action: rinse it with lukewarm water the second you take it out. Follow that up with a daily, gentle scrub using a soft toothbrush and a clear, unscented liquid soap. This quick habit is your best defense against the plaque and bacteria that love to build up, which can stain your retainer and mess with your oral health.
The Real Reason You Need to Clean Your Retainer

That retainer you pop in every night isn't just a piece of plastic or wire—it's the guardian of your smile, the thing protecting the investment you made in straightening your teeth. But its warm, moist environment is also the perfect breeding ground for bacteria. Within just a few hours of wear, a sticky, invisible film called plaque biofilm starts to form all over it.
If you let it slide, this film creates some real problems. It's not just about embarrassing bad breath or ugly yellow stains. A dirty retainer reintroduces a cocktail of harmful bacteria into your mouth every single time you wear it, leading to gum irritation and even upping your risk for cavities.
From Plaque to Tartar
You'd be surprised how fast things can go downhill. When plaque isn't cleaned off, it can harden into a crusty, stubborn deposit called tartar (or calculus) in as little as 24 to 48 hours. Once that happens, you're dealing with something much tougher to remove than soft plaque.
Neglecting your retainer isn't just a cosmetic issue. It directly impacts your oral hygiene by creating a reservoir for bacteria that can compromise the health of your teeth and gums.
This isn't a rare problem. Poor retainer hygiene can increase the risks of bacterial infections and bad breath by up to 70%. In fact, nearly 80% of retainer wearers who skip regular cleaning end up with significant tartar buildup. The financial toll is staggering, too—in the U.S. alone, retainer replacements due to poor cleaning contribute to over $500 million in related orthodontic costs each year. You can learn more by checking out recent trends in dental cleaning tablets that shed light on these statistics.
To give you a clear, at-a-glance guide, here’s a quick summary of the essential Do's and Don'ts for keeping your retainer in top shape.
Quick Guide to Retainer Cleaning
| Action | Frequency | Why It Matters |
|---|---|---|
| Rinse Immediately | Every time you remove it | Prevents saliva and plaque from drying and hardening on the surface. |
| Gentle Daily Scrub | Once daily | Removes soft plaque and food particles before they can become tartar. |
| Deep Clean Soak | Once weekly | Kills lingering bacteria and dissolves mineral buildup that daily brushing misses. |
| Avoid Hot Water | Always | Hot water can warp and permanently damage the plastic, ruining the fit. |
| Use Safe Cleaners | Always | Harsh chemicals (like bleach) can degrade the material and are unsafe for your mouth. |
| Air Dry & Store Properly | After every cleaning | Prevents moisture-loving bacteria from growing and keeps the retainer safe. |
Sticking to these simple rules will make a world of difference in the longevity and cleanliness of your appliance.
Protecting Your Orthodontic Investment
Ultimately, knowing how to clean your retainer is about more than just upkeep. It’s about protecting your health and the smile you worked so hard for. A consistent cleaning routine stops problems before they even start, ensuring your retainer stays:
- Hygienic and Safe: Free from the nasty bacteria that cause oral health issues.
- Clear and Odor-Free: Looking and smelling fresh, so you can wear it with confidence.
- Effective and Durable: Maintaining its precise shape to keep your teeth perfectly in place.
Building Your Daily Retainer Cleaning Habit

An effective retainer care routine doesn't need to be some huge, time-consuming project. Honestly, success comes down to consistency, not complexity. It’s all about building two small, automatic habits into your day—one in the morning and one at night—until it feels as natural as brushing your teeth.
The real goal here is to stop plaque from building up before it has a chance to harden into that stubborn, crusty tartar. Trust me, this proactive approach is way easier than trying to scrub away weeks of accumulated grime.
Your Morning Rinse Routine
The very first thing you should do when you take your retainer out in the morning is rinse it. Please, don't just set it on the counter to dry; head straight for the sink.
Use lukewarm water to wash away the saliva and soft plaque that have built up overnight. This quick, 10-second rinse is more important than you think. It prevents that film from drying and hardening, which makes your evening cleaning session a thousand times easier.
Think of it like rinsing a dinner plate right after you eat. If you let the food dry and crust over, you'll be scrubbing forever. Rinse it immediately, and cleaning is a breeze.
This tiny step makes a massive difference in the daily battle against bacteria. It really sets the stage for a cleaner retainer all day.
The Essential Nightly Scrub
Before you pop your retainer in for the night, it needs a more thorough cleaning to get rid of any food particles and biofilm from the day. This is your chance to tackle anything that morning rinse might have missed.
For this job, you'll need two specific tools:
- A dedicated, soft-bristled toothbrush. Seriously, do not use the same brush you use on your teeth—that's just a recipe for transferring bacteria back and forth. A separate, soft brush also prevents scratching the retainer's surface.
- Clear, unscented liquid soap or a specialized retainer cleanser. These are gentle enough that they won't damage the retainer's material over time.
Just apply a small drop of soap to the wet toothbrush and gently scrub every surface of your retainer, inside and out. Pay extra attention to the little nooks and crannies where bacteria love to hide out.
Why You Must Avoid Toothpaste
It seems logical to clean your retainer with the same stuff you use on your teeth, right? Wrong. This is a common and costly mistake. Most toothpastes are packed with abrasive ingredients that are designed to polish tough tooth enamel.
Those gritty particles can create thousands of microscopic scratches all over your plastic or acrylic retainer. You can't see them, but these tiny abrasions become the perfect hiding spots for bacteria, leading to yellowing, stains, and odors that just won't go away. For a deeper look, our guide on how often to clean retainers offers more insights into proper maintenance.
Sticking with a gentle, non-abrasive cleaner like mild soap ensures you're actually cleaning your retainer without accidentally damaging it. After scrubbing, just rinse it thoroughly under cool water until all the soap is gone. Then it's ready to wear or store. This simple, two-part daily habit is your first and best line of defense for keeping your retainer fresh and clean.
Deep Cleaning Methods for Stubborn Buildup
Even if you're a rockstar with your daily cleaning routine, your retainer is going to need a more serious scrub every so often. It's the only way to tackle the stubborn, cloudy film and buildup that a quick brush-and-rinse just can't handle.
Think of it as the difference between a daily wipe-down of your kitchen counters versus a full-on spring clean. This weekly or bi-weekly deep clean is your secret weapon for keeping your retainer crystal clear, odor-free, and hygienic.
Fizzing Tablets: The Go-To Deep Clean
For most of us, the easiest and most effective way to deep clean is with effervescent cleaning tablets. These are made specifically for oral appliances and couldn't be simpler to use. You just pop a tablet into a glass of lukewarm water, and it fizzes away, releasing powerful, oxygenating bubbles.
Those bubbles aren't just for show—they get to work lifting away stains and knocking out 99.9% of the germs that cause bad odors. Letting your retainer soak in the solution for about 15-20 minutes is usually all it takes to bring back that fresh, clean feeling. If you're not sure which brand to choose, our complete retainer cleaner reviews can point you in the right direction.
The Ultimate Upgrade: An Ultrasonic Cleaner
Want that professional, straight-from-the-dentist clean at home? An ultrasonic cleaner is the way to go. These gadgets used to be exclusive to dental labs, but now you can get a compact version for your own bathroom counter.
Here's how they work: the machine sends high-frequency sound waves through water, creating millions of microscopic bubbles. These tiny bubbles vibrate intensely, blasting away plaque, tartar, and other gunk from every single crevice—even the spots your brush could never dream of reaching. It’s a totally hands-off process that delivers a noticeably deeper clean.
An ultrasonic cleaner gets your retainer clean on a level that manual scrubbing just can't touch. It’s like the difference between wiping a surface and pressure washing it. The results speak for themselves.
There's a reason the ultrasonic retainer cleaner market is booming, with projections to hit $520 million globally by 2032. These devices can remove 98% more plaque than just brushing. For a truly powerhouse clean, fill the machine with water, drop in a cleaning tablet like Retainer Brite, and run a 5-minute cycle. This one-two punch can actually cut down on how often you need to replace your retainer by up to 40%, saving you a nice chunk of change over time.
Comparing Deep Cleaning Options
So, which method is right for you? It really comes down to your budget, how much time you want to spend, and the level of clean you're after. Here's a quick comparison to help you decide between the two most popular options.
| Method | Best For | Pros | Cons |
|---|---|---|---|
| Effervescent Tablets | Simplicity, travel, and budget-conscious users. | Inexpensive, very easy to use, effective for regular maintenance. | May not remove the toughest, calcified tartar buildup on its own. |
| Ultrasonic Cleaner | A professional-grade clean and removing stubborn buildup. | Delivers the deepest clean possible, hands-free, works on jewelry too. | Higher initial cost, requires counter space and electricity. |
Ultimately, both are excellent choices. Tablets are a fantastic, affordable baseline for weekly cleaning, while an ultrasonic machine is a worthwhile investment for anyone who wants to ensure their retainer is as clean as humanly possible.
What About Other Deep Cleaning Solutions?
While tablets and ultrasonic cleaners are my top recommendations, some people like to go the DIY route. It's good to be aware of the pros and cons of using different disinfectants like hydrogen peroxide and rubbing alcohol if you're considering at-home concoctions.
A common DIY method is to soak the retainer in a mix of one part white vinegar to three parts water for about 20 minutes. This can help dissolve some mineral buildup. Another popular option is a 50/50 soak of 3% hydrogen peroxide and water.
But a word of caution: these methods come with risks. The acid in vinegar can be harsh on the metal wires and solder joints of a Hawley retainer over time. And if you use peroxide, you absolutely have to rinse it off thoroughly before putting the appliance back in your mouth.
My advice? Stick to the gentle, proven methods. A consistent deep cleaning routine, whether with tablets or a machine, is the safest and most reliable way to keep your retainer in perfect shape and protect your orthodontic investment.
Costly Retainer Cleaning Mistakes to Avoid
Sometimes, what you don't do is just as critical as what you do. So many people, with the best of intentions, end up damaging their retainers by using cleaning methods that seem logical but are actually quite harmful. These simple mistakes can turn a perfectly good retainer into a warped, stained, or ineffective piece of plastic.
Learning how to clean your retainer properly means unlearning these common but costly habits. The goal here is to protect your orthodontic investment, not put it at risk. Avoiding just a few key pitfalls will ensure your retainer stays effective and hygienic for years to come.
Heat Is Your Retainer's Worst Enemy
One of the most frequent and irreversible mistakes is using hot or boiling water. It's easy to think hot water would give a deeper, more sterilizing clean, but it's a surefire way to destroy a plastic retainer. The materials used for clear aligners and Hawley retainers are precisely molded to your teeth, and high temperatures will instantly warp the plastic, ruining its custom fit.
Always stick with lukewarm or cool water for rinsing and soaking. A good rule of thumb: if the water feels too hot for your hands, it is definitely too hot for your retainer. This simple temperature check can save you from a costly replacement and an emergency trip back to the orthodontist.
Poor cleaning habits are a surprisingly common problem. In fact, they contribute to 30% of retainers needing replacement within just six months, costing users anywhere from $200 to $400 a pop. Soaking your retainer in cool water with effervescent tablets not only dodges the warping issue but also kills 99% of odor-causing bacteria in about 10 minutes, which is crucial for preventing the biofilm that can form in as little as 12 hours.
Harsh Chemicals and Abrasives Are Off-Limits
Another group of culprits includes harsh chemicals and abrasive substances. It can be tempting to reach for strong cleaners to tackle stubborn stains or odors, but these almost always do more harm than good.
Make sure you stay away from these common household items:
- Bleach and Alcohol: These chemicals will degrade the retainer's material, making it brittle and prone to cracking. They can also leave behind harmful residues that are definitely not safe to put in your mouth.
- Colored Mouthwash: While it seems like a great idea for freshness, the dyes in most mouthwashes can permanently stain clear plastic retainers, giving them an ugly tint.
- Abrasive Toothpaste: The tiny, gritty particles in most toothpastes create microscopic scratches all over your retainer's surface. These scratches become perfect hiding spots for bacteria and lead to discoloration over time.
This flowchart offers a simple way to help you choose the right deep cleaning method based on what's most important to you.
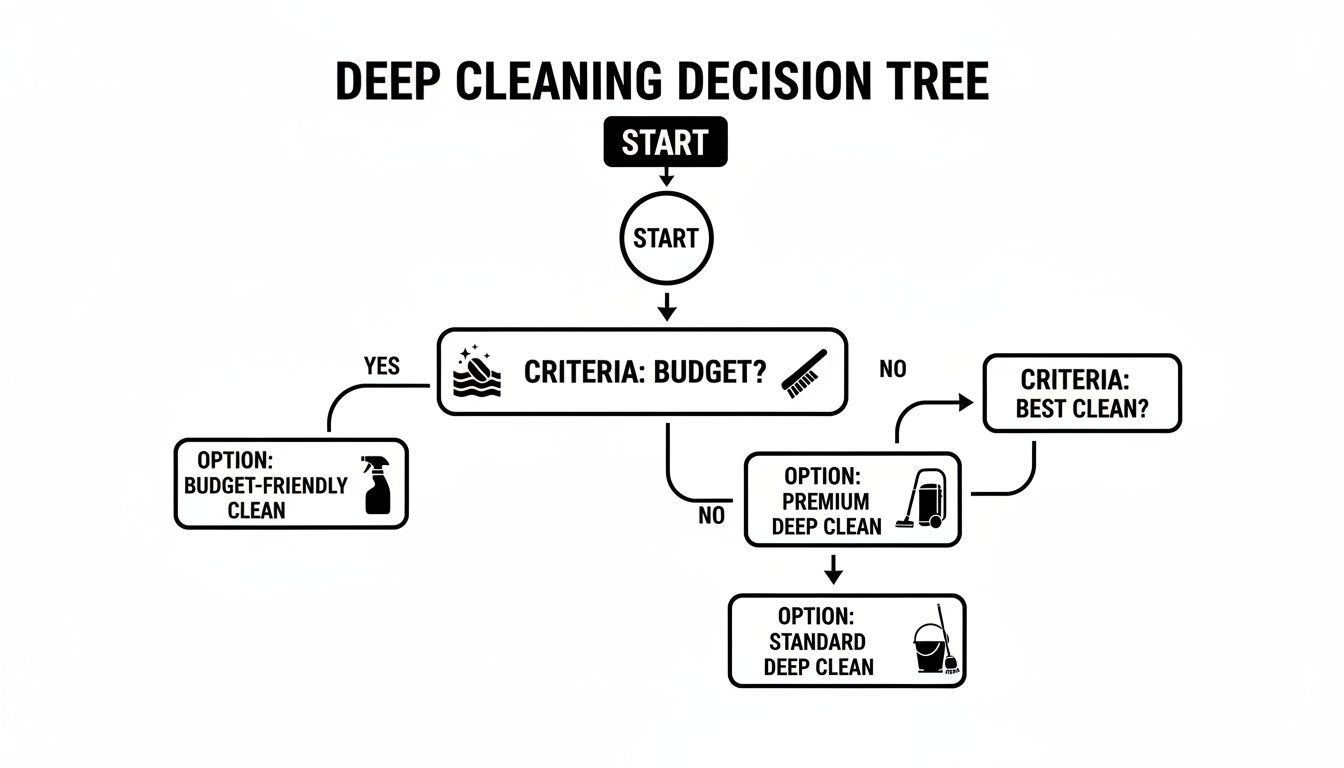
It really just boils down to whether you prefer budget-friendly tablets or the superior clean you get from an ultrasonic device.
The safest and most effective approach is to use products specifically designed for oral appliances. Mild, clear liquid soap or specialized cleaning tablets are your best bet for a thorough clean that won't cause damage.
By avoiding these common mistakes, you ensure your cleaning efforts are helping, not hurting. If you're curious about what makes a cleaning product safe and effective, it's worth exploring the ingredients in popular products like Retainer Brite to see how they work.
Proper Storage to Keep Your Retainer Safe
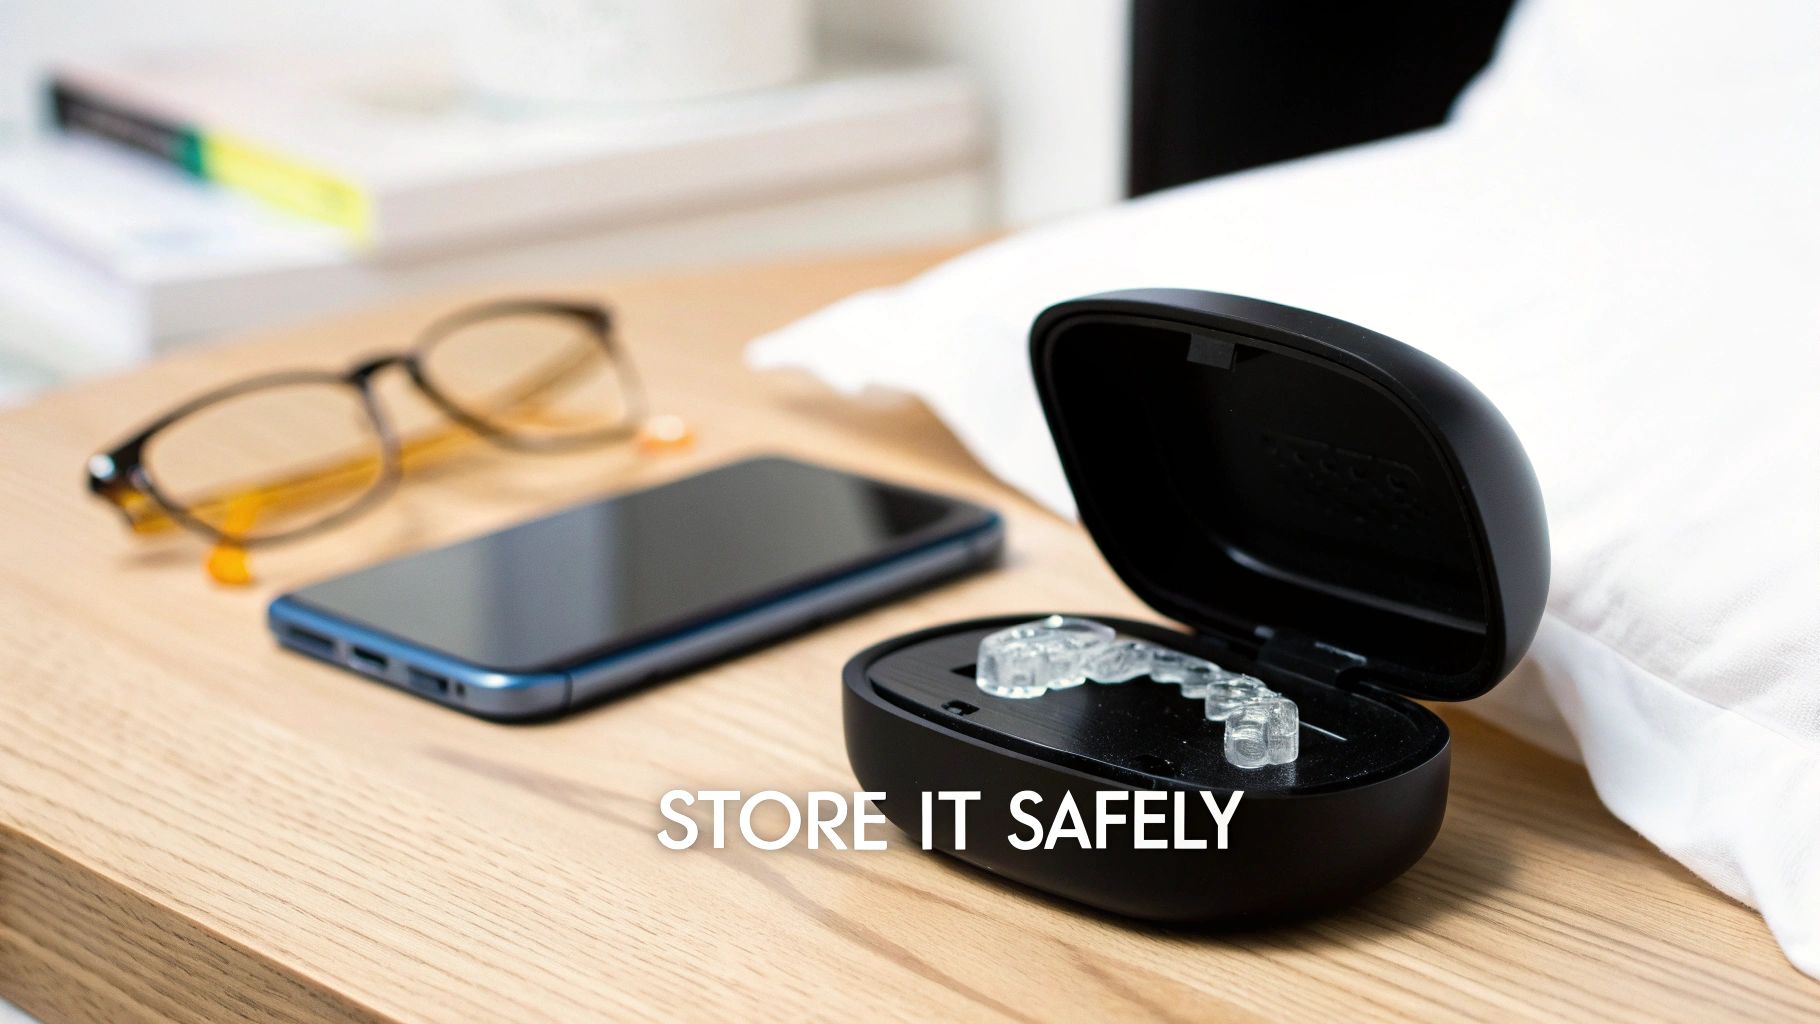
Keeping your retainer pristine with a great cleaning routine is only half the battle. How you store it is just as crucial for preventing loss, damage, and contamination from airborne bacteria.
The most important rule is also the simplest one to remember: if it's not in your mouth, it's in its case.
We've all heard the horror stories—a retainer wrapped in a napkin gets accidentally tossed in the trash at a restaurant or gets crushed at the bottom of a backpack. Your protective case is your first and best line of defense against these common mishaps, saving you from a costly replacement.
When thinking about keeping your retainer safe, it helps to apply the same logic as you would with proper storage solutions for other valuables. A dedicated, clean space prevents damage and makes items easy to find when you need them.
Keeping Your Retainer Case Clean
Your retainer's home needs to be just as clean as the retainer itself. What’s the point of cleaning your retainer only to put it back into a grimy case? A dirty case can reintroduce bacteria right back onto your freshly cleaned appliance.
Make it a habit to clean the case a few times a week. It only takes a minute:
- Wash it out with warm water and a little bit of mild soap.
- Use a small brush to get into any corners or crevices where gunk can hide.
- Rinse it thoroughly and—this is key—let it air dry completely before closing it up.
Trapping moisture inside creates a perfect breeding ground for mildew and mold, which completely undermines all your cleaning efforts.
Your retainer case is more than just a container; it's a hygienic environment. Treating it with the same care as your retainer ensures you aren't undoing all your hard work.
Smart Storage Habits to Avoid Disaster
Beyond just using the case, where you put the case also matters. A few mindful habits can prevent some of the most common retainer-related disasters.
Be especially cautious about leaving your retainer where it might be exposed to extreme temperatures. A hot car dashboard, for instance, can warp a plastic retainer just as easily as boiling water, rendering it useless and ill-fitting.
Also, be wary of curious pets. Dogs, in particular, are often drawn to the scent of saliva on retainers and can chew them to pieces in minutes.
Always store your cased retainer in a cool, dry place that is safely out of reach of pets and small children. A nightstand drawer or a medicine cabinet is perfect. These simple precautions are key to protecting your investment in that straight smile.
Your Questions on Retainer Care Answered
Even with the best routine, you're bound to have questions about the little details of keeping your retainer clean and safe. Getting the right answers can save you from accidentally damaging your appliance or making a panicked call to your orthodontist's office. Let's tackle some of the most common questions we hear.
Can I Use Vinegar or Baking Soda to Clean My Retainer?
You’ll see these DIY cleaning hacks all over the internet, but honestly, they’re not worth the risk. The acid in vinegar can slowly eat away at the acrylic on Hawley retainers, making it weak and brittle over time. And baking soda? It's abrasive. That gritty texture can create microscopic scratches on the surface of your clear plastic retainers, which are perfect little hiding spots for bacteria to thrive.
It’s always a safer bet to stick with products that were actually made for retainers. Non-abrasive effervescent tablets are designed to kill germs without harming the delicate materials your appliance is made from.
Stick to what's proven and safe. DIY solutions might seem convenient, but they can cause gradual, irreversible damage that ends up costing you more in the long run.
How Do I Remove Yellow Stains and White Buildup?
That yellow tint is usually a sign of plaque that's been left behind, while those stubborn white spots are hardened plaque, also known as tartar or calculus. The best way to deal with them is to prevent them in the first place with a solid daily cleaning habit.
If you're already seeing buildup, a quick daily scrub won't be enough to get rid of it—you need a deep clean. Soaking your retainer in a specialized cleaning solution is a great start, and using an ultrasonic cleaner can be incredibly effective at breaking down those tough deposits. If the buildup is really severe and just won’t budge, your orthodontist can give it a professional-grade cleaning to get it looking new again.
How Often Should I Replace My Retainer Case?
There isn’t a hard-and-fast rule, but you should definitely grab a new case if the old one is cracked, doesn't snap shut properly, or holds onto a funky smell even after a good wash. A damaged case just can't protect your retainer from bacteria or an accidental drop.
A good rule of thumb is to replace your case every 6 to 12 months. This helps make sure you’re storing your retainer in a truly hygienic environment. And in the meantime, don't forget to wash your current case with soap and water a few times a week. Always let it air dry completely to keep mildew from growing.
Why Does My Retainer Still Smell After Cleaning?
A persistent odor is the classic sign that bacteria have worked their way deep into the microscopic pores of your retainer. It’s a telltale sign that your daily cleaning routine isn't quite getting the job done and that it's time to bring in the deep-cleaning big guns.
Try an intensive treatment: use an effervescent cleaning tablet every single day for about a week. This should be enough to kill off the embedded, odor-causing bacteria. If that funky smell still hangs around after a week of deep cleaning, it's a good idea to check in with your orthodontist. They can take a look and see if there's a bigger issue at play.
For a reliable, dentist-recommended clean, explore the full range of retainer care products at DentalHealth.com. From powerful cleaning tablets to ultrasonic cleaners, we have everything you need to keep your smile healthy and your retainer in perfect condition. Shop now for fast, free shipping on all USA orders.