

How to Remove Plaque from Retainers The Right Way
Getting plaque off your retainer really comes down to a solid daily and weekly cleaning habit. For the day-to-day, a gentle scrub with a soft toothbrush and some mild soap, followed by a good rinse, is your best bet. Then, at least once a week, you'll want to do a deep clean by soaking it in a special retainer cleaning solution to break down any stubborn gunk.
Why Plaque Loves Your Retainer and How to Stop It
Before we jump into the how, it helps to know why that cloudy, sticky film seems to appear out of nowhere. That film is plaque—a nasty biofilm made of bacteria, tiny food particles, and your own saliva. Your mouth is a warm, moist environment, which is basically a paradise for this stuff to grow and cling to any surface it can find, especially your orthodontic retainer.
This buildup is more than just ugly. It's the source of bad breath, can damage the retainer itself, and isn't great for your overall oral health. Understanding the enemy is the first step in winning the war against it.
How Plaque Builds on Different Retainer Types
Believe it or not, not all retainers attract plaque equally. The material and design of your specific appliance make a huge difference in how easily bacteria can set up shop.
- Hawley Retainers: The colorful acrylic part of a Hawley retainer is slightly porous. Think of it like a sponge with microscopic nooks and crannies that are perfect for plaque to grab onto, making these retainers a bit more challenging to keep sparkling clean.
- Essix (Clear Plastic) Retainers: While they feel much smoother than acrylic, the thermoplastic material of clear retainers still gives bacteria plenty of places to hide. Plaque tends to build up in the tiny, detailed crevices that fit snugly against your teeth.
- Bonded (Fixed) Retainers: These permanent wires are notorious plaque magnets. Since they're glued right onto your teeth, cleaning around them is a real chore. In fact, studies show that fixed retainers are linked to a significantly greater accumulation of dental plaque and calculus compared to removable ones. You can explore the full research on plaque accumulation on different retainer types to see the data for yourself.
The data from that study paints a clear picture of how much plaque builds up on different retainer types, with removable options consistently showing lower scores.
This just confirms what dentists have known for a while: being able to take your retainer out for a thorough cleaning makes a massive difference in keeping plaque under control.
Key Takeaway: No matter which type of retainer you have, plaque is going to happen. The secret to managing it isn't just cleaning, but using the right methods for your specific appliance. A consistent and correct cleaning routine is your best defense against buildup.
Building Your Daily and Weekly Cleaning Habits
The real secret to a plaque-free retainer isn't some intense, once-in-a-while scrub session. It's all about the small, consistent habits you build over time. You have to think of retainer care just like brushing your teeth—it’s not something you do only when there's a problem, but a non-negotiable part of your routine to stop problems before they start.
The goal is to create a simple, two-part system: a quick daily clean and a more thorough weekly deep clean. This one-two punch effectively tackles both fresh plaque and the early stages of stubborn buildup, making sure your retainer stays clear, fresh, and hygienic. Protecting your orthodontic investment really just means making these habits second nature.
Your Two-Minute Daily Ritual
The absolute best time to clean your retainer is the second you take it out of your mouth. At that point, the plaque is still soft and hasn't had a chance to harden into that crusty white stuff called calculus. Don't just set it on the counter—that's a huge missed opportunity.
Instead, build an instant habit: retainer out, rinse, clean. This whole process takes less than two minutes and makes a massive difference in the long run.
- Rinse Immediately: Get it under some lukewarm water to wash away saliva and any loose particles. Never, ever use hot water, as it can easily warp the delicate plastic.
- Gentle Brushing: Grab a separate, soft-bristled toothbrush (not your regular one) and a tiny bit of mild, clear dish soap or castile soap.
- Scrub All Surfaces: Gently brush every single surface, inside and out. Pay extra close attention to the nooks and crannies where plaque absolutely loves to hide.
- Rinse Thoroughly: Make sure every last bit of soap is washed away before you pop it back into its case.
This daily scrub is your first and most critical line of defense against the cloudy film that signals the start of plaque buildup.
The Essential Weekly Deep Clean
While that daily brushing gets rid of most of the daily grime, a weekly deep clean is crucial for dissolving what you can't see. Soaking your retainer in an effective cleaning solution kills off lingering bacteria and handles any plaque that has started to mineralize.
A simple trick I tell all my patients is to set a recurring reminder on your phone. "Retainer Soak Sunday" (or whatever day works for you) is an easy way to make sure you never forget. Consistency is what prevents you from needing a much more aggressive cleaning down the road.
Think of a proper soak as a "reset" button for your retainer's hygiene. You can get a better sense of the right cleaning schedule by learning more about how often you should clean your retainers. This weekly step is non-negotiable if you truly want to learn how to remove plaque from retainers for good and keep them looking as pristine as the day you got them.
A Practical Cleaning Guide for Every Retainer Type
You wouldn’t use the same cleaning method for a wooden cutting board and a glass stovetop, right? The same logic applies to your retainer. Not all retainers are created equal, and your cleaning strategy shouldn't be a one-size-fits-all approach. The specific materials and design of your retainer dictate the best way to tackle plaque and keep it hygienic.
Let's break down the most effective methods for the three main types you'll encounter.
This visual guide shows the basic process for keeping any removable retainer clean, splitting the tasks between daily upkeep and the essential weekly deep soak.
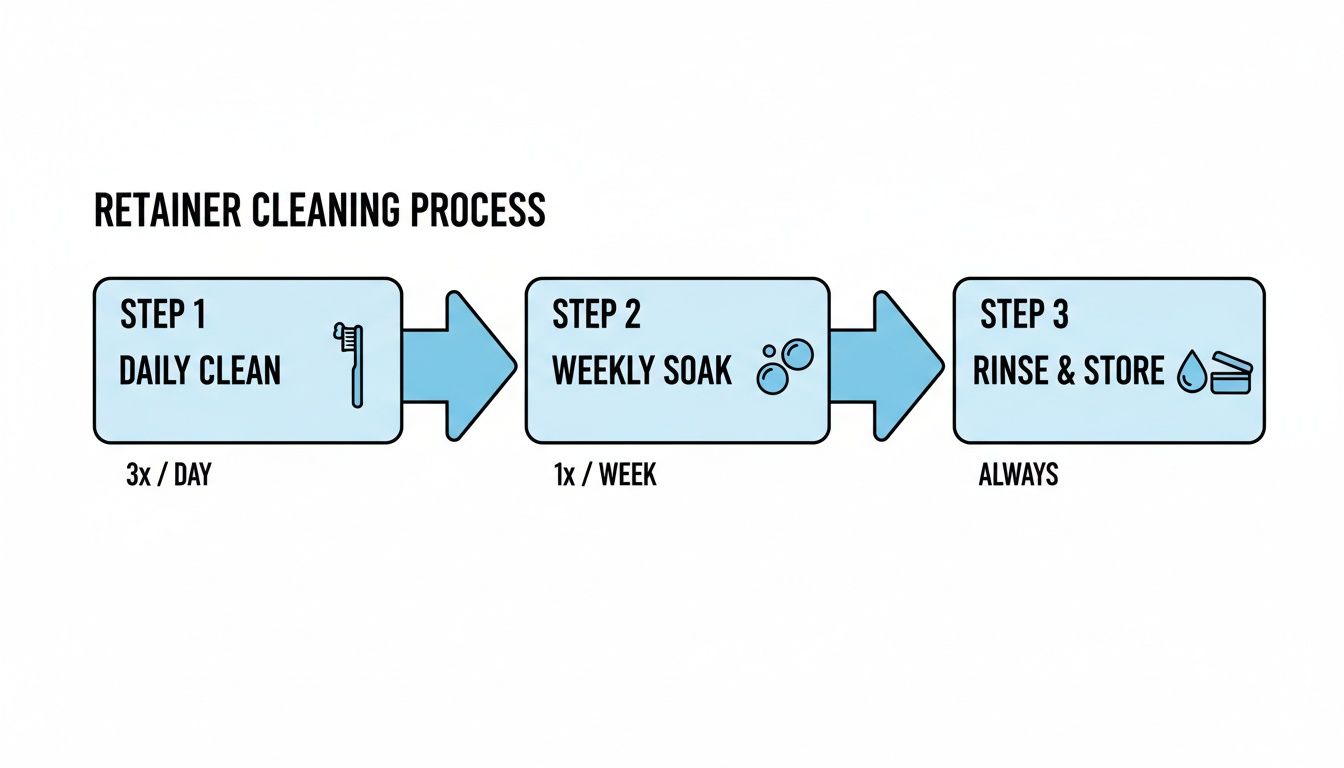
The key takeaway here is simple: daily brushing gets rid of the immediate gunk, but those weekly soaks are crucial for dissolving the stubborn, mineralized plaque that a toothbrush just can't handle.
Cleaning Clear Plastic Retainers (Essix or VFR)
Clear aligners are incredibly popular, but that snug fit and all their little crevices make them a perfect target for that cloudy, white buildup. Since they hug your entire tooth surface, keeping them pristine is non-negotiable for preventing cavities and bad breath.
These retainers are also surprisingly delicate. The thermoplastic material can warp with hot water and easily get scratched by abrasive cleaners, which just creates more tiny hiding spots for bacteria to thrive.
For daily care, a soft-bristled toothbrush and a drop of clear, unscented liquid soap are your best tools. Gently scrub all surfaces, inside and out, with lukewarm water right after you take it out. For a deeper clean, specialized effervescent tablets like Retainer Brite are perfect because they're designed to dissolve plaque without damaging the plastic.
Pro Tip: Whatever you do, never use toothpaste on your clear retainer. Most formulas contain abrasive particles that will create thousands of micro-scratches, instantly dulling the plastic and making it a magnet for future plaque and stains.
Tackling Plaque on Hawley Retainers
The classic Hawley retainer, with its acrylic plate and metal wire, brings its own set of challenges. The acrylic part is slightly porous, giving plaque a great textured surface to cling to. Plaque especially loves to build up right where the wire meets the acrylic—a spot that's notoriously tricky to clean thoroughly with just a brush.
Just like with clear retainers, a daily scrub with a soft brush and mild soap is essential. But for the weekly deep clean, soaking is an absolute must. Effervescent cleaners work wonders here, bubbling away buildup in those hard-to-reach areas. A soak in a 50/50 solution of distilled white vinegar and water for 15-20 minutes can also be really effective at dissolving early-stage calculus.
If you want a better grasp of cleaning delicate oral items, the principles are a lot like those for learning how to clean pacifiers safely. Using gentle, non-toxic methods is the common thread.
Managing Bonded (Permanent) Retainers
Bonded retainers are the ultimate plaque traps. Because they’re permanently fixed to the back of your teeth, you can't just pop them out for a scrub, making them a hotspot for calculus formation. This isn't just an opinion—research shows these fixed wires can lead to 2-3 times more calculus accumulation than removable retainers in just the first six months.
Meticulous, detailed oral hygiene is the only way to manage plaque around that bonded wire.
- Floss Threaders: These are your best friend. A floss threader is a small, plastic needle that helps you guide dental floss underneath the wire, letting you clean between each tooth properly.
- Water Flossers: An excellent tool for blasting away food particles and plaque from around the wire and bonding material. It can reach spots that a toothbrush and even floss might miss.
- Interdental Brushes: Think of these as tiny pipe cleaners for your teeth. They are perfect for scrubbing the small spaces between the wire and your teeth.
Successfully learning how to remove plaque from retainers really comes down to mastering the specific techniques your appliance demands. By tailoring your approach, you protect both your orthodontic investment and your long-term oral health.
Retainer Cleaning Methods at a Glance
To make things even easier, here’s a quick-reference table that summarizes the best cleaning approaches for each type of retainer.
| Retainer Type | Daily Cleaning Method | Deep Cleaning Method | Recommended Products |
|---|---|---|---|
| Clear Plastic (Essix) | Brush gently with soft toothbrush & mild, clear soap. Rinse with lukewarm water. | Soak using effervescent tablets (e.g., Retainer Brite) for 15-20 minutes. | Soft toothbrush, clear liquid soap, effervescent cleaning tablets. |
| Hawley | Brush acrylic plate and wire with soft toothbrush & mild soap. | Soak with effervescent tablets or a 50/50 vinegar/water solution. | Soft toothbrush, mild soap, effervescent tablets, distilled white vinegar. |
| Bonded (Permanent) | Use floss threaders or water flosser to clean under the wire daily. | Professional cleaning during dental check-ups. | Floss threaders, water flosser, interdental brushes. |
This table should help you quickly identify the right tools and techniques, ensuring you're giving your specific retainer the care it needs to last.
Safe Cleaning Solutions vs. Damaging Mistakes
Picking the right cleaning solution for your retainer is just as critical as your daily cleaning habit. It’s easy to grab something from under the sink or in the bathroom cabinet, but the wrong product can cause irreversible damage, turning your expensive orthodontic appliance into a warped, bacteria-friendly mess. Let's walk through what works and what you should absolutely avoid so you can clean with complete confidence.
Common Cleaning Mistakes to Avoid
Some household items seem like a good idea in theory, but in practice, they’re the worst offenders for retainer care. Using them can scratch, warp, or degrade the materials, making your retainer less effective and just plain unhygienic.
-
Hot Water: This is a big one. Never use hot or boiling water. The thermoplastic in clear retainers and the acrylic in Hawley models are incredibly sensitive to heat. High temperatures will warp the material in seconds, completely ruining the custom fit your orthodontist worked so hard to create. Always stick to lukewarm or cool water.
-
Toothpaste: It seems logical, right? Wrong. Most toothpastes contain abrasive particles designed to scrub tough tooth enamel. On the soft plastic of a retainer, these ingredients create thousands of microscopic scratches. This not only dulls the plastic but also gives plaque and bacteria countless new nooks and crannies to hide in.
-
Harsh Chemicals: Stay away from bleach, alcohol-based mouthwash, and aggressive household cleaners. These are far too harsh for dental appliances. They can degrade the retainer’s plastic, causing it to become brittle, and can discolor the acrylic and corrode the metal wires. When choosing a cleaner, it's useful to understand the difference between products meant for living tissue versus inanimate objects, as detailed in this guide on disinfectant and antiseptic agents.
Safe and Effective Cleaning Options
Fortunately, the best options are both gentle on your retainer and powerful against buildup. These solutions will tackle plaque and bacteria without compromising your retainer's structure or fit.
Effervescent Cleaning Tablets
These specialized tablets are the gold standard for a deep clean, and for good reason. Products like Retainer Brite are specifically formulated to kill germs and dissolve plaque without any harsh scrubbing. As a dental professional, I can tell you we see much better results from patients who use them.
Studies have shown an 85% patient success rate with effervescent cleaners, a huge jump compared to just 55% with toothpaste alone. For clear retainers, a nightly soak in these tablets can prevent 99.9% of bacterial growth, making it one of the most effective tools for keeping your retainer pristine.
Mild Soaps
For your daily brush-up, a small amount of clear, mild dish soap or an unscented castile soap is perfect. These gentle soaps are non-abrasive but are fantastic at cutting through that greasy film of plaque and saliva that builds up during the day. Just make sure you rinse it thoroughly with cool water afterward.
To see what makes these cleaners work so well without damaging your appliance, you can check out our breakdown of Retainer Brite ingredients.
Simple DIY Soaks
If you prefer a homemade solution, you’ve got a couple of great, cost-effective options that work wonders.
- Distilled White Vinegar: Mixing a solution of 50% white vinegar and 50% water creates a fantastic cleaning soak. The natural acetic acid is excellent at dissolving stubborn calculus (tartar) and killing bacteria. Let your retainer soak for about 15-20 minutes, then give it a light brush and a thorough rinse to get rid of the vinegar taste.
- Baking Soda: You can use this in two ways. Create a paste with baking soda and a little water to gently scrub away any surface buildup. Alternatively, for a deodorizing and cleansing soak, just dissolve two tablespoons of baking soda into a cup of water and let your retainer sit for a bit.
Solving Tough Retainer Problems Like White Spots and Odors
Even if you’re a pro with your daily cleaning routine, you might still run into some stubborn issues. Maybe it’s a cloudy film that just won’t scrub off, a strange smell, or a slow creep of yellowing. These problems are usually a sign that your current method needs a little boost, but the good news is, they're almost always fixable.
Think of this as your go-to troubleshooting guide. We'll break down the most common retainer headaches, get to the root of what's causing them, and give you a clear plan to get your appliance looking and feeling fresh again.
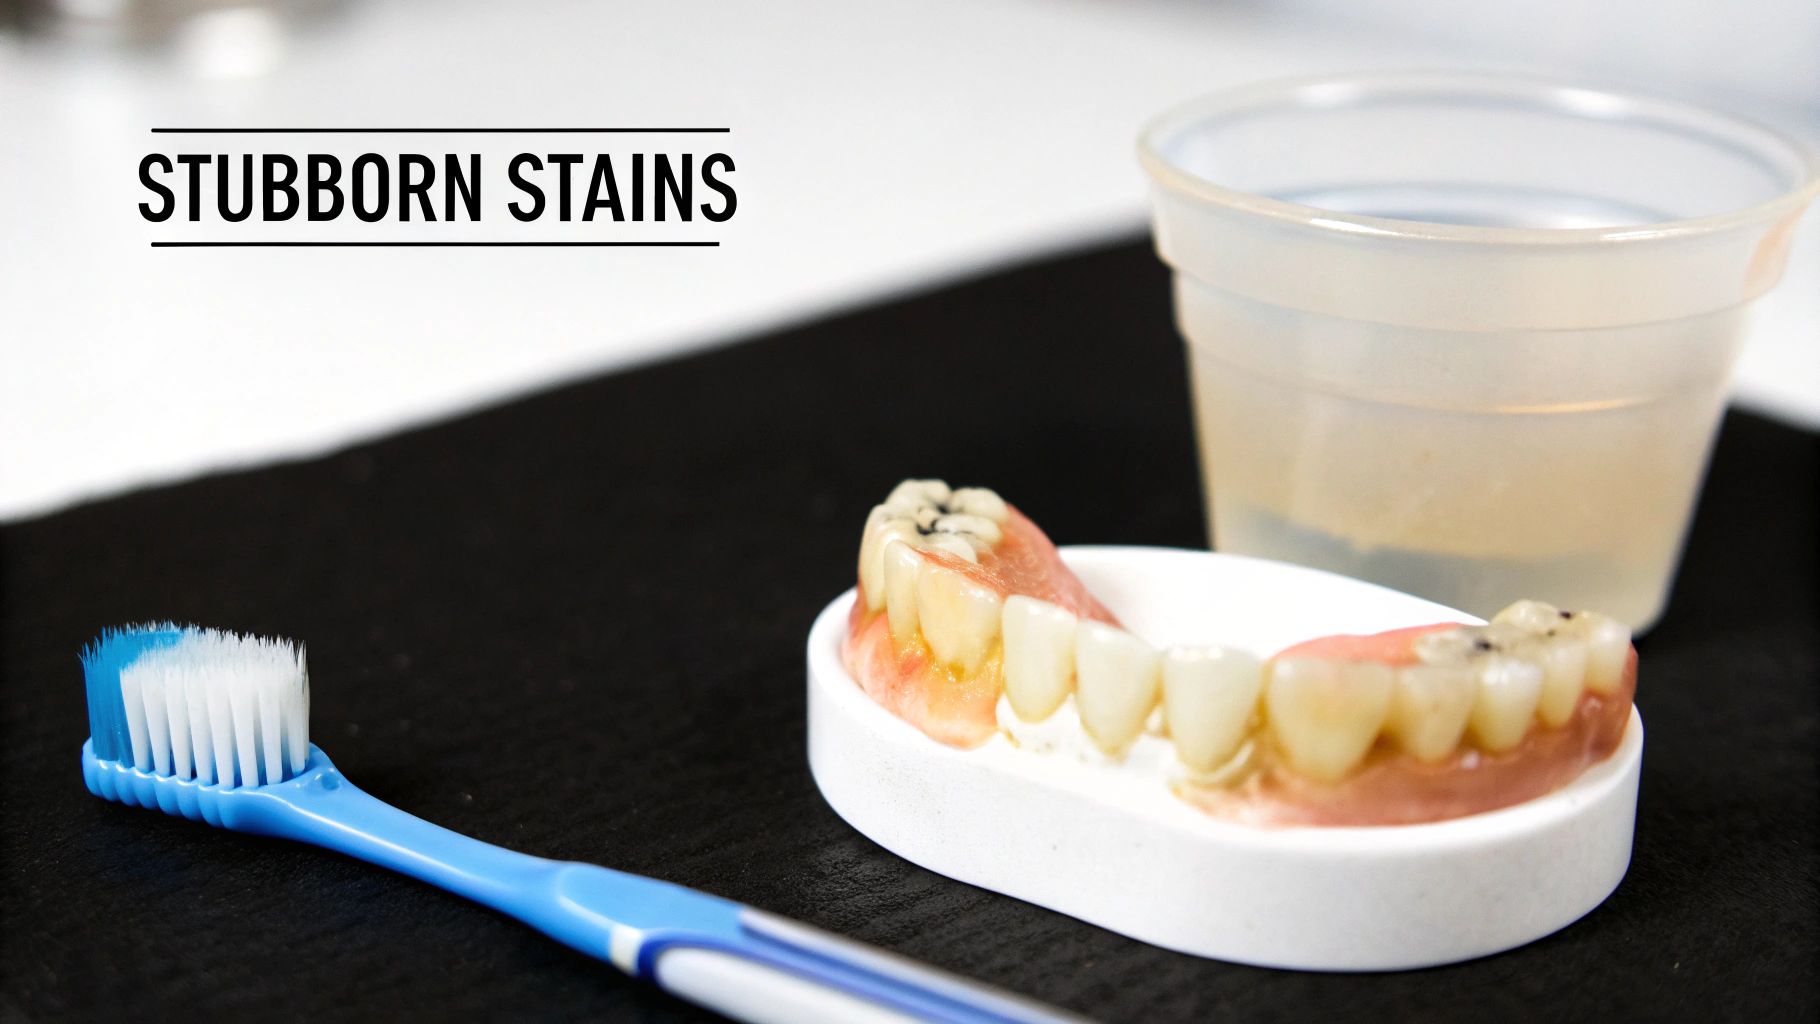
Tackling Hard White Spots and Calculus
Those crusty, hard white spots are the final boss of retainer cleaning. This isn't just plaque anymore; it’s calculus, also known as tartar. It’s what happens when plaque mineralizes and basically cements itself onto your retainer. At this stage, it’s incredibly tough and won't budge with a simple brushing.
Your best at-home strategy is a targeted acid soak.
- The Vinegar Solution: Mix up a solution of 50% distilled white vinegar and 50% water. The acetic acid in the vinegar is fantastic for dissolving the mineral deposits that form calculus.
- Soak, Don't Scour: Let your retainer soak in this mixture for about 20-30 minutes. Once it's done soaking, use a soft-bristled toothbrush to gently scrub away the now-softened buildup.
- Rinse and Repeat: Give it a thorough rinse under cool water. For really tough spots, you might need to repeat this process a couple of times.
If the vinegar soak doesn’t do the trick after a few tries, that’s your cue to stop. Whatever you do, don't try to scrape the spots off with a sharp object. You'll almost certainly scratch or gouge the plastic, causing permanent damage. At this point, it's time to bring it to your orthodontist for a professional cleaning.
Eliminating Yellow Stains and Discoloration
A yellowing retainer is often a direct result of what you eat and drink. The materials used in retainers are porous, meaning they can easily absorb pigments from food and beverages over time.
The usual suspects are dark-colored drinks like coffee, tea, and red wine. Foods with strong natural dyes, such as curries, berries, or tomato-based sauces, are also major contributors. If you aren't taking your retainer out every single time you eat or drink anything besides water, some discoloration is pretty much guaranteed. To learn more about this common issue, check out our guide on how to effectively remove stains from retainers.
Banishing Persistent Odors
If your retainer smells bad, that's a sure sign of bacterial overgrowth. When plaque isn't cleaned off effectively each day, the bacteria party gets started, releasing stinky sulfur compounds. Another common mistake is storing your retainer in a closed, damp case without letting it air-dry first—this creates the perfect breeding ground for odor-causing germs.
The solution here is a two-part attack. First, get really disciplined about your daily cleaning. Second, commit to a weekly deep-clean using an effervescent retainer tablet to kill the bacteria your brush can't reach. This one-two punch is usually all it takes to solve even the most stubborn odor problems and bring back the freshness.
Your Retainer Plaque Questions Answered
Even with the best guide, you're bound to have some specific questions pop up. To help you feel completely confident in your cleaning routine, I've put together the most common questions I hear from retainer wearers, with some direct, practical answers.
Think of this as your quick-reference troubleshoot for keeping your retainer in top shape for the long haul.
How Often Should I Deep Clean My Retainer?
While a daily gentle scrub is non-negotiable, a deep clean using a specialized soaking solution should be part of your weekly routine at a minimum. For most people, once a week is the perfect frequency to dissolve any sneaky buildup that daily brushing might miss.
But what if you notice a cloudy film reappearing quickly or a persistent odor? Don't hesitate to bump up the deep cleans to two or three times per week. The key is to be observant—your retainer will tell you what it needs.
What Are the Hard White Spots on My Retainer?
Those stubborn, crusty white spots are calculus. It's just plaque that has hardened and mineralized over time. You'll notice it's much tougher than soft plaque and won't come off with a simple brush.
Don't panic! Before you do anything else, try an at-home remedy. Soaking your retainer in a 50/50 solution of distilled white vinegar and water for about 20 minutes can often soften the calculus enough for you to gently brush it away. If the spots remain after a couple of tries, do not attempt to scrape them off yourself. Just take your retainer to your orthodontist; they have special tools to clean it professionally without causing any damage.
Is It Safe to Clean My Retainer with Mouthwash?
I generally advise against using mouthwash for cleaning retainers, and for a couple of good reasons. Many popular brands contain alcohol, which can seriously dry out the retainer's plastic. Over time, this makes it brittle and much more prone to cracking.
On top of that, the vibrant dyes found in many mouthwashes can easily stain the porous material of your appliance, especially if you have a clear plastic type. It's much safer to stick with clear, specialized retainer cleaners or the gentle soap and DIY soaks we've talked about.
When Should I Get a New Retainer?
Your retainer isn't meant to last forever. It’s definitely time for a replacement if you notice any visible cracks, warping, or if it suddenly feels loose when you put it in. A damaged or poorly fitting retainer just can't do its job of keeping your teeth perfectly aligned.
Likewise, if there's stubborn calculus that even your orthodontist can't remove, or if it has a permanent stain or odor you can’t get rid of, it's time to invest in a new one. Protecting the result of your orthodontic treatment is worth it.
At DentalHealth.com, we provide the professional-grade products you need to keep your smile healthy and your retainer pristine. From effervescent cleaners like Retainer Brite to sensitivity-friendly toothpastes, you can find dentist-recommended brands delivered right to your door. Shop our collection of oral care essentials today.