

How to Remove Stains From Retainers and Keep Them Clear
Getting stains out of your retainer isn't a one-and-done deal. It's really a two-part strategy: you need consistent daily cleaning with something gentle like a soft brush and non-abrasive soap, plus a weekly deep clean using specialized tablets or a safe homemade solution. This combination approach is the best way to tackle everything from light discoloration to that tougher plaque buildup, keeping your retainer fresh and clear.
Understanding Why Your Retainer Gets Stained
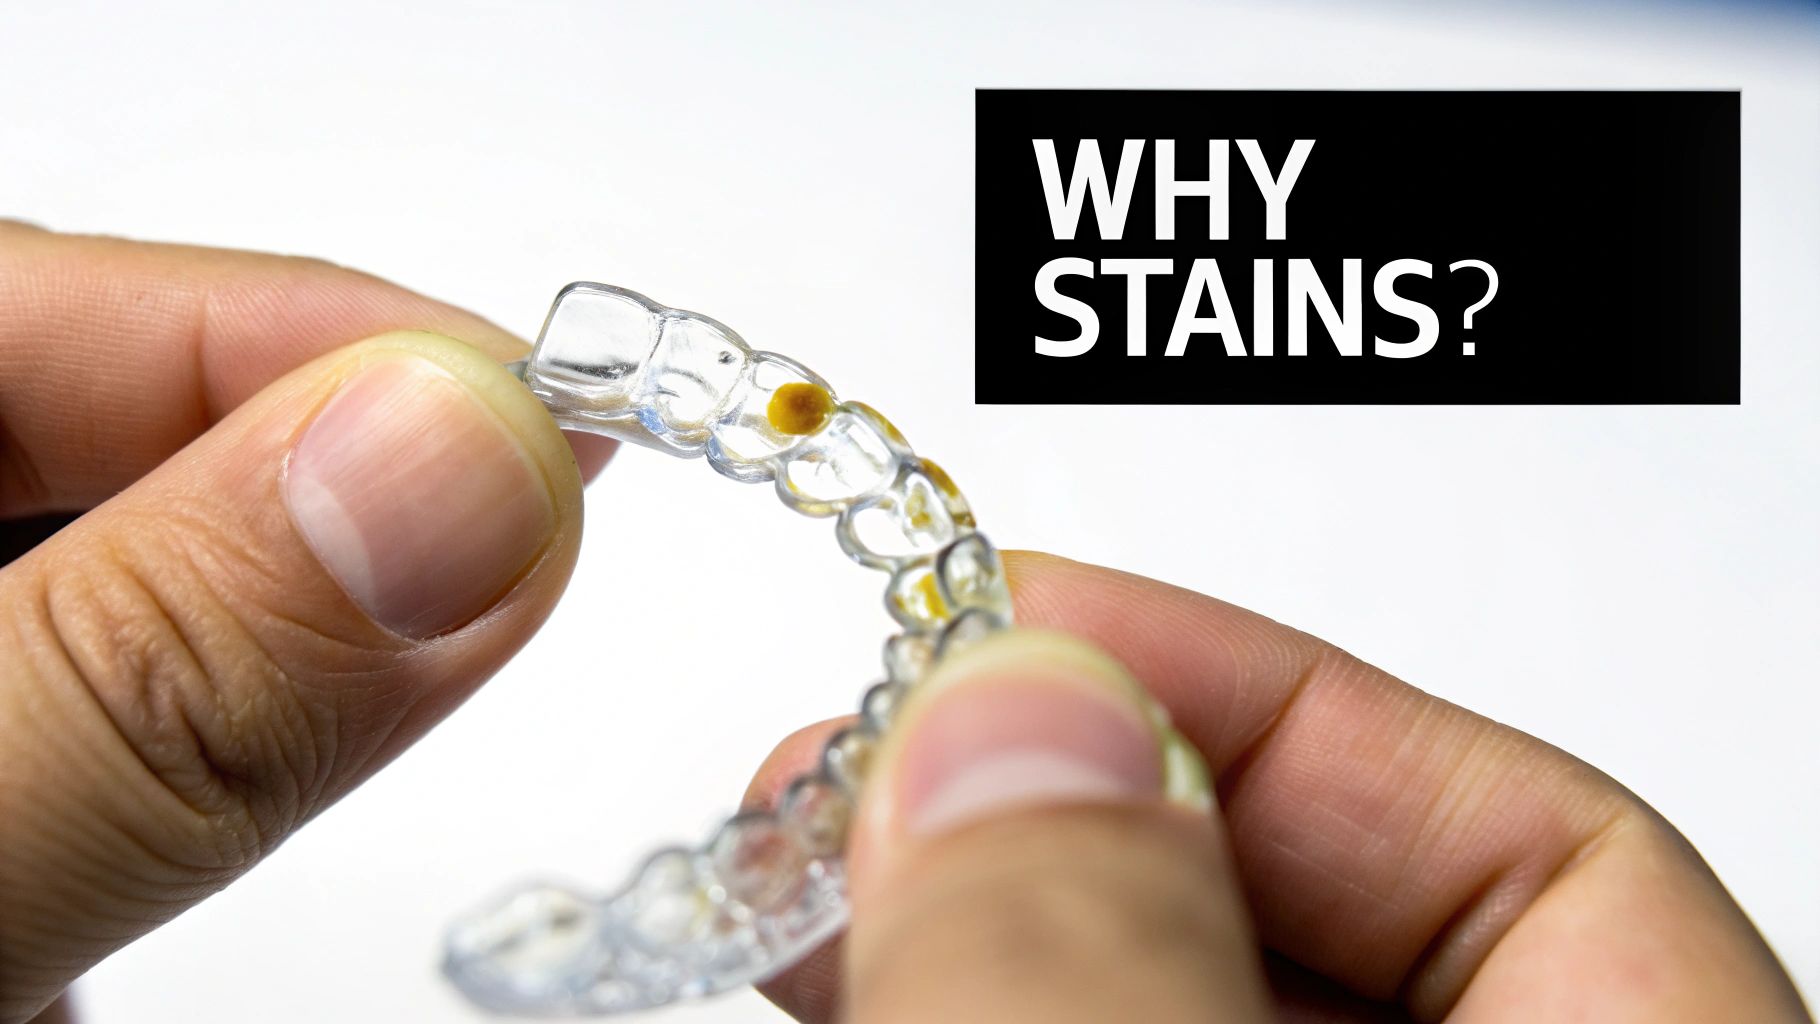
It’s a frustration we hear about all the time: your once-invisible retainer starts to look cloudy, yellow, or even a little brown. Before you can get those stains off, it helps to know what you’re up against. The main culprits are usually the things you eat and drink every day, mixed with the natural environment inside your mouth.
Your retainer is the perfect spot for bacteria to set up shop. This bacteria creates a sticky, invisible film called plaque. If you don't clean it off daily, that plaque starts absorbing pigments from your food and drinks, and that's when the discoloration begins. Let it sit long enough, and it can harden into tartar (also called calculus), which is a crusty deposit that’s much tougher to remove.
The Main Causes of Retainer Discoloration
Several things contribute to a less-than-pristine retainer. Getting a handle on these will not only help you clean it better but also stop future stains before they start.
The most common sources of stains include:
- Dark-Colored Drinks: Coffee, tea, red wine, and dark sodas are packed with strong pigments called chromogens that love to cling to the porous surface of your retainer.
- Colorful Foods: Think berries, tomato sauce, curry, and soy sauce. These are notorious for leaving behind colorful residues that can literally dye the plastic.
- Plaque and Tartar Buildup: This is hands-down the most frequent cause of that general yellow or cloudy look. The buildup itself just gets stained over time.
- Improper Cleaning Habits: Using abrasive toothpastes can create tiny micro-scratches where stains and bacteria can hide. And using hot water? That can warp the plastic, making it even more likely to pick up stains.
The good news is that most of this staining is just on the surface. With a solid, consistent cleaning routine, you can lift the vast majority of discoloration and get your retainer’s clarity back without needing to replace it.
It's a lot like keeping your teeth white—your retainer needs similar attention. In fact, many of the habits that prevent stains on your teeth also help protect your retainer.
For a quick overview of what works best, here's a simple guide to matching the cleaning method to the type of stain you're dealing with.
Quick Guide to Stain Removal Methods
| Stain Type | Recommended Daily Method | Recommended Deep-Cleaning Method |
|---|---|---|
| Light Yellowing/Cloudiness | Gentle brushing with non-abrasive soap or castile soap. | White vinegar and water soak (10-20 minutes). |
| Coffee, Tea, or Food Stains | Immediate rinse after consumption, followed by gentle brushing. | Retainer cleaning tablets (e.g., Retainer Brite, Polident). |
| White Spots/Plaque Buildup | Thorough brushing, focusing on crevices. | Baking soda and water paste/soak. |
| Stubborn, Hardened Tartar | Brushing with a dedicated retainer brush. | Professional cleaning by a dentist or orthodontist. |
This table should give you a starting point for tackling the most common issues. Remember, consistency is more important than intensity when it comes to keeping that retainer looking its best.
Building Your Daily Retainer Cleaning Routine
When it comes to keeping your retainer pristine, an ounce of prevention is truly worth a pound of cure. The absolute best way to fight stains is to stop them from ever forming in the first place. This all comes down to a simple daily cleaning routine that takes just a few minutes but pays off big time.
Think of your retainer and your toothbrush as a team. A solid routine means cleaning your retainer every single time you brush your teeth—especially when you wake up and right before bed. This simple habit prevents the daily buildup of plaque and bacteria that eventually hardens into that stubborn, yellow tartar.
Your Morning and Evening Cleaning Steps
Consistency is everything. By folding these quick steps into your daily schedule, you’re creating a powerful defense against discoloration. The goal here is to wash away saliva and bacteria before they have a chance to get comfortable and set in.
Here’s a practical way to approach it:
- Rinse Immediately: The second your retainer comes out of your mouth, give it a good rinse under lukewarm water. Stay away from hot water—it can easily warp the plastic, causing permanent damage.
- Gentle Brushing: Grab a separate, soft-bristled toothbrush (not the one you use for your teeth) and gently scrub every surface of the retainer. Using a dedicated brush is key to avoid just moving plaque from your teeth to your retainer and back again.
- Use the Right Soap: Skip the toothpaste. Most are too abrasive and will etch tiny scratches into your retainer's surface, which are perfect hiding spots for stains. Instead, a little bit of clear, unscented liquid soap or castile soap works wonders.
This process physically breaks up and removes the biofilm that forms throughout the day and overnight. You can find more details on how often to clean your retainers to keep them in top shape.
Daily Soaks for Proactive Prevention
If you want to add another layer of defense, especially if you know you're prone to buildup, a quick daily soak can make a huge difference. Products like Retainer Brite were made for exactly this. These effervescent tablets dissolve in water, creating a cleaning solution that knocks out odor-causing bacteria and keeps plaque from accumulating.
A short, 15-minute soak with a specialized cleaning tablet each day can effectively stop plaque from calcifying into stubborn tartar. This proactive step keeps your retainer looking and feeling new.
It might seem like a small addition to your routine, but it's incredibly effective. It gets into all the nooks and crannies that brushing might miss, ensuring a much deeper clean every day. By tackling the buildup before it even starts, you’re actively preventing that cloudy, yellow appearance that so many people struggle with. This daily habit is the foundation of a stain-free retainer for years to come.
Effective Deep Cleaning for Every Retainer Type
Daily cleaning is your first line of defense, but a weekly deep clean is where you really go to war against set-in stains and prevent that stubborn buildup. Since retainers are made from different materials, you can't just use a one-size-fits-all approach.
You have to tailor your deep cleaning method to your specific retainer type—whether it's clear plastic, a classic Hawley, or a permanent bonded wire. This is critical for getting rid of stains without accidentally causing damage.
This simple flowchart can help guide your daily routine, which is really the foundation for any deep-cleaning success.
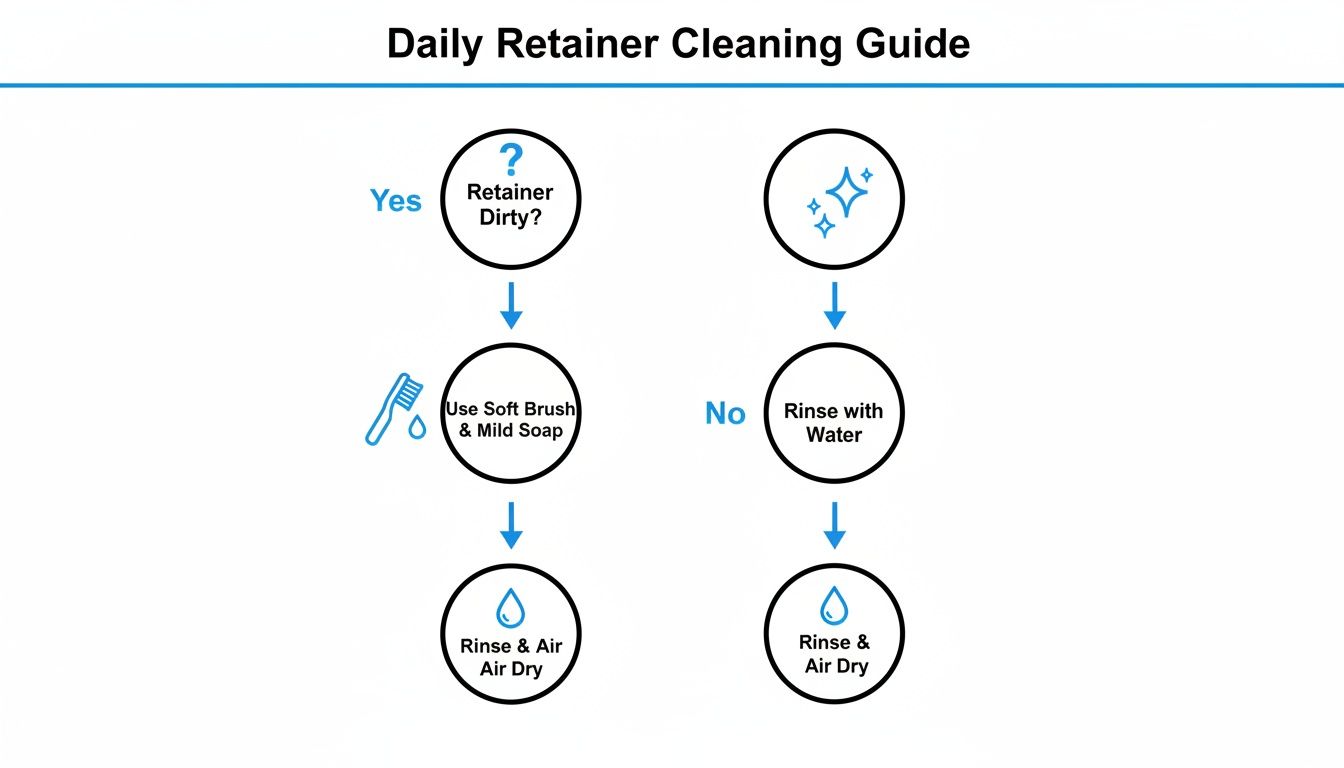
As you can see, a quick daily brush is the non-negotiable first step. It's what stops that gross film from building up and turning into deeper, tougher stains down the road.
Cleaning Clear Plastic Retainers (Essix and Vivera)
Clear plastic aligners are fantastic for being nearly invisible, but their porous nature makes them absolute magnets for stains from coffee, tea, and plaque. For these, specialized cleaning tablets are your best friend.
Products like Retainer Brite or Polident for Retainers use a cool effervescent action to lift away stain molecules and kill bacteria. Just a 15-20 minute soak once a week can dramatically improve clarity and get rid of any funky odors.
Want an even more powerful clean? Consider an ultrasonic cleaner. These devices use high-frequency sound waves to create microscopic bubbles that blast away debris from every single tiny crevice your brush can't reach.
A 2022 study confirmed what many of us have seen firsthand: commercial cleaning solutions are highly effective, but pairing them with an ultrasonic cleaner significantly boosted their performance, especially against tough tea stains.
Deep Cleaning Hawley Retainers
Hawley retainers, with their classic combo of acrylic and metal wire, demand a two-part cleaning strategy. The acrylic plate can harbor plaque just like clear retainers, while the wire can tarnish or even corrode if you use the wrong products.
A great DIY method is a simple soak in a 50/50 solution of distilled white vinegar and water for about 20 minutes. The vinegar is acidic enough to dissolve tartar buildup on the acrylic without being harsh enough to damage the metal wire.
After soaking, grab a soft brush to gently scrub both the acrylic and the wire, then give it a thorough rinse. For those who prefer a commercial option, we've broken down some of the best choices in our comprehensive guide on retainer cleaner reviews: https://dentalhealth.com/blogs/news/retainer-cleaner-reviews.
Maintaining Bonded or Permanent Retainers
Since bonded retainers are literally fixed to your teeth, you can't just pop them out for a soak. The real challenge here is cleaning around the wire and the bonding material where plaque absolutely loves to accumulate, leading to tartar and potential staining.
The key is having the right tools to get into those tight spaces:
- Floss Threaders: These are absolutely essential. They help you guide floss underneath the wire to clean between your teeth properly.
- Water Flossers: A water flosser is a game-changer for dislodging food particles and flushing out bacteria from around the wire and bonding agent.
- Interproximal Brushes: Think of these as tiny pipe cleaners for your teeth. They can scrub the areas directly under the wire that your regular toothbrush just can't touch.
Understanding specific cleaning requirements is essential for the longevity and hygiene of all kinds of oral appliances. For instance, devices used in specialized treatments like oral appliance therapy also demand diligent care.
No matter your retainer type, a consistent and targeted deep-cleaning routine is the ultimate secret to keeping it stain-free and hygienic.
Safe And Effective At-Home Cleaning Solutions
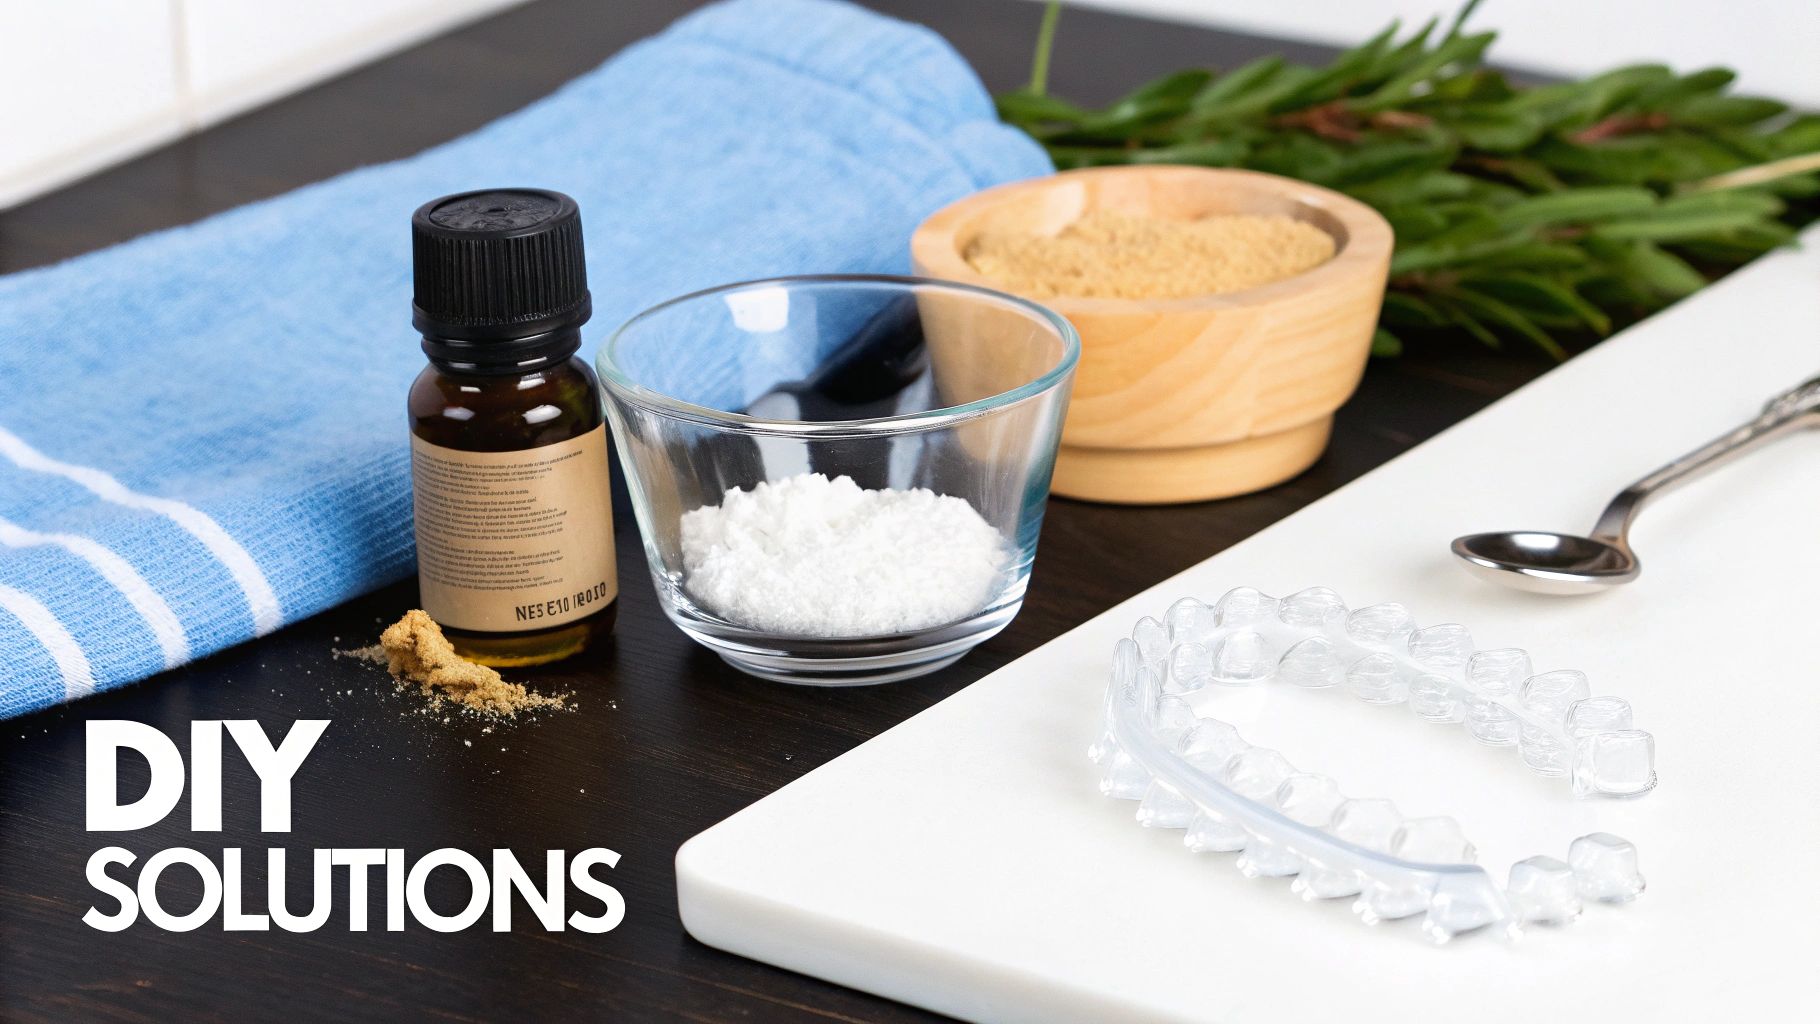
You really don't need a cabinet full of expensive, specialized products to keep your retainer sparkling. In fact, some of the best stain-fighters are probably sitting in your kitchen pantry right now. These at-home solutions are great because they're cheap and use simple chemistry to break down the plaque and tartar that cause that dreaded discoloration.
Once you learn how to handle stains with these methods, you'll feel much more in control of your oral hygiene. It all comes down to knowing which ingredients to use, how to mix them, and—most importantly—how long to let them work their magic without accidentally damaging your retainer.
Using White Vinegar to Dissolve Buildup
Distilled white vinegar is a fantastic tool for cutting through that crusty mineral buildup. Its acetic acid is just strong enough to dissolve the calcium and phosphate that form hardened tartar (calculus), but it's gentle enough that it won't harm most retainer materials if you use it correctly.
For a quick and effective cleaning soak, just mix one part distilled white vinegar with one part lukewarm water in a clean glass. Drop your retainer in, making sure it's completely submerged, and let it soak for no more than 20 minutes. Any longer, and the acid could start to eat away at the retainer's surface. Afterward, give it a gentle scrub with a soft-bristled brush and rinse it thoroughly under cool water to wash away every last trace of vinegar.
Harnessing the Power of Baking Soda
Baking soda, or sodium bicarbonate, is a wonderfully mild abrasive. It can scrub away surface stains and knock out odors without putting a single scratch on your retainer. I find it’s especially good at tackling that stubborn yellow film left behind by plaque.
You can make a simple but effective paste by mixing a tablespoon of baking soda with a teaspoon of water. Apply this paste to your retainer and gently scrub every nook and cranny with a soft brush. If it needs a deeper clean, you can also create a soaking solution. Just dissolve two tablespoons of baking soda in a cup of warm water and let your retainer soak for about 30 minutes.
It’s interesting how the basics of choosing effective cleaning products stay the same, whether you're dealing with dental appliances or other sensitive equipment. It's all about matching the right solution to the problem without causing damage.
The Gentle Lift of Hydrogen Peroxide
Hydrogen peroxide is an excellent disinfectant that also helps lift stains and kill off lingering bacteria. When using it for your retainer, you absolutely must stick to a 3% solution—this is the standard concentration you'll find at any drugstore.
Mix equal parts hydrogen peroxide and water, and let your retainer soak for about 30 minutes. You'll see it start to bubble as it works, which is a good sign that it's lifting away debris and gently whitening the appliance. It's critical to rinse your retainer extremely well after this soak to make sure no peroxide is left before you put it back in your mouth.
DIY Retainer Cleaning Solutions Comparison
To help you decide which at-home method is right for you, here’s a quick comparison of the options we've covered. Each has its own strengths, so you can pick the one that best suits the type of stain you're dealing with.
| Solution | Best For | Instructions & Soaking Time | Safety Warning |
|---|---|---|---|
| White Vinegar | Dissolving hardened tartar (calculus) and mineral buildup. | Mix 1:1 with lukewarm water. Soak for max 20 minutes. | Over-soaking can damage the retainer material. Rinse thoroughly. |
| Baking Soda | Removing surface stains, yellow plaque film, and neutralizing odors. | Make a paste to scrub or dissolve 2 tbsp in water. Soak for 30 minutes. | Its mild abrasiveness is safe, but always use a soft brush. |
| Hydrogen Peroxide (3%) | Disinfecting, killing bacteria, and lifting organic stains. | Mix 1:1 with water. Soak for 30 minutes. | Must be rinsed extremely well to avoid oral irritation. |
These simple pantry items can be just as effective as commercial cleaners when used correctly. Just be mindful of the soaking times and always finish with a thorough rinse.
One surprising option is certain types of mouthwash. A 2023 study found that soaking retainers in Listerine twice a week was highly effective at maintaining clarity. It preserved up to 88% of the retainer’s light translucency over three months, outperforming other methods. Explore more details on these findings for retainer care.
Troubleshooting Stubborn Stains and Buildup
Sometimes, you do everything right—daily rinses, weekly soaks—and still find yourself staring at stains that just won't quit. Don't worry, it happens. These stubborn spots usually need a more direct approach, and figuring out what you're dealing with is the first step to getting your retainer back to its crystal-clear state.
Generally, you'll encounter one of three culprits. There's the classic yellow plaque film that gives the whole appliance a dingy, hazy appearance. Then you have the more distinct brown spots, which are typically hardened tartar that’s soaked up pigments from things like coffee or tea. Finally, you might see chalky white deposits, which are mineral buildups from your saliva that have essentially petrified onto the plastic.
Advanced Cleaning for Tough Cases
When your usual soaking routine isn’t making a dent, it’s time to call in the reinforcements. For really tough calcification and tartar, pairing a strong cleaning solution with an ultrasonic cleaner can be a total game-changer. These little devices use high-frequency sound waves to create microscopic bubbles that blast away grime from every nook, cranny, and pore of your retainer.
This one-two punch is especially good for retainers that have layers of buildup from months or even years of use. An ultrasonic device combined with a specialized cleaning tablet can often rescue a retainer you thought was a lost cause. The vibrations seriously amplify the cleaner's chemical reaction, physically knocking loose particles that a simple soak would never touch.
And if your retainer has developed a persistent odor along with the stains? That’s a major red flag for a significant bacterial colony. At that point, a deep-clean isn't just recommended—it's essential for your oral health.
Knowing When to Call Your Orthodontist
While you can tackle most issues at home, it's critical to know when to throw in the towel and get professional help. Trying to scrape off tartar yourself or using harsh, unapproved chemicals can permanently damage your retainer.
Your orthodontist is your best resource for stain removal that goes beyond basic cleaning. They have professional-grade tools and solutions that can safely and effectively remove even the most stubborn buildup without harming the retainer.
It’s definitely time to schedule a visit if you see any of these signs:
- Persistent Stains or Odors: If you’ve tried multiple deep-cleaning methods and nothing has improved, let your orthodontist take a look.
- Warping or Cracks: Any physical damage means your retainer won't fit correctly, which compromises its ability to hold your teeth in place. Stop wearing it immediately and call your ortho, as a warped retainer can actually move your teeth in the wrong direction.
- Changes in Fit: If your retainer suddenly feels too loose or too tight, it could be warped, or your teeth might have shifted slightly.
Often, a professional cleaning can bring a heavily stained retainer back to life. But if the appliance is cracked or the material itself has started to break down, your orthodontist will likely recommend a replacement. It’s the best way to protect both your smile and the investment you've made in it.
Got Questions About Retainer Stains? We've Got Answers
Even with the best guide, there are always those nagging little questions that pop up. You're not the first person to wonder about the dos and don'ts of retainer care, so let's clear up some of the most common questions we hear.
Can I Use Toothpaste to Clean My Retainers?
This is probably the most common mistake people make, and the short answer is no, you should avoid using regular toothpaste. Here's why: most toothpastes contain mild abrasives designed to polish tough tooth enamel. Your retainer is made of a much softer plastic, and those gritty particles create thousands of tiny, invisible scratches on its surface.
While you can't see them, these micro-scratches are the perfect hiding spots for bacteria and the pigments that cause stains. Over time, using toothpaste actually makes your retainer more likely to get yellow and smelly. A much better and safer option is a soft-bristled brush with a little bit of clear, unscented liquid soap.
How Often Should I Deep Clean My Retainers to Prevent Stains?
Your daily cleaning is essential, but a regular deep clean is what really stops that stubborn, cloudy buildup before it even starts. For most people, a good deep clean once a week is perfect. This schedule keeps plaque from hardening into tartar and keeps things looking fresh.
That said, your habits matter. If you're a big coffee, tea, or dark soda drinker, you might notice discoloration creeping in faster. In that case, bumping your deep clean up to twice a week is a smart move to keep your retainer from yellowing. A quick 15-20 minute soak with a specialized cleaning tablet is usually all it takes to maintain that crystal-clear look.
Key Takeaway: Not all mouthwashes are created equal for retainers. While many can cause damage, some specific formulas are okay in a pinch. If you're going to use one, make sure it's a clear, alcohol-free mouthwash to avoid dyes and prevent the plastic from becoming brittle.
Is It Safe to Use Mouthwash to Soak My Retainers?
You have to be really careful with this one. Soaking your retainer in the wrong kind of mouthwash can definitely do more harm than good. The two biggest culprits to avoid are color and alcohol. The bright green or blue dyes in many popular mouthwashes can easily absorb into the porous plastic of your retainer, leading to permanent staining.
On top of that, alcohol is a drying agent. It can make your retainer's material brittle over time, increasing the risk of it cracking. If you absolutely want that fresh feeling from a mouthwash soak, only use a formula that is both clear and alcohol-free. Even then, keep the soak brief and always give your retainer a thorough rinse with cool water afterward.
My Clear Retainers Have Turned Yellow. Can I Fix Them?
Yes, in almost all cases, you can reverse that yellow tint! What looks like a permanent stain is usually just a stubborn, thin film of plaque and tartar that has built up over time. Getting rid of it just requires a consistent and effective deep-cleaning routine.
Start with a soak in a solution known for breaking down buildup. A 50/50 mixture of white vinegar and water is a great home remedy, as are high-quality retainer cleaning tablets. If you want to really supercharge your efforts, use one of these solutions in an ultrasonic cleaner. The high-frequency vibrations are fantastic at shaking that yellow film loose and restoring your retainer's original clarity.
For all your retainer care needs, from powerful cleaning tablets to gentle daily washes, DentalHealth.com offers a curated selection of professional-grade products. Shop our collection and keep your retainer looking brand new.