

Your Guide to Professional At Home Teeth Whitening
Professional at-home teeth whitening is the perfect sweet spot, giving you the power of a dental treatment with the ease and affordability of something you'd grab at the drugstore. It's a complete system—think professional-grade gels and custom-fit trays—that delivers significant, lasting results right from your living room. Essentially, it puts dentist-level whitening power in your hands.
Bridging The Gap Between The Dentist And The Drugstore
Think about your whitening options as a spectrum. On one end, you have the lightning-fast, high-impact results from an in-office dental procedure. On the other, you’ll find the easy-to-grab (but less powerful) whitening strips and toothpastes at your local pharmacy. Professional at-home teeth whitening carves out its own space right in the middle, truly offering the best of both worlds.
This isn't just about using stronger stuff; it's about a smarter, more targeted system. It provides a structured process that feels a lot like what you’d get from a dentist, but it’s been adapted so you can safely do it on your own time.
And people are catching on. The global professional teeth whitening market was valued at USD 2.68 billion and is expected to hit USD 3.73 billion by 2030. This shows a huge shift toward effective aesthetic dentistry, a trend that got a major boost when at-home kit sales in the UK jumped by 87% during the 2020 pandemic. Read the full research about the growing teeth whitening market.
The Core Components Of A Professional System
At the heart of any professional at-home whitening kit are two key things that make it miles better than your average store-bought option:
- High-Concentration Whitening Gels: These gels use active ingredients like carbamide peroxide or hydrogen peroxide in strengths that can actually break down deep, stubborn stains inside the tooth enamel—not just the stuff sitting on the surface.
- Custom-Fit or Thermoforming Trays: Forget about those one-size-fits-all strips. These trays are molded to fit your teeth perfectly. This snug fit makes sure the whitening gel covers every single tooth surface evenly, so you don't get splotchy results, and it keeps the potent gel off your gums.
The real magic is in combining a powerful gel with a precise application. That synergy is what lets you achieve a uniformly bright smile that used to be something you could only get in a dental clinic.
This flowchart breaks down the three main paths to a brighter smile, making it easy to see exactly where professional at-home kits fit into the picture.
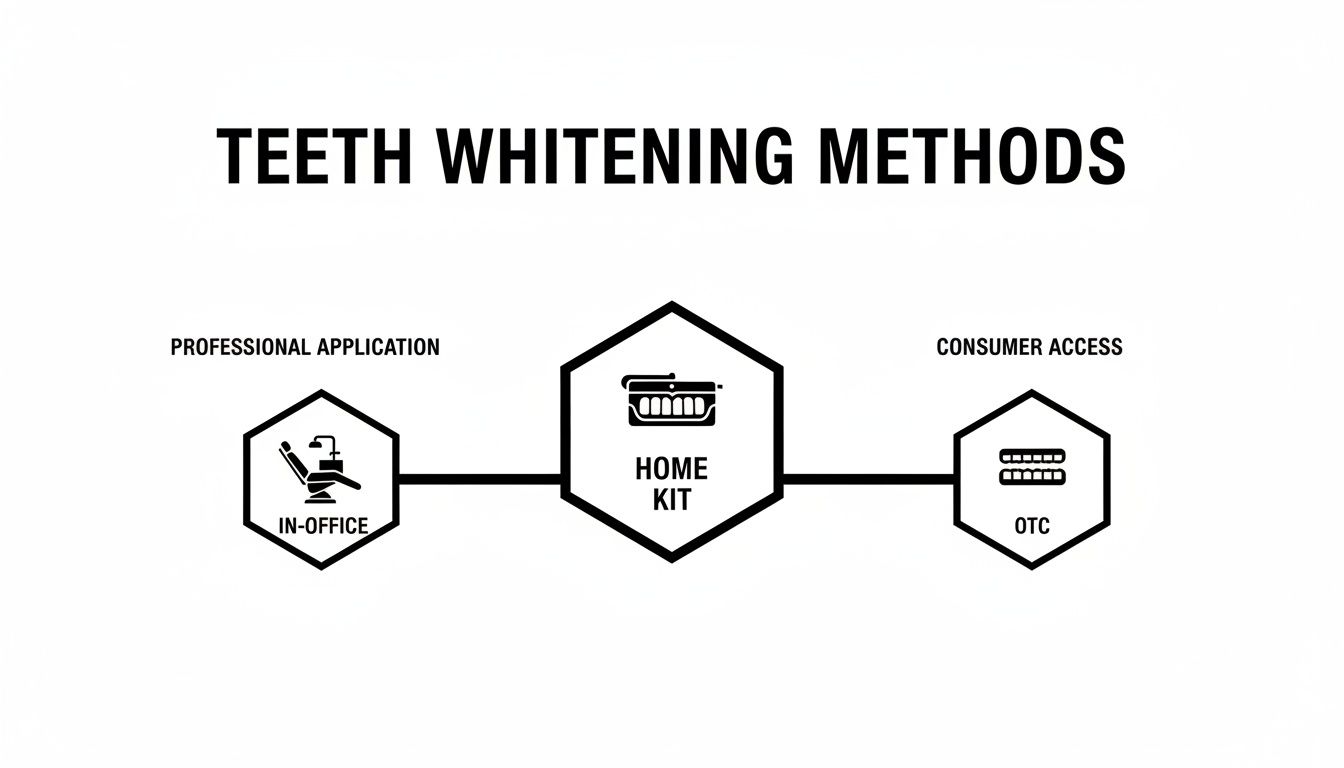
As you can see, these at-home kits really are the central hub, blending the oversight of a professional approach with the convenience of a consumer product.
Understanding Your Whitening Choices
To figure out what’s right for you, it helps to see how these methods stack up. The main differences come down to cost, convenience, how fast you'll see results, and whether a dentist is involved. Each route has its own pros and cons depending on your goals, budget, and how much time you have.
The table below gives you a clear, side-by-side comparison to help you quickly grasp the differences.
Teeth Whitening Methods At a Glance
| Feature | Professional At-Home Kits | In-Office Treatment | Over-the-Counter Products |
|---|---|---|---|
| Primary Active Ingredient | Higher-concentration carbamide or hydrogen peroxide | Highest-concentration hydrogen peroxide, often light-activated | Lower-concentration carbamide or hydrogen peroxide |
| Application Method | Custom-fit or thermoforming trays for even coverage | Direct application by a dental professional | Strips, paint-on gels, or generic trays |
| Typical Treatment Time | 30–60 minutes daily for 1–2 weeks | A single 60–90 minute visit | 15–30 minutes daily for several weeks |
| Cost | $$ (Moderate) | $$$ (High) | $ (Low) |
| Effectiveness | Excellent for significant, lasting whitening | The most dramatic and immediate results available | Good for minor surface stain removal |
| Convenience | High—use anytime, anywhere | Low—requires scheduling a dental appointment | Very high—readily available and easy to use |
Ultimately, choosing the right method is a personal decision. This comparison should give you a solid foundation for weighing the effectiveness, cost, and time commitment of each option.
How Professional Whitening Gels Brighten Your Smile
Ever wondered what’s actually happening inside your whitening trays to lift away years of stains? It’s not magic—it's a clever chemical reaction that gets to the root of discoloration. Once you understand the process, you’ll see how professional at home teeth whitening delivers such great results, safely.
Think of it like this: a tough stain on your teeth is like dirt ground deep into a white t-shirt. You can scrub the surface all day (that’s your whitening toothpaste), but the deep-set grime isn’t going anywhere. For that, you need a powerful stain remover that can get into the fabric’s fibers and break the dirt apart.
Professional whitening gels work the exact same way for your smile.
The Science Of Stain Removal
The two workhorse ingredients in professional whitening gels are carbamide peroxide and hydrogen peroxide. When either of these ingredients makes contact with your teeth, they kick off a process called oxidation.
Put simply, they release tiny, highly reactive oxygen molecules. These molecules are small enough to travel through the microscopic pores in your tooth enamel and into the dentin layer underneath—which is where the really stubborn, deep-set stains live.
Once inside, the oxygen molecules hunt down the complex colored compounds that cause stains, known as chromophores. They get to work breaking the chemical bonds holding these chromophores together, which makes them colorless. The result is a tooth that’s visibly brighter from the inside out.
Think of it as a microscopic cleaning crew that doesn't just wipe the surface. It goes deep inside the tooth to dismantle the stain at its source. That’s the key difference between professional gels and surface-level whiteners.
Carbamide Peroxide vs Hydrogen Peroxide
While both ingredients get you to the same bright destination, they take slightly different routes. Knowing how they work helps you understand what to expect from your treatment.
- Hydrogen Peroxide: This is the fast-acting agent. It gets to work almost immediately, releasing most of its whitening power within the first 30–60 minutes. This makes it perfect for treatments with shorter wear times.
- Carbamide Peroxide: This one is a bit more stable, breaking down more slowly. It first converts into hydrogen peroxide and urea, which creates a sustained, gradual release of whitening power over several hours. This makes it ideal for longer wear schedules, including overnight use.
To give you an idea, a gel with 10% carbamide peroxide is roughly equivalent to one with about 3.5% hydrogen peroxide, but it delivers its power over a longer period. This slow-and-steady approach is often much gentler on teeth, a huge plus for anyone prone to sensitivity.
Why Concentration Levels Matter
The concentration of the peroxide in your gel directly impacts how quickly and dramatically you’ll see results. Most over-the-counter products you find at the drugstore have very low concentrations, which is why they tend to only tackle minor surface stains and take a long time to show even minimal improvement.
Professional systems, on the other hand, come in a range of strengths. A higher percentage can get you to your goal shade faster, but it also might increase the odds of temporary tooth sensitivity. That's why dentists often suggest starting with a moderate concentration to see how your teeth react before considering a stronger formula.
This gives you control over your whitening journey, letting you balance impressive results with personal comfort. To learn more about finding the right strength and type of whitener for your goals, check out our guide to the best teeth whitening products. Armed with this knowledge, you can make a smart choice and get on the path to a truly brilliant smile.
The Real Pros and Cons of Whitening at Home
When you're chasing a brighter smile, you’ve got options. Think of professional at-home whitening systems as the powerful middle ground between a quick, pricey trip to the dentist and the milder results you get from drugstore products. It's a fantastic choice for many, but it's not a one-size-fits-all solution. Let's break down the good and the not-so-good so you can decide if it's the right move for you.
The biggest draw for most people? Incredible value. You’re getting your hands on dentist-grade whitening gels and custom-molded trays for a fraction of what an in-office session costs. The results are dramatic and long-lasting, but your bank account doesn't take a massive hit.
The Clear Advantages of At-Home Systems
Beyond the cost savings, the sheer convenience is a huge win. You don’t have to shuffle your schedule around for dental appointments or burn through your paid time off. You can literally whiten your teeth while you’re answering emails, watching Netflix, or just winding down for the night. It fits into your life, not the other way around.
Here’s a quick rundown of the main perks:
- Significant Cost Savings: Get results that rival what you'd see from a professional treatment, but for a much smaller investment.
- Unmatched Convenience: Whiten whenever, wherever. You’re in complete control of your treatment schedule.
- Impressive and Lasting Results: The tag team of potent whitening agents and custom trays is incredibly effective at lifting deep, set-in stains, giving you a bright smile that truly lasts.
This mix of affordability, convenience, and professional-level results is fueling a massive shift in the market. The global teeth whitening industry is set to jump from USD 8.93 billion in 2025 to a staggering USD 12.95 billion by 2030, and a huge part of that growth comes from these powerful at-home kits becoming more accessible. You can discover more insights about these cosmetic dentistry trends to see where things are headed.
Understanding the Potential Downsides
Of course, no method is perfect, and it’s always smart to know about potential bumps in the road. The most common issues with at-home systems are almost always temporary and easy to manage, but you should know what to expect before you start.
The number one concern people run into is some temporary tooth sensitivity. The whitening gel works by opening up microscopic pores in your enamel to lift stains, which can make the nerves inside a bit more reactive. It often feels like a quick "zing" and usually fades away not long after you take the trays out.
Another thing to watch for is minor gum irritation. This usually only happens if you overfill the trays and the whitening gel oozes out onto your gums. The key here is to remember that less is more—just a tiny dot of gel for each tooth is all you need.
"The most common side effects—sensitivity and gum irritation—are almost always temporary and can be easily managed by adjusting wear time or application technique. They are not signs of damage but rather a temporary response to the whitening process."
Finally, your results are completely tied to your own consistency. This isn't a one-and-done deal like an in-office treatment. At-home whitening requires a bit of commitment. To get the best results, you really have to stick with the schedule, which is typically about one to two weeks. If you start skipping days or cutting sessions short, you just won't get to that final shade you're hoping for. It’s a gradual process that requires a little patience, but the payoff is absolutely worth it.
Your Step-By-Step Guide to a Flawless Application
You've got your professional at-home teeth whitening kit, and you're ready for a brighter smile. This is where the magic happens. Following a consistent process is the real secret to getting those brilliant, even results you're after—all while keeping sensitivity under control.
Think of it like painting a room. You wouldn't just slap a coat of paint on a dirty wall and hope for the best, right? You have to prep the surface, apply the paint carefully, and let it cure. The same idea applies here. Preparation and precision are everything.
This guide will walk you through each step, turning what might seem like a clinical task into a simple, confident routine.
Step 1: Prepare Your Teeth for Whitening
First things first: you need a perfectly clean canvas. Any plaque or food debris left behind can act as a barrier, stopping the whitening gel from making full contact with your tooth enamel. This is a recipe for uneven, splotchy results, which is exactly what we want to avoid.
Start by brushing your teeth thoroughly for two full minutes using a non-whitening toothpaste. Next, floss between each tooth to clear out any stubborn plaque hiding in the gaps. Give your mouth a good rinse with water and make sure your teeth are completely dry before you move on.
Step 2: Load the Trays Correctly
This is probably the most important step for getting great results and staying comfortable. The goal is to use just enough gel to coat the front surface of each tooth without it oozing out onto your gums. Overfilling the trays is the #1 cause of temporary gum irritation.
Here's the best way to do it:
- Dispense the Gel: Squeeze a very small, continuous bead of whitening gel along the inner front surface of the tray. You're aiming for the part of the tray that will sit against the visible, "smile-side" of your teeth.
- Try the "Dot" Method: Another great technique is to place a tiny, teardrop-sized dot of gel into the depression for each tooth in the tray. One small dot per tooth is more than enough.
- Check the Amount: A single syringe of gel should last for several whitening sessions. If you're running out after just one or two uses, you are definitely using too much.
Remember, the gel only needs to touch the parts of your teeth people see when you smile. There's no reason to whiten your back molars, so you can save gel by focusing on the front 6-8 teeth on both the top and bottom.
Step 3: Seat the Trays and Begin Your Session
With your trays loaded, it’s go-time. You're looking for a snug but gentle fit that distributes the gel evenly across your teeth.
- Insert the Trays: Carefully place one tray at a time over your teeth. Press it gently into place, but try not to slide it around—that can smear the gel and push it onto your gums.
- Wipe Away Excess Gel: As soon as the trays are seated, take a soft toothbrush, a cotton swab, or even your finger and gently wipe away any gel that has squeezed out onto your gum line. This simple move is your best defense against irritation.
- Follow the Recommended Time: Stick to the wear time suggested by the manufacturer or your dentist. It can be tempting to leave them in longer, but this won't speed up your results. It will, however, significantly increase your risk of sensitivity.
- Rinse and Clean: Once your session is over, take the trays out. Rinse your mouth with lukewarm water to get rid of any leftover gel. Then, clean your trays with cool water and a toothbrush before popping them back in their case to dry.
Following these simple steps sets you up for a successful, comfortable, and effective whitening experience. For more tips on getting stunning results, check out our guide on how to whiten teeth at home fast.
How to Manage and Prevent Tooth Sensitivity
Let's talk about the number one concern people have with professional at-home teeth whitening: sensitivity. That little "zing" you might feel can be a bit startling, but it's crucial to know that it isn't a sign of damage. It’s actually a predictable, and completely temporary, reaction.
So, what’s really happening? The whitening gel needs to get past your tooth enamel to break down the deep-set stains. Think of your enamel as a smooth surface full of microscopic pores. The gel temporarily opens up these tiny channels, called tubules, giving it a direct line of sight to the discolored molecules hiding underneath.
This process also briefly exposes the nerve pathways inside your teeth, which is why they might react more to hot coffee or a cold drink. The great news is this is totally reversible. Once your session is over, those pores close back up and everything returns to normal. Even better, you can take a few simple steps to minimize or even sidestep sensitivity altogether.
Proactive Strategies Before You Whiten
The best defense is a good offense. A little prep work before you even start whitening can make a massive difference in how comfortable your experience is.
- Switch Your Toothpaste: About a week or two before you plan to start, swap your regular toothpaste for one made for sensitive teeth. These are typically formulated with ingredients like potassium nitrate that help block the nerve pathways, basically building up a defensive shield before you begin.
- Get Your Gums in Shape: Whitening agents can be irritating to gums that are already inflamed. Make sure you're keeping up with gentle brushing and daily flossing. Healthy gums are happy gums and are far less likely to get irritated.
Managing Sensitivity During Treatment
If you do feel some sensitivity creeping in during a whitening session, don’t panic. There are several ways to adjust your routine to dial down the discomfort without sacrificing your results. The key is simply to listen to your body.
You can tweak your approach to find that sweet spot between a dazzling smile and total comfort. It’s all about making the process work for you, not the other way around.
It's a common myth that you have to "power through" sensitivity to get the best results. The truth is, a comfortable whitening journey is a successful one. Adjusting your routine isn't a compromise—it's the smart way to whiten.
Here are the most effective ways to manage sensitivity on the fly:
- Shorten Your Wear Time: If the directions suggest wearing your trays for 60 minutes, try cutting back to 30 or 45. You'll still achieve fantastic results; it might just take a few extra sessions to get there.
- Take a Break: You don't have to whiten every single day. Skipping a day or two between treatments gives your teeth a chance to remineralize and recover, which can dramatically reduce sensitivity.
- Use a Desensitizing Gel: After whitening, rinse your trays and pop them back in with a post-whitening desensitizing gel. These products are designed to soothe the nerves and help those microscopic pores close up faster.
- Check How Much Gel You're Using: Make sure you aren't overfilling the trays. A tiny drop is all you need. Any excess that squishes out onto your gums is a leading cause of irritation, which can often be mistaken for tooth sensitivity.
For a more in-depth look at keeping discomfort at bay, check out our guide on how to reduce tooth sensitivity after whitening. With these tips in your back pocket, you can get the bright, confident smile you want, comfortably.
Making Your Bright Smile Last a Lifetime
So you've put in the work and finally reached that perfect shade of white—fantastic! Now the real work begins: maintenance. Keeping that investment protected and making sure your brilliant smile doesn't start to fade is simpler than you'd think. It all comes down to a few smart habits.
Think of your newly whitened teeth as a blank white canvas. The mission is to stop new stains from ever getting a foothold. It really just starts with being mindful of the usual suspects that can reverse all your hard work in a hurry.
Adopt Smile-Friendly Habits
Your daily choices have the single biggest impact on keeping your teeth white long-term. The most powerful staining agents are things many of us enjoy every day, but you don't have to give them up completely. A few simple tweaks can be incredibly effective.
Give these small but mighty changes a try:
- Watch the Usual Suspects: Dark-colored foods and drinks are the number one enemy. We're talking coffee, tea, red wine, colas, and even berries.
- Use a Straw: When you do indulge in a staining drink, a straw is your best friend. It helps the liquid bypass the front surfaces of your teeth, minimizing contact.
- Rinse Right Away: After a meal or a dark beverage, just swishing your mouth with plain water can wash away those staining compounds before they have time to settle into your enamel.
These aren't massive lifestyle changes. They're just easy habits that build a defensive wall around your smile, helping you keep that "just whitened" glow for much, much longer.
The Foundation of a Lasting White Smile
Beyond dodging stains, your basic oral hygiene routine is absolutely non-negotiable. A clean mouth is your best defense against discoloration, period. Plaque buildup is notorious for attracting stains and holding onto them, which can give your teeth a dingy, yellowish look.
Your toothbrush and floss are your first line of defense in smile maintenance. Consistent, top-tier oral hygiene doesn't just prevent cavities—it's the cornerstone of keeping your teeth brilliantly white.
Make sure you're brushing thoroughly twice a day and flossing daily. This simple routine scours away that sticky film of plaque where new stains love to cling. A clean surface simply doesn't give stains much to grab onto.
Plan for Strategic Touch-Up Sessions
Even if you do everything right, a little bit of dulling over time is perfectly normal. Life happens. This is where touch-up sessions save the day. A touch-up isn't a full-blown whitening cycle; it’s just a quick, periodic boost to freshen up your results.
For most people, a short professional at home teeth whitening session every few months is all it takes. This could be as simple as wearing your trays for a night or two every three to six months. This proactive move zaps minor new stains before they become a real problem, effortlessly preserving your bright, confident smile for years.
Have Questions About At-Home Whitening? We've Got Answers.

Even with a great game plan, it's normal to have a few questions before you start your whitening journey. Getting those last few details sorted out can give you the confidence to dive in. Let's tackle some of the most common things people wonder about.
A huge question is always about timing. When will I actually see a difference? While everyone's teeth respond a little differently, most people using a professional-grade kit will start seeing a change within the first 3 to 5 days. The real "wow" moment usually comes after the full treatment, which typically takes one to two weeks.
Will Whitening Gels Affect My Dental Work?
This is a big one for anyone with crowns, veneers, fillings, or bonding, especially on the front teeth. The short answer is no, whitening gels won't change the color of your dental work. The peroxide agents are designed to lift stains from natural tooth enamel, not from porcelain or composite materials.
What this means, though, is that if your dental work was matched to your original tooth color, it might look a little dark or out of place after you whiten the surrounding teeth.
Key Takeaway: It's always a good idea to chat with your dentist before starting any whitening treatment if you have dental work. They can help you figure out what to expect and make a plan to keep your smile looking seamless and natural.
How Do I Choose the Right Gel Concentration?
Picking the right gel strength is all about finding your personal sweet spot between your whitening goals and your sensitivity levels. There's no single "best" concentration for everyone.
Think of it as a trade-off: speed versus comfort.
- Lower Concentrations (e.g., 10-16% Carbamide Peroxide): This is the perfect place to start if you're new to whitening or know you have sensitive teeth. The results come on a bit more gradually, but the process is much gentler on your teeth and gums.
- Higher Concentrations (e.g., 22-35% Carbamide Peroxide): These gels pack more of a punch, delivering faster, more dramatic whitening. They're a better fit for people who have whitened before without any trouble and are looking for a significant shade lift.
When in doubt, start low and go slow. You can always get to that brilliant white, it just might take a few more applications with a gentler gel. It’s the best way to make sure your whitening experience is a comfortable one. As personal care evolves, it's interesting to see how new technologies are helping people manage their routines; you can see examples of this in case studies on AI beauty assistants.
Ready to find the perfect professional-grade products for your smile? At DentalHealth.com, we offer a curated selection of dentist-recommended whitening gels, sensitivity treatments, and oral care essentials to help you achieve and maintain your ideal results. Shop our collection and start your journey to a brighter smile today. https://dentalhealth.com